[Solved] INET_E_RESOURCE_NOT_FOUND
Summary: Many users are used to the INET_E_RESOURCE_NOT_FOUND error. It usually pops up when you try to access a website using the Microsoft Edge or Internet Explorer on your Windows 10 system. Besides the perplexing error message, usually, there will be a warning that reads “Hmm… cannot reach this page”. Users often tend to dismiss this error and luckily, it may disappear for good. However, if that error persists, that problem, to cap it off, could lead to data loss issues. Hence, If you are continually hassled by this error, check out the following content to learn some effective solutions to it. Moreover, we will introduce our effective and user-friendly tool, Bitwar Data Recovery, to help you bring back lost data resulting from the error.
Table of Contents
What Are the Causes of the INET_E_RESOURCE_NOT_FOUND Error?
If this is the first time that you are running into the error, you might wonder why it popped up. In most cases, the error happens after you have installed the latest Windows update. However, there are other culprits that might trigger the INET_E_RESOURCE_NOT_FOUND error:
- The DNS name you have tried to access does not exist.
- The requested DNS may be unavailable at the moment.
- Failure to establish a secure connection to the DNS server.
- Some server-side errors that are need of being fixed.
- There could be a temporary DNS server error.
How To Fix The INET_E_RESOURCE_NOT_FOUND Error?
Method 1: Netsh Reset
If you have a static IP, you could ignore this method as following the steps below will reset all IP settings, if you are not concerned about static IP, then you could try this method.
Step 1: Press the Windows Key + X.
Step 2: Click on Powershell (Admin).
Step 3: Type in the following commands in order and then press Enter at the end of each line.
netsh int ip reset c:\resetlog.txt
netsh winsock reset
Step 4: Reboot your computer and check whether the problem is solved.
Method 2: Uncheck Enable TCP Fast Open
This method has been suggested by Microsoft officials and it serves many users well. According to what they suggested, after you have turned off the option TCP fast open feature in the Microsoft Edge browser, you will see off it. TCP Fast Open is a feature offered by Microsoft that boosts the performance and security of Microsoft Edge. So, disabling it will not bring about any ill effect. Use the following steps to disable TCP Fast Open.
Step 1: Launch Microsoft Edge.
Step 2: Type in the following sentence in the address bar.
Step 3: Scroll down to look for the Network section.
Note: In cases of certain versions, you may need to press Ctrl + Shift + D to show all the preferences.
Step 4: Uncheck the option labeled TCP Fast Open. In the case of the newer Edge, you should change the option to Always off.
Step 5: Restart your computer to see whether the problem is solved.
Method 3: Use InPrivate Browsing
Another efficient method suggested by Microsoft Officials is to use InPrivate Browsing. which is a method for browsing privately. If you use this mode of browsing, the browser will not record your history. Refer to the following steps to learn how to use it.
Step 1: Launch Microsoft Edge.
Step 2: Click on the 3 horizontal dots on the top right corner.
Step 3: Click on New InPrivate Window.

Step 4: Now use the browser as you normally would.
The InPrivate Window should ensure your browser works fine.
Method 4: Change UAC Settings
Many users have proved that changing the settings of the UAC (User Account Control) can solve the INET_E_RESOURCE_NOT_FOUND issue. If you have disabled the UAC feature before, Microsoft Edge may not work correctly. However, making any other settings will make the Edge browser work fine again. Hence, refer to the following steps to learn how to change the settings to something else to solve the problem.
Step 1: Press Windows key + R.
Step 2: Type in control and then press Enter.
Step 3: Click on User Accounts.
Step 4: Click on User Accounts again.
Step 5: Click on Change User Account Control settings.
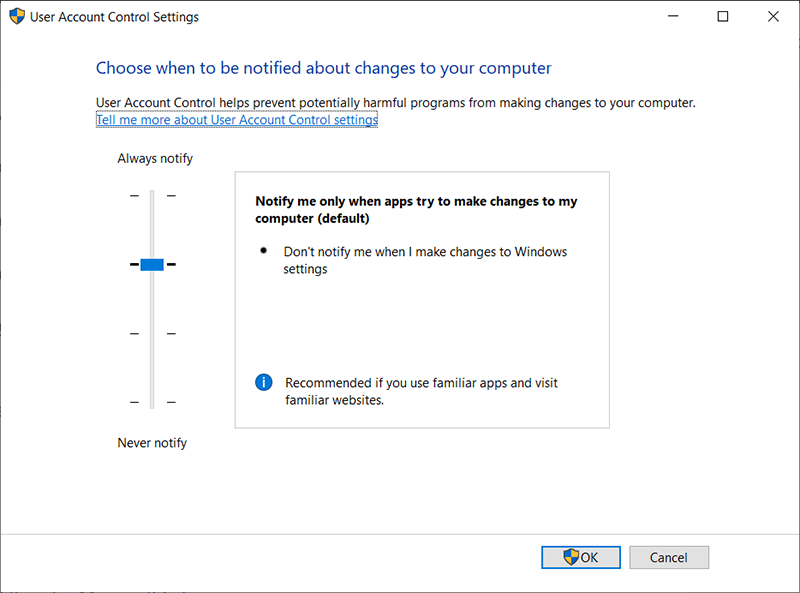
Step 6: Slide the bar up and down to change the settings. Change it to whatever you want bar Never notify. It is better to set it to the second option from the top.
Step 7: Click on Ok.
Method 5: Flush DNS
Flushing the DNS and retrying works for many users who encountered this issue as well. So, use the following steps and then try Microsoft Edge again.
Step 1: Press Windows key + Q.
Step 2: Type Command Prompt in the search bar.
Step 3: Right-click on Command Prompt from the search results and then select Run as administrator.
Step 4: Type in the following command line and then press Enter.
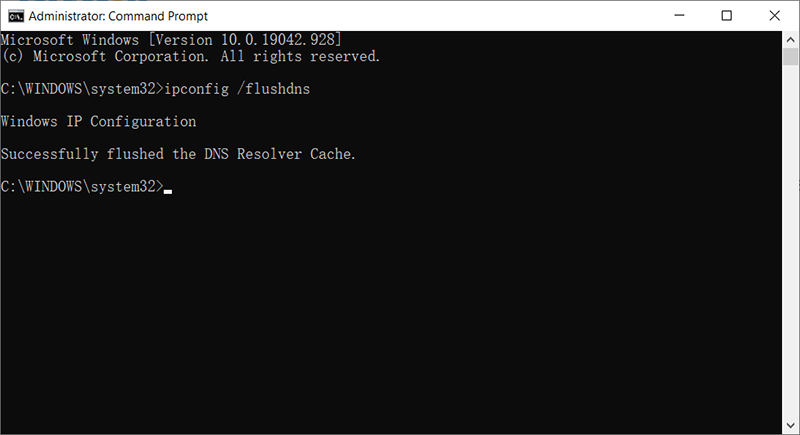
Step 5: You will see a message saying Windows IP configuration successfully flushed the DNS Resolver Cache.
Step 6: Type in exit and then press Enter.
Method 6: Rename Connections Folder
Sometimes, making specific adjustments in the registry will fix the error. Therefore, in this method, you could try renaming the connections folder.
Step 1: Press Windows + R keys to open the run prompt.
Step 2: Type in Regedit and press Enter.
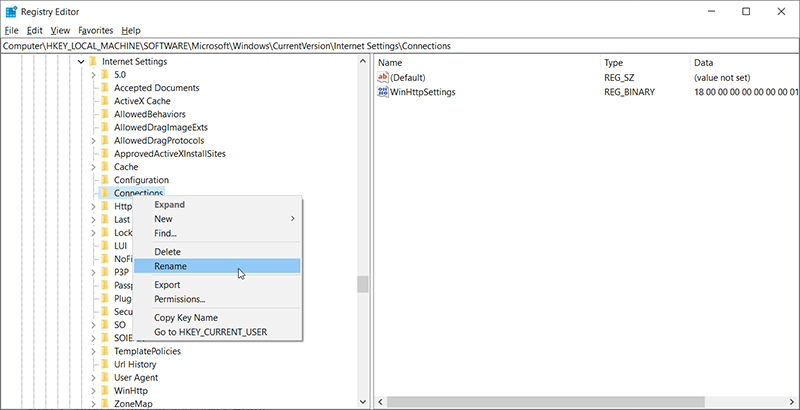
Step 3: Open the folder by using the following path
Step 5: Right-click on the Connections folder and then select rename.
Step 6: Type in ConnectionsX and press enter.
Step 8: Reboot your computer and then check if the issue persists.
Method 7: Reboot Router
There have been many reports from users that showed they fixed the INET_E_RESOURCE_ERROR by simply booting their routers again. But we will instead teach you how to conduct a proper router reboot to ensure that the DNS and internet configurations are also properly reset. To learn how to do so, refer to the following steps:
Step 1: Open your browser and type your IP address in the address bar.
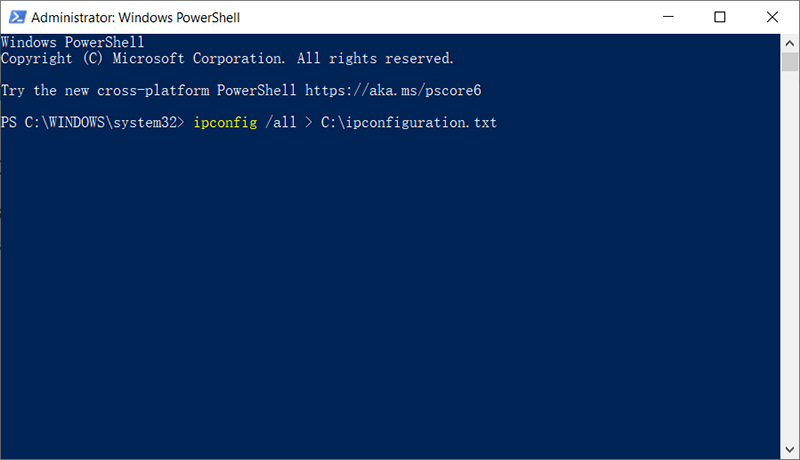
Step 2: To find your IP address, press Windows + R to open the run prompt. Type in CMD and then press Shift + Ctrl + Enter to provide admin permissions.
Step 3: Type in ipconfig/all and then press Enter. Your IP Address should be listed in front of the Default Gateway option.
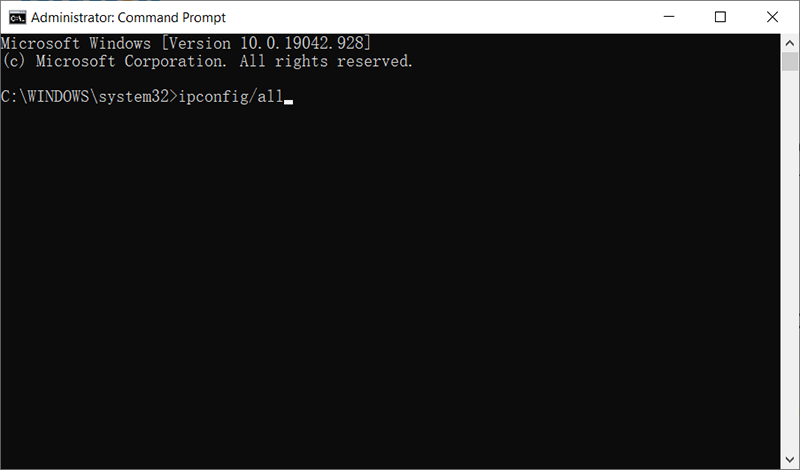
Step 3: After you have typed in the IP Address, press Enter to open the Router login page.
Step 4: Enter the username and password on the router’s login page, both of which should be written on the back of your router. If not, you could try the default values Admin and admin for both the password and the username.
Step 5: After you have logged in to the router, click on the Reboot button in the menu.
Step 6: Wait for the rebooting process to finish.
Step 7: Reboot your computer to see whether the issue persists.
Method 8: Network Reset
In some cases, there might be glitches in the default Windows Network adapters or the corresponding adapter configurations. This corruption can occur on account of a number of reasons including improper manual reconfiguration of these settings. Therefore, in this case, we will completely reset all the network configurations on our computer and get rid of any erroneous cache or stored data for the DNS settings. In this way, we will get our network connection back up and get rid of this error as well. To do so, use the steps listed below.
Step 1: Press Windows + R to open the Run box.
Step 2: Type in Control Panel and then press Ente.
Step 3: In the Control Panel, click on the View By option and then select Large Icons.
Step 4: After selecting the Large Icons, click on the Network and Sharing Centre option.
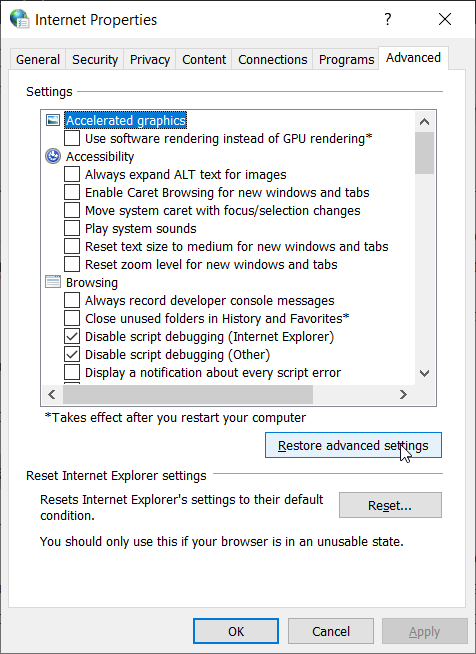
Step 5: In the Network and Sharing Centre, select the Internet Options option and from the left navigation pane at the bottom.
Step 6: In the new window, click on the Advanced tab and then select the Restore Advanced Settings option.
Step 7: Press Windows + I to open the Windows Settings.
Step 8: Click on the Network and Internet option and then select the Status button on the left panel.
Step 9: Scroll down until you find the Network Reset option.
Step 10: Click on the Network Reset option and select Reset Now.
Step 11: Confirm any prompts that ask if you want to initiate a network reset.
Step 12: Back up any work that you have not backed up yet.
Step 13: After the computer has rebooted, you’ll notice that the network connection isn’t active. Select the network icon and choose the network you want to reconnect to, and then choose Connect.
Method 9: Turn Off Antivirus Scanning
In some cases, the INET_E_RESOURCE_NOT_FOUND error might be triggered by your Windows Defender Antivirus, which is preventing the connection from being established. In this case, you will need to temporarily turn off the Windows Firewall and disable the Realtime Protection to check if that works. To do so, use the steps listed below.
Step 1: Press Windows + R to open the Run box.
Step 2: Type in Control Panel and then press Enter.
Step 3: In the Control Panel, click on the View By option and then select Large Icons.
Step 4: Click on the Windows Defender Firewall option to open the Firewall and then select Turn Windows Defender Firewall On or Off.
Step 5: Tick off the Turn off Windows Defender Firewall to turn the Firewall off.
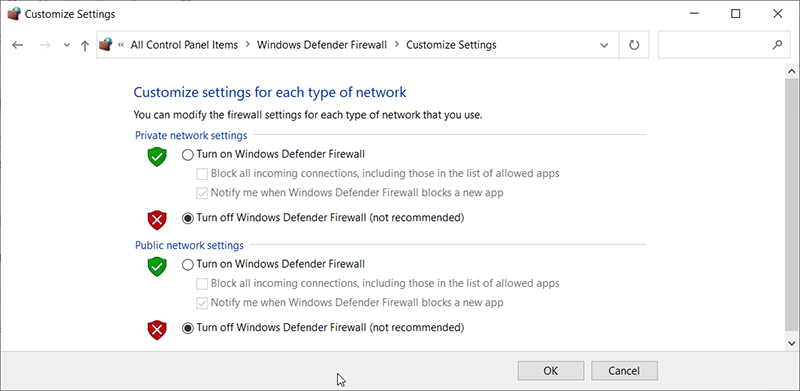
Step 6: Save your changes and exit.
Step 7: Press Windows+ I to open Settings.
Step 8: Inside the settings, click on Update and Security and select Windows Security from the left side.
Step 9: Click on the Virus and Threat Protection option and then click on the Manage Settings option below the Virus and Threat protection settings title.
Step 11: Turn the toggle off for Realtime Protection, Cloud-Delivered Protection, Automatic Sample Submission, and Tamper Protection.
Step 12: After you have disabled all of these settings, navigate back to the desktop and check if the issue persists.
How To Recover Lost Files Using Bitwar Data Recovery
In normal cases, you will not lose your files when fixing the INET_E_RESOURCE_NOT_FOUND error. But if you end up losing your data because of it, then you should be prepared to recover the lost data with the help of our Bitwar Data Recovery, an effective and user-friendly tool. Check out the following steps to learn how to use it:
Step 1: Download Bitwar Data Recovery from our official website and install it.
Step 2: Open the program, choose the disk drive where those missing files were stored, and then click Next.
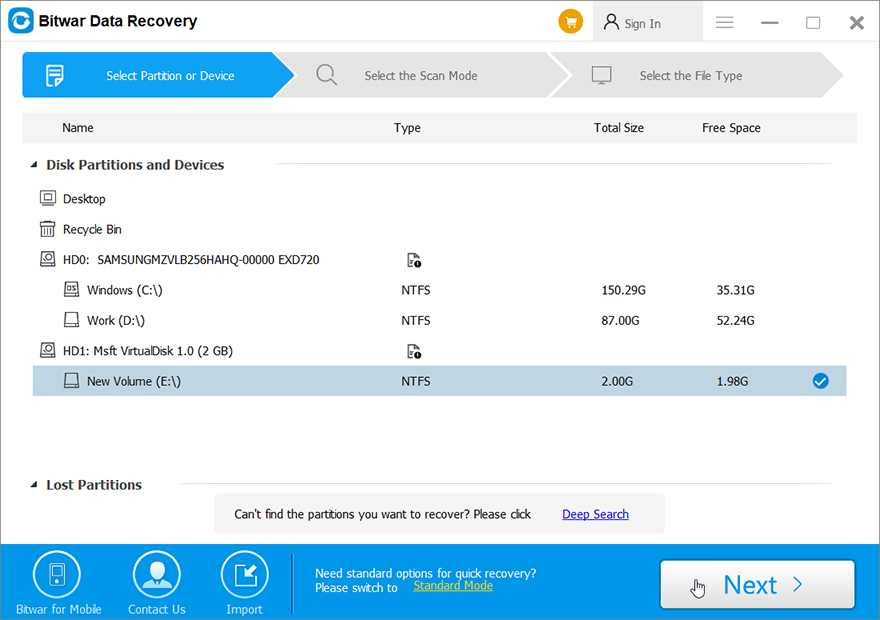
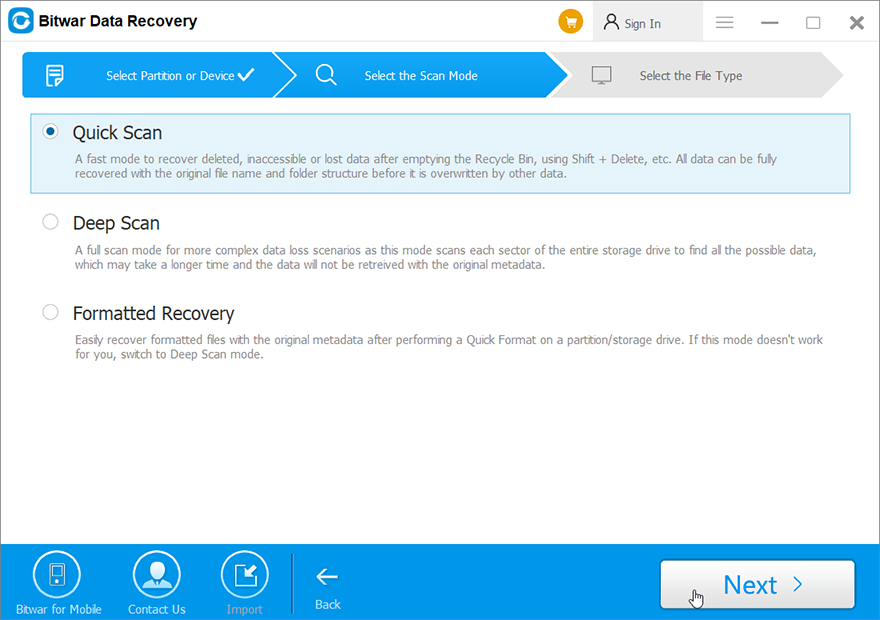
Step 3: You could select a scan mode in this stage. We would like to recommend Quick Scan, which is able to retrieve a great number of lost files. If it fails you, you can re-run the tool again and choose Deep scan, which is more effective.
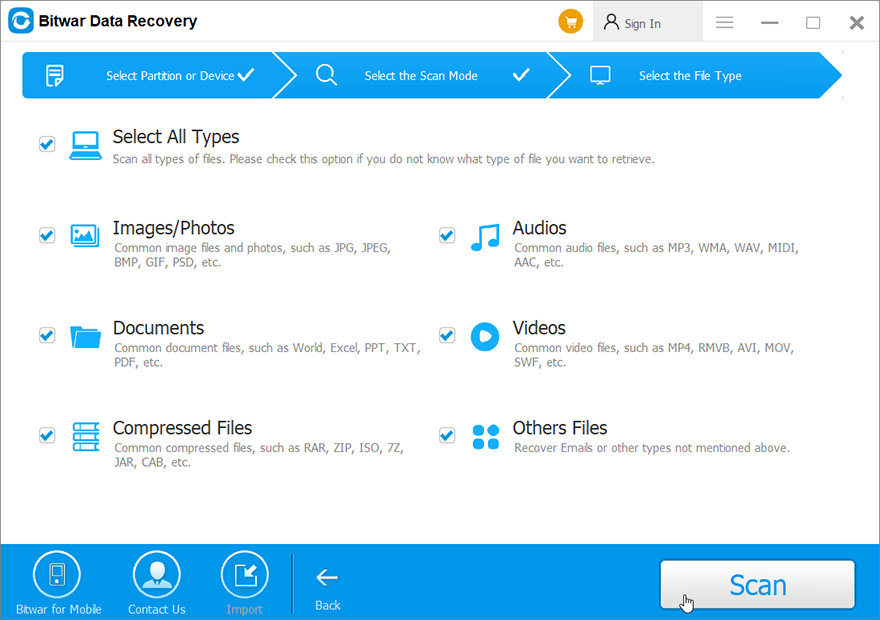
Step 4: Choose the types of files you want to bring back and click Scan.
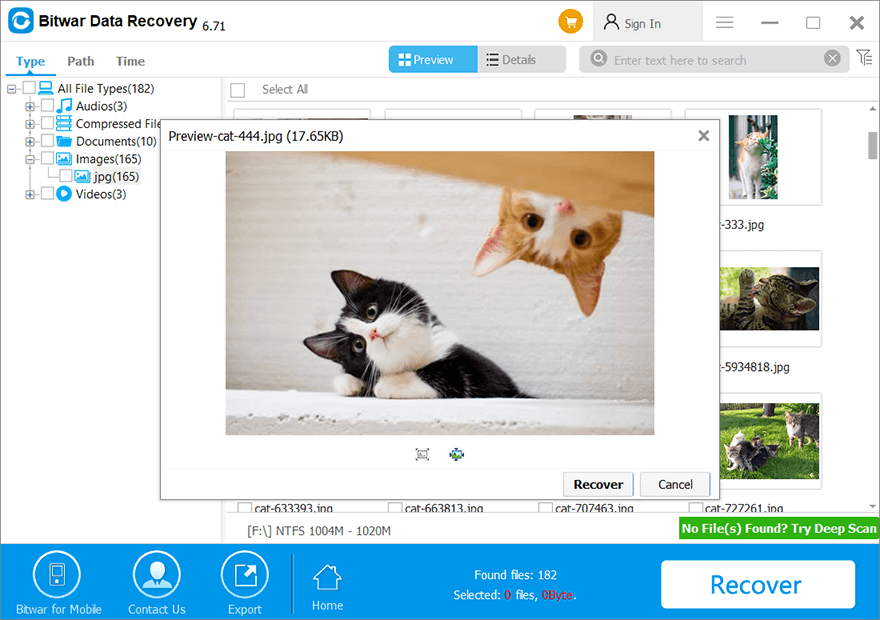
Step 5: Preview files you want to check their intactness. Choose those intact files and click Recover.
Wrapping Up
It is quite frustrating when the computer is interrupted by an error code: INET_E_RESOURCE_NOT_FOUND_ERROR. Fortunately, the aforementioned methods will help you fix the error without any further problems. And, if you encounter any problems that cause you to lose any crucial data due to this error, bear in mind that you can always turn to Bitwar Data Recovery for help and restore lost files.
Previous Article
7 Best Solutions to the This Device Cannot Start (Code 10) Error Summary: Many users are used to the INET_E_RESOURCE_NOT_FOUND error. It usually pops up when you try to access a website...Next Article
Fixed: Location Is Not Available Summary: Many users are used to the INET_E_RESOURCE_NOT_FOUND error. It usually pops up when you try to access a website...
About Bitwar Data Recovery
3 Steps to get back 500+ kinds of deleted, formatted or lost documents, photos, videos, audios, archive files from various data loss scenarios.
Learn More


