7 Best Solutions to the This Device Cannot Start (Code 10) Error
Summary: Computer users now do more and more things via the internet rather than in a local environment. That is why the most vexing problem related to PCs is the failure of an internet connection. One form of this failure is the network adapter code 10 error. A lot of users have reported this problem after an update or suddenly. One obvious symptom of this issue is that the network adapter does not seem to work. In this article, we will expound on several solutions to this issue and also explain how to use Bitwar Data Recovery to bring back your precious data, if you encounter any data loss problem triggered by this issue.
Table of Contents
The Reasons for Code 10
This error message pops up when the Device Manager can’t start the hardware device because of corrupted or outdated drivers. It could also happen when a driver manifests an error Device Manager can’t fix.
The Code 10 error is a common error message that warns the user of some kind of unspecified hardware issues. It can occur on every version of Windows such as Windows 7, Windows 8, Windows 10, etc.
Besides, devices such as USB drives have seen the error too.
To help users facing different scenarios, we will explain common solutions that can be generally used to solve this device cannot start (Code 10) cannot start error. In general, users faced with the error don’t know the exact cause. You can just try these solutions one by one.
Solutions to This Device Cannot Start (Code 10) Error
Solution 1: Update Device Drivers
Because this error can result from corrupt or faulty device drivers. You may try tackling it by updating some drivers via Device Manager. Refer to the following steps:
Step 1: Press Windows + X and click on Device Manager.
Step 2: Look for the outdated drivers and then right-click on one of them.
Step 3: Switch to Properties and then click on the Driver tab on the window.
Step 4: There, click Update Driver.
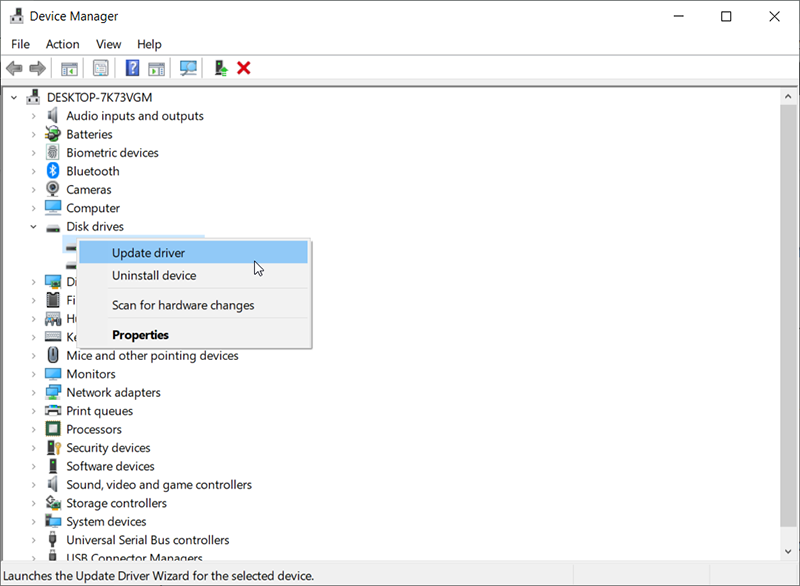
Step 5: Select the Search automatically for the updated driver software option.
Step 6: Windows will download and install the latest driver for the device. After you have updated the drivers, close the window, and reboot your computer to check whether the error is fixed.
Solution 2: Rollback Device Drivers
An alternative to updating drivers is to roll back the driver. To do so, use the following steps:
Step 1: Press Win + Q to open the search bar, type in Device Manager, and then open it.
Step 2: Right-click on the device you want to roll back and then click on Properties.
Step 3: Switch to the device’s Properties. Click on the Driver tab and then click Roll Back Driver.
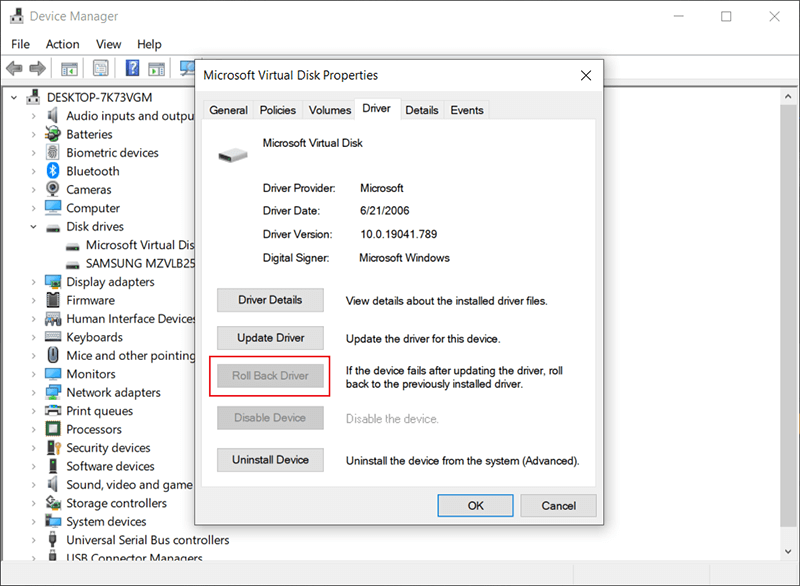
Step 4: Choose a reason for rollback and then click on Yes.
Step 5: After the computer has finished the process, reboot your computer and check whether the error still persists.
Solution 3: Power Cycle Your PC
Completely discharging your PC has proved its efficacy when it comes to fixing the unresponsive state of the network adapter. This might get rid of any undesired power surges that have been registered in the adapter.
Step 1: Unplug your charger, power off your computer, and then remove all the power cables.
Step 2: Press the power button for at least 30 seconds and then wait about 10 minutes.
Step 3: Put the battery back in, with the charger and reboot your PC.
Step 4: Check if this fixed it.
Solution 4: Use System Restore
If a virus or a new program or an update messes with your PC, conducting a system restore to the point at which your network adapter worked well will fix this problem. This is why users are recommended to create restore points regularly. Refer to the following steps to learn how to use System Restore.
Step 1: Press Windows key + R to open the Run box.
Step 2: Type in rstrui.exe and then press enter to open System Restore.
Step 3: Click on Next and then choose the restore point that bears a date before the error occurred.

Step 4: Click on next In the last window, click on Finish to confirm that you want to restore your computer to an earlier point. Any changes made to the computer including installation of programs and configurations will be undone. Your personal files, downloads, and documents will be spared from deletion. Your system might reboot a few times during this procedure.
Solution 5: Reinstall Wireless Drivers Manually
If none of the above methods work, you can try reinstalling the drivers manually after uninstalling them. Here, we will first open the device manager, uninstall the drivers, and let the default drivers install themselves. However, if the default drivers don’t work properly, you will need to manually install the drivers from the manufacturer’s website.
Note: Make sure that your system and BIOS are updated to the latest build before proceeding.
Step 1: Press Windows + R, type in devmgmt.msc in the dialog box, and then press Enter.
Step 2: In the device manager, expand the Network adapters tree.
Step 3: Disable the device first, right-click on it and then select Uninstall device.
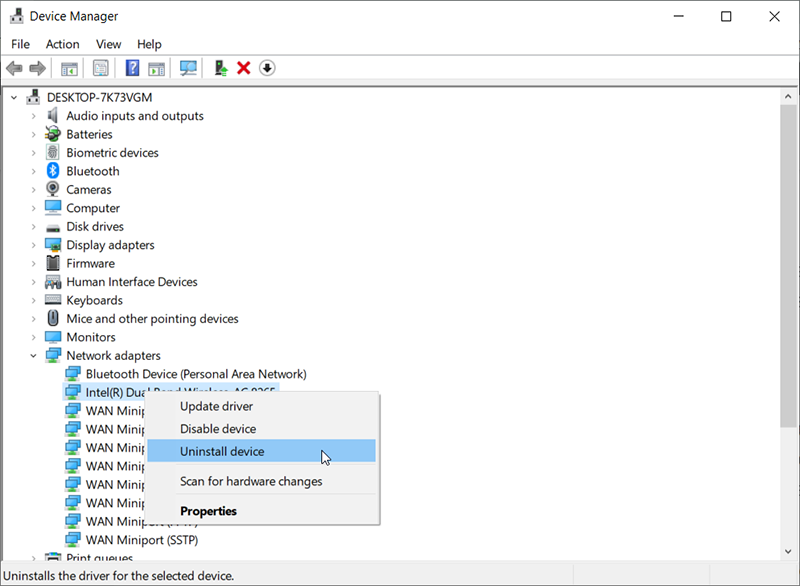
Step 4: After you have successfully uninstalled the driver, Go on to uninstall Intel PROSet/Wireless Software.
Step 5: Press Windows + X and then press F.
Step 6: Look for the software and then uninstall it. Download and install the latest version of the software.
Step 7: After installing, reboot your computer and navigate to the Device Manager. Right-click on any empty space and then select Scan for hardware changes.
Check your Wi-Fi and see if it works well. If not, use the following steps:
Step 1: Navigate to Device Manager and expand the network adapter tree. Right-click on the driver, click on Update Driver and then click on Browse my computer for driver software.
Step 2: Select Let me pick from a list of available drivers on my computer.
Step 3: Click Have Disk and navigate to find the file Netwtw08.IN you have stored on the computer.
Step 4: Reboot your computer after making changes and see whether the issue is solved.
How To Recover Lost Files Using Bitwar Data Recovery
Fixing the errors is the way out. However, saving essential files and data has high stakes too. If some files or data on the computer afflicted with this error disappear for no reason, you can try our Bitwar Data Recovery to rescue them. This easy-to-use tool can recover practically everything you can think of, files, folders, photos, audio, videos, etc. It can dig your data from recycle bin, crashed PC, or external devices just when you cleave to the belief that the lost files are gone forever. Refer to the following steps to learn how it works:
Step 1: Download Bitwar Data Recovery from our official website and install it.
Step 2: Open the tool and select the disk drive where your missing data were stored and then click Next.
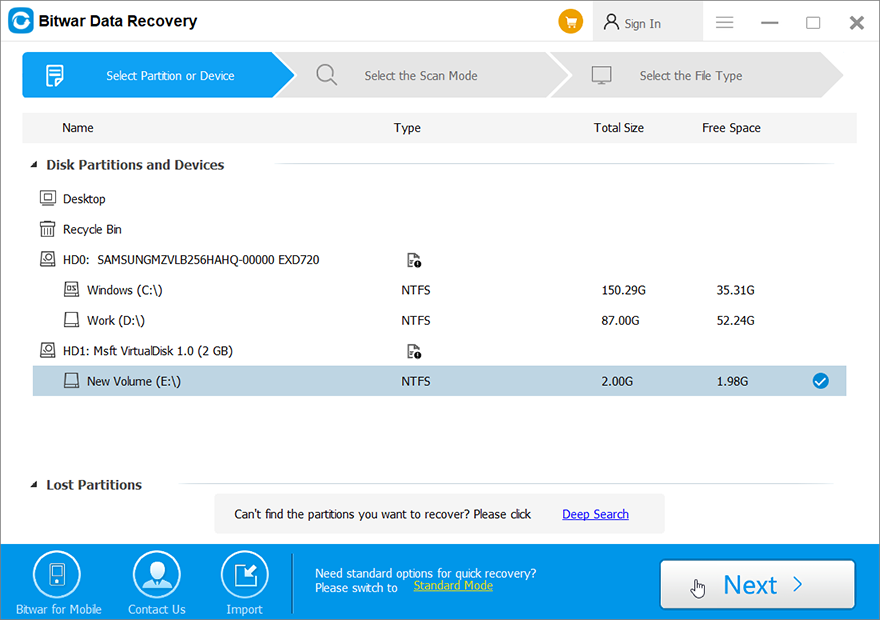
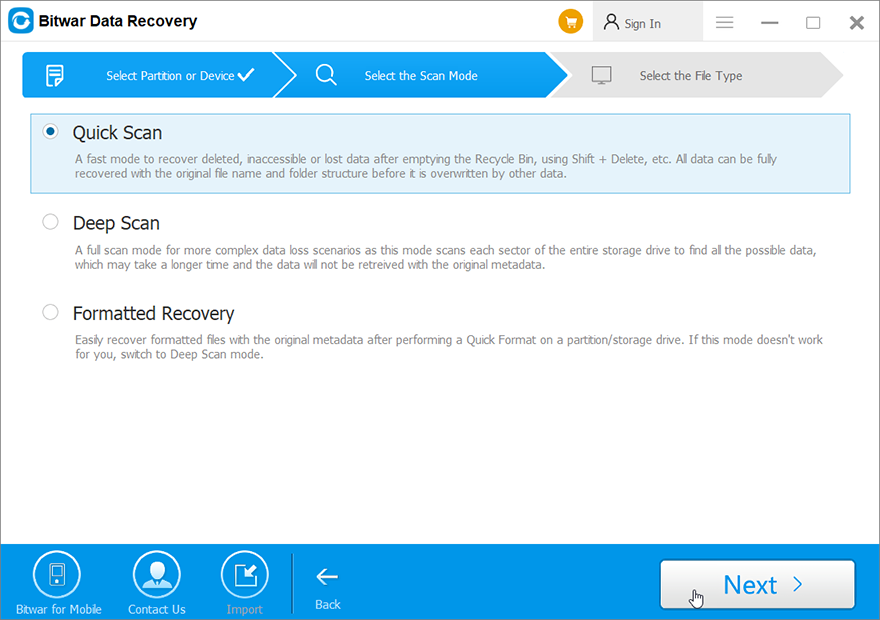
Step 3: Choose a scan mode in this stage. We would like to recommend Quick Scan, which is capable of retrieving a healthy number of lost files. If it doesn’t work, you could run the tool again and use Deep scan, which is more effective.
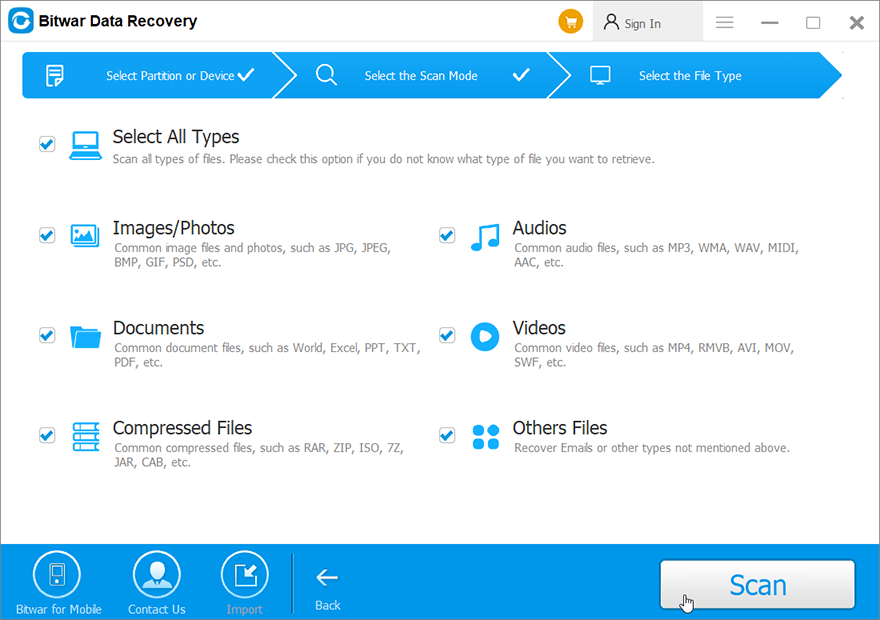
Step 4: Select the types of data you want to recover and click on Next.
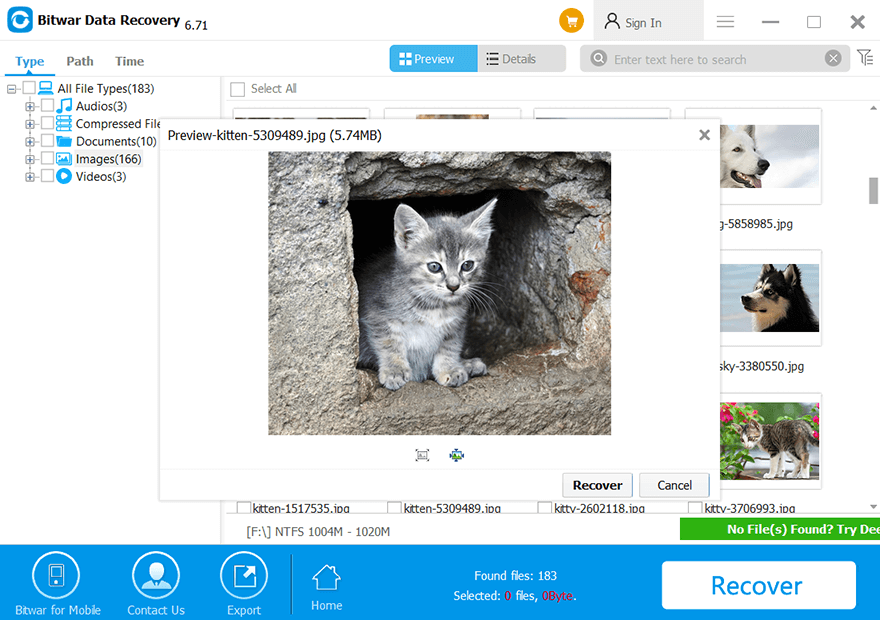
Step 5: Preview wanted files to check their intactness. Select them and click Recover to start the recovery process.
Last Resort: Replace Your NIC or Wireless Card
If you have tried every solution mentioned before and you have narrowed down the possible causes of the faultiness of the network adapter card, you can replace it as a last resort. For users of desktop PC, this is very simple to do. Simply unplug the card from the expansion slot (PCI slot) and insert the new card. Although it is not necessary to have an identical replacement, it is recommended to do so because it will help in finding later updates from your computer manufacturer.
Replacements for laptops are not that easy. The Wireless can be replaced by disassembling the laptop. You will need an identical replacement card to do so. If the LAN card is detachable, you can try finding another identical replacement from eBay or a local repair shop.
Conclusion
In this article, we have expounded on several solutions to this Device Cannot Start (code 10) error. Besides, any data loss problem triggered by this issue should not trouble you anymore if you use our Bitwar Data Recovery, which is a user-friendly and effective tool and can help you bring back lost files.
Previous Article
Solved: The Directory Name is Invalid Summary: Computer users now do more and more things via the internet rather than in a local environment. That is...Next Article
[Solved] INET_E_RESOURCE_NOT_FOUND Summary: Computer users now do more and more things via the internet rather than in a local environment. That is...
About Bitwar Data Recovery
3 Steps to get back 500+ kinds of deleted, formatted or lost documents, photos, videos, audios, archive files from various data loss scenarios.
Learn More


