[FIXED] Solutions to Solve Windows Was Unable To Repair the Drive Error
Summary: This article will introduce you to some easy methods to eliminate Windows was unable to repair the drive issue and recover all your data using the powerful recovery tool – Bitwar Data Recovery.
Table of Contents
Summary of Windows Was Unable To Repair the Drive Error
The majority of Windows users encounter an issue saying that: there is an error with the drive which you are using, you need to scan and fix it. When the disk pops up with this error, you will need to choose either scan and fix the removable drive or continue without scanning.
We will show a similar case faced by a user below:
“Ever since I start to use Windows 10 system, the error message starts to pop up after every time I connect my USB, hard drive, flash drive or others to my computer. At first, I thought there is a problem with my drive, but after I cancel the message, I found that there is no problem with the external device. Besides, the error message will pop up every time I reconnect the drive to the computer. Is there any way I can fix this error message?”
Common Factors
First of all, we will show you the common factors that can cause the Windows was unable to repair the drive issue to happen on your computer as below:
- Unsafe ejection or removal of the hard drive.
- Viruses and Malware.
- Corrupted file system.
- Drive is used in many other devices such as laptops, cameras and gaming consoles, etc.
Therefore the best recommendation is to scan the drive to make sure it is clean and safe for your file system but make sure you recover all your relevant data first with the best data recovery tool because there are good chances that you will end up losing your data from the drive.
Recover Data from Drive
Bitwar Data Recovery software is the best recovery tool for Windows because it can recover all types of files from external or internal devices. Besides, it supports Windows 7, 8 and 10, which is very compatible with all Windows users.
So follow the easy recovery steps below to restore data from your drive:
Step 1: Open the official website of Bitwar Data Recovery and download and install the software on your computer.
Step 2: After installing, open the data recovery software, click on Standard mode, and then select Lost Partition Recovery and then click on the Next button.
Step 3: Select the lost partition from the Lost disk Partitions and click on the Next button.
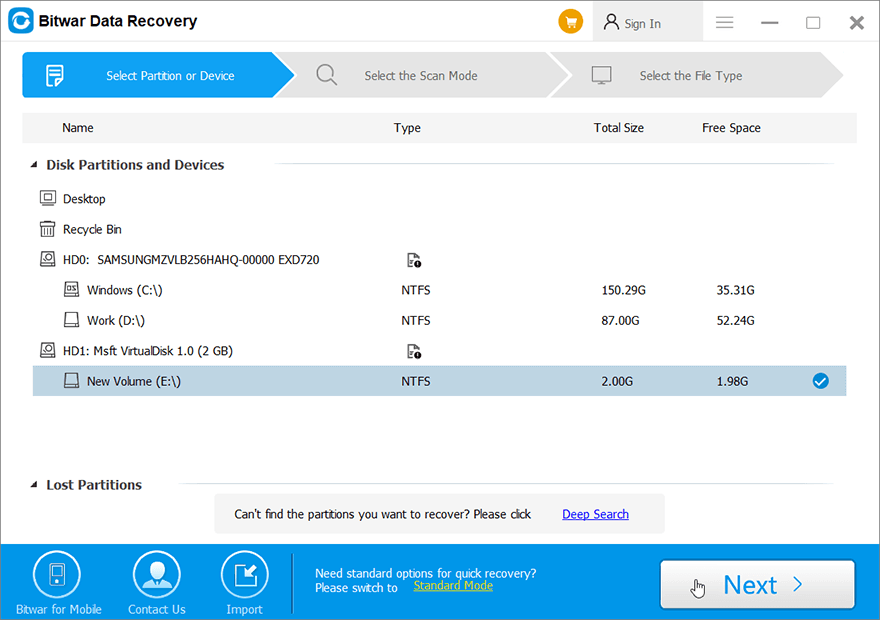 Step 4: In case you are unable to find the lost partition, select the Deep Scan mode to search for more partitions. After this, click on your lost partition and press the Next button.

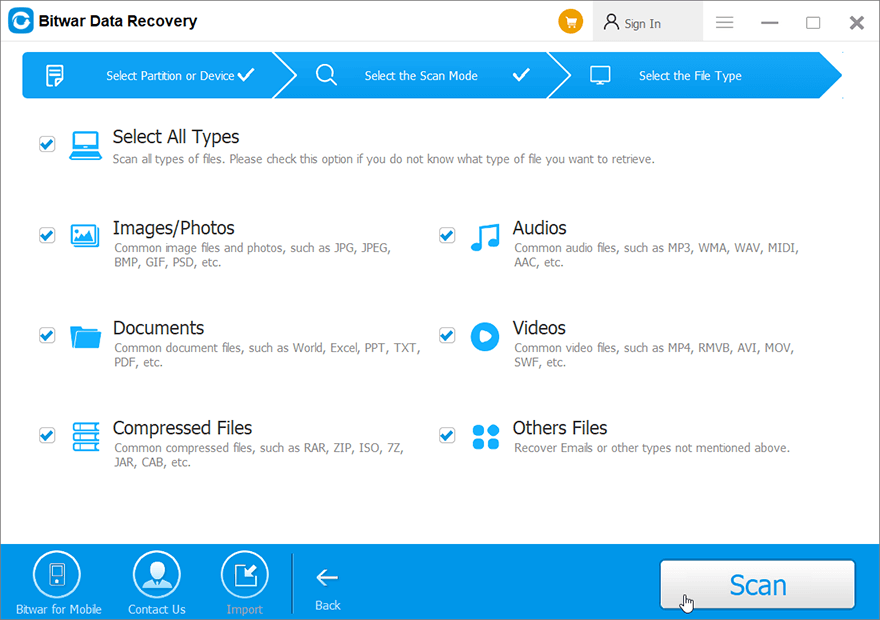
Step 5: Click the file types you wish to recover and press Next.
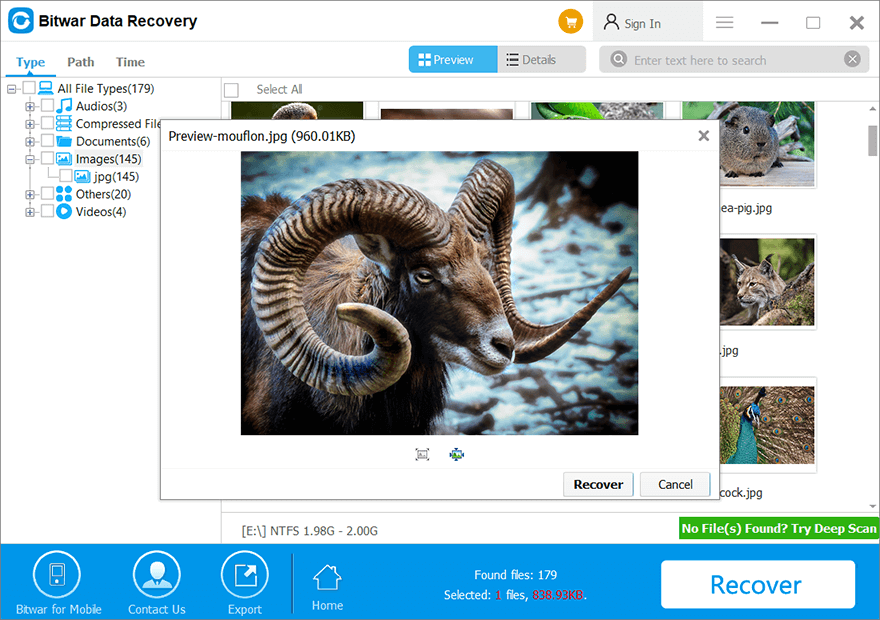
Step 6: After this, preview the data selected by you and press Recover to begin the recovery of lost files.
Scan and Fix (Recommended)
After finish recovering your data at a safe partition, the best recommendation is to scan the drive first to make sure it is clean and safe for your file system.
Step 1: Select Scan and fix (recommended) from the Microsoft Windows window and click Repair drive.

Step 2: Wait for the Windows system to scan and fix the file system errors.
Step 3: When the process is complete, restart your PC to check the error is fixed or not.
However, after the scan is complete, there are two possible outcomes:
- No error was found in the scan process.
- In case an error is encountered, Windows will notify you to fix the error by following a simple procedure to repair the erroneous drive in no time.
If the procedures given by the Windows are not able to overcome the Windows was unable to repair the drive issue, you can refer to some of the effective solutions below to fix the issue!
Effective Solutions to Fix Windows Was Unable To Repair the Drive Issue
Solution 1: Run Command Prompt
Step 1: Navigate to the start menu and type cmd in the search menu provided to launch the Command Prompt.
Step 2: Once the Command Prompt is opened, right-click on it and choose the option Run as Administrator.
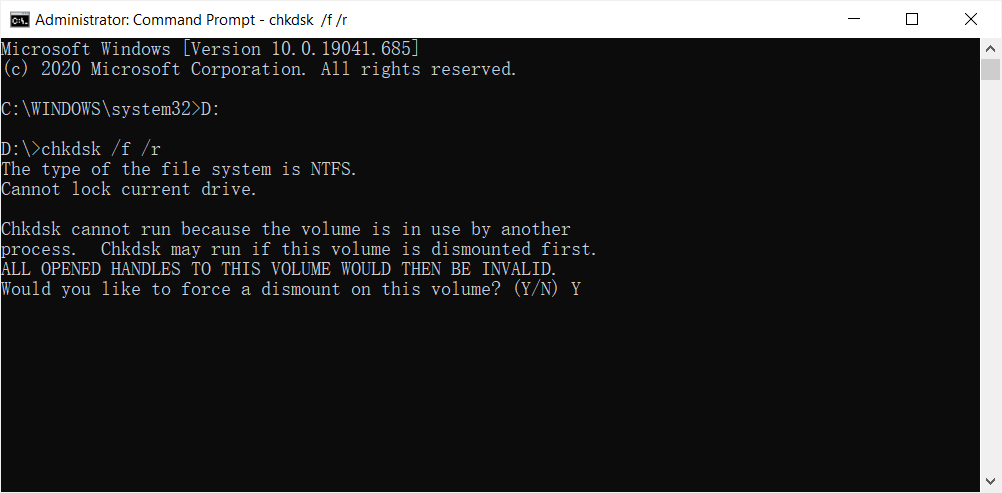
Step 3: In the command prompt window, type the command E: (Replace E: with your drive letter). After this, press Enter.
Step 4: Type another command: chkdsk /f /r and press Enter. Here, /r helps in finding the bad sectors and recovering data from wherever possible, and /f works to force the drive or disk to unmount before the starting of the scan process.
Step 5: At last, please wait patiently for the process to complete.
Solution 2: File System Checker Tool
Step 1: Go to Start and type cmd in the search menu to open the Command Prompt again.
Step 2: Right-click on the Command Prompt icon and choose the option Run as Administrator.
Step 3: In this window, type sfc /scannow command and hit Enter to execute it.
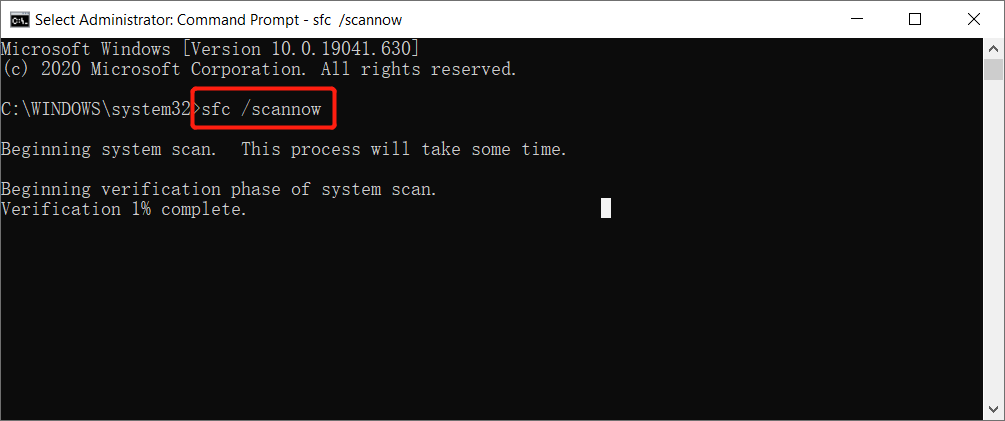
Step 4: Wait for the scan process to finish and then log out of the Command Prompt.
Step 5: Finally, restart your computer and check if the issue is fixed or not.
Solution 3: Hardware and Devices Troubleshooter
If both the solutions above are not able to fix the issue in Command Prompt, then you can apply this solution to troubleshoot the drive to check for issues or problems.
Step 1: Go to the search menu and type Control Panel to launch it.
Step 2: Select the View by Small Icons option and then click on the Troubleshooting option from the items list.
Step 3: After this, look for Hardware and Sound from the right side of the panel and click on the Configure a device option.
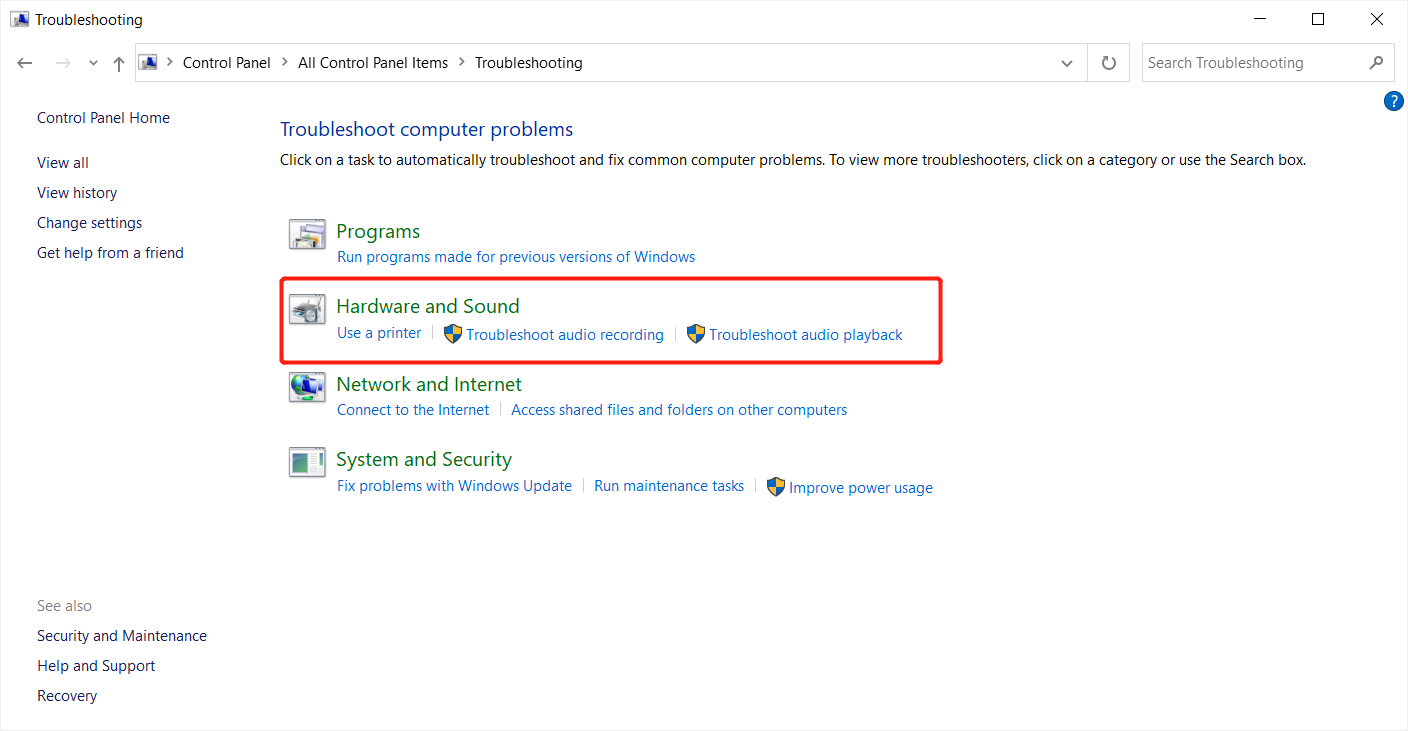
Step 4: Choose the Advanced option from the pop-up window by clicking on it and applying the repairs automatically.
Step 5: Finally, click on the Next button and follow the instructions as given to complete the repairing procedure.
Solutions 4: Restart Computer to Clean Boot
Users can try to reboot the computer to clean boot to fix the Windows was unable to repair the drive error because some inappropriate programs can cause the error to happen.
Step 1. Go to Search menu and type in msconfig to start the System Configuration utility.
Step 2. Tap on Selective startup from the General tab.
Step 3. Please tick the Load System Services and Use Original boot configuration check box continue to untick the Load Startup items box too.
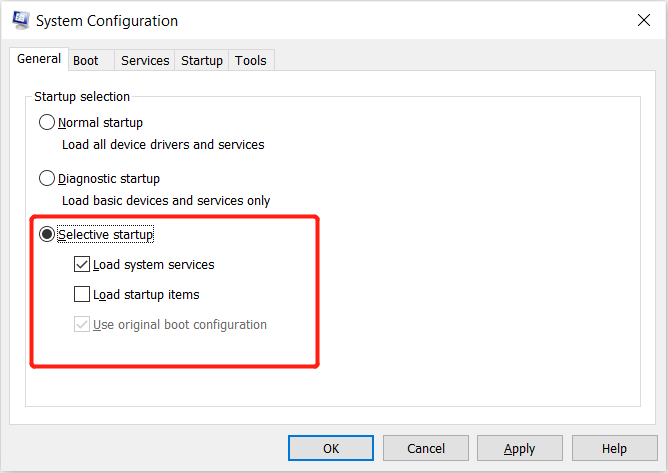
Step 4. Choose the Hide All Microsoft Services box from the Services tab and select Disable all.
Step 5. After configuring the settings, tap Apply or OK. Finally, please Restart your Windows system.
By following the steps above, your computer will restart into the Clean Boot State and select Undo the changes to make sure the Windows is running as the usual startup. Once the computer has restarted, check whether the error is fixed or not in the Clean Boot State.
Solution 5: Startup Repair
Windows provides multiple types of tools to fix errors on computers and Startup Repair is the most used tool in the system. It allows you to scan and repair errors that are difficult to scan and take a long loading process.
Step 1: Go to the Start menu and select Settings.
Step 2: Select the Update & Security and continue with Recovery from the left-hand panel.
Step 3: Select the Advanced startup menu and click the Restart now button.
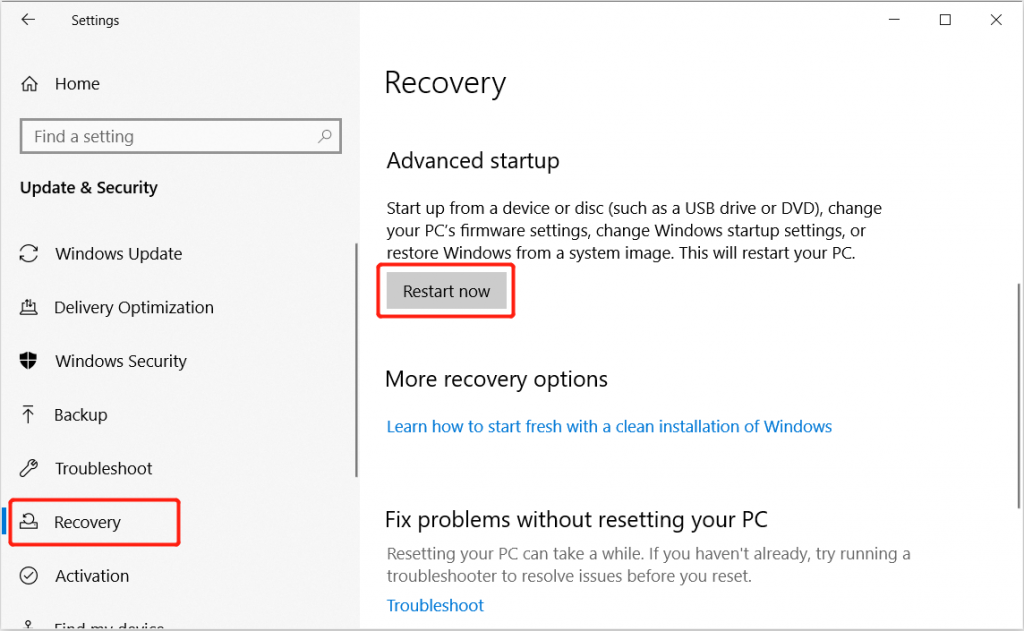
Step 4: Choose the Troubleshoot option from the window and select the Advanced option from the Troubleshoot window.
Step 5: Tap on Startup Repair option and select the current account followed by the account password.
Step 6: Lastly, click Continue and wait for the Windows process to complete.
FAQ Related Windows Was Unable to Repair the Drive
How to fix corrupted files?
Actually, you have to check whether is the real file document corrupted or the drive that stores the files is corrupted. This is because if the real file is corrupted, you are unable to fix it. On the other hand if the drive is corrupted not the file, then you can still restore the file from the drive.
- Scan and recover using Bitwar Data Recovery.
- Run Command Prompt (CMD) to recover data.
- Perform error checking to search for errors in the drive.
- Perform a deep scan through the Maintenance in Control Panel.
Eliminate Drive Error Quickly!
Computers are vulnerable, which can cause many errors and dysfunctionalities because of virus attacks, malware, improper removal of external storage devices and corrupted file system. These errors usually restricted your access to the data that is stored in the affected storage device.
Therefore you can refer to all the useful solutions mentioned in the article above to eliminate the Windows was unable to repair the drive error and always make sure to back up your data. Still, in case there is a data loss throughout the process, please use Bitwar Data Recovery to retrieve back the data to prevent permanent data loss!
Previous Article
[TIPS] How To Change iPhone Call Notification Window To Full Screen on iOS 14? Summary: This article will introduce you to some easy methods to eliminate Windows was unable to repair the drive issue...Next Article
How to Recover Deleted Music From Mac? Summary: This article will introduce you to some easy methods to eliminate Windows was unable to repair the drive issue...
About Bitwar Data Recovery
3 Steps to get back 500+ kinds of deleted, formatted or lost documents, photos, videos, audios, archive files from various data loss scenarios.
Learn More


