[SOLVED] Windows Stop Code Kernel Data Inpage Error
Summary: Have you ever faced Blue Screen of Death (BSOD) accompanied by an error message: kernel data inpage error? The error usually happens when your computer encounters alarming hardware or system failure. Although it may not be as fatal and crippling as some malicious virus, it usually leads to unexpected data loss. So, in this article, we are going to layout several solutions to this issue and introduce an effective and reliable data recovery tool, Bitwar Data Recovery, to help you recover lost data.
Table of Contents
Possible Reasons for the Kernel Data Inpage Error
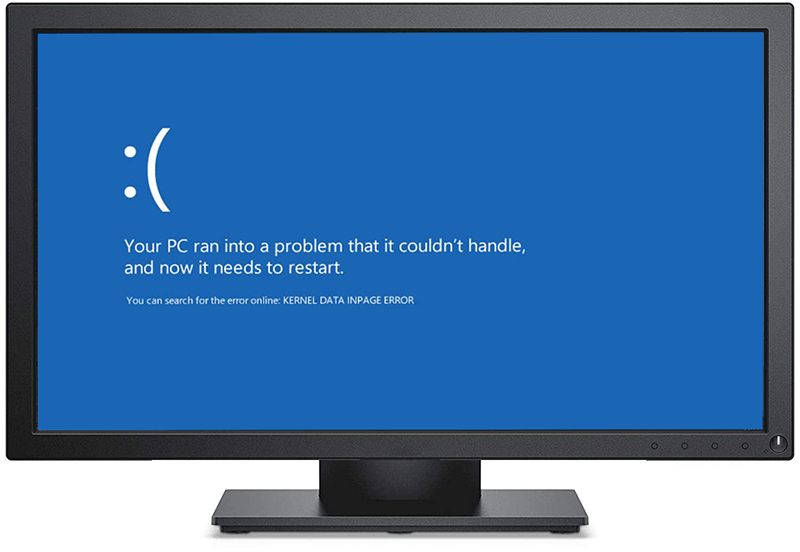
Kernel data inpage error is one of the BSOD error codes, which is also known as stop code. BSOD can be considered as a tool computers use to protect themselves against further problems, as we have mentioned in the article: Fix: Thread Stuck in Device Driver Error [16 Solutions], which deals with another notorious BSOD error. For users who are curious about reasons for the issue, here we have posted a list of possible ones:
- Hard drive failures
- System file corruption
- Outdated device drivers
- Paging file corruption
- Virus or malware infection
Basic Solutions
Solution 1: Check Hardware Connections
This is the first step you should try when you try to fix the kernel data inpage error. You should pay attention to the power cable and hard drive cables. If necessary, disconnect and reconnect the wires. Make sure that the error didn’t occur on account of hardware problems. After the checking, boot the computer to see whether the problem persists.
Solution 2: Check the Health Status of The Hard Drives
Since the connections related to the hardware are in good condition, the next step is to check the health status of the hard drives with the help of SMART attributes, which will present some basic information about a drive you need to know to determine whether it’s bad or not. Refer to the following steps to learn how to run SMART.
Step 1: Right-click the Start Menu button and then select Command Prompt(Admin).
Step 2: Type in the following command: wmic diskdrive get model, status.
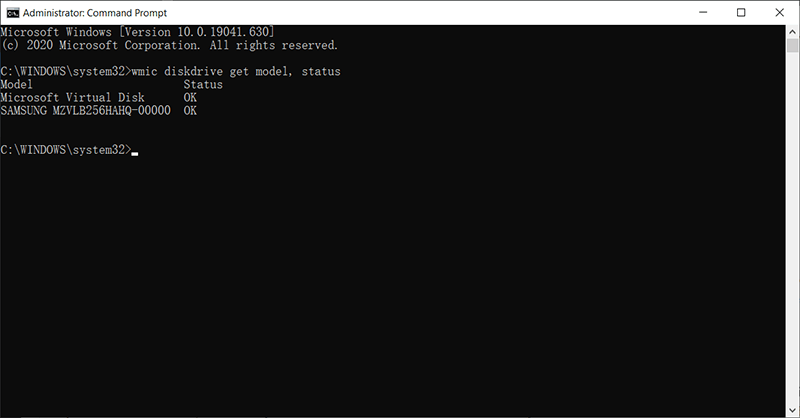
Step 3: Press Enter and wait for the scanning process to finish.
Step 4: After the process, the window will show you one of the three results under the Status column:
- Unknown, Bad: Indicates High probability of hard drive errors.
- Caution: Indicates that the hard drive is deeply affected and needs repair.
- OK: Indicates that the drive works properly.
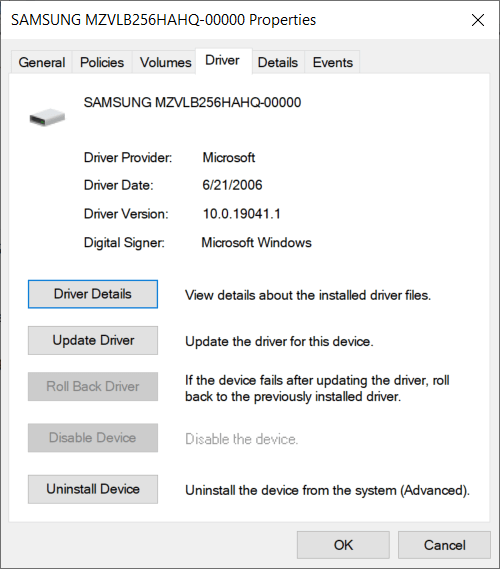
Solution 3: Reinstall or Update Device Drivers
As this article has said before, one of the possible reasons for the kernel data inpage error is the outdatedness of the device drivers. To reinstall or update devices drivers, you can use the following steps:
Step 1: Press Win + Q, type in Device Manager, and open it.
Step 2: Expand the tree labeled Disk drives.
Step 3: Right-click on the hard drive and select Properties.
Step 4: Check the status of the device driver and decide whether to reinstall (update) it or not.
Solution 4: Clean Boot
It’s reported that several peripheral devices, for example, external storage media, can cause the kernel data inpage error. In this case, you can power on your computer with a clean boot, which means to boot the computer with all unnecessary peripheral devices disconnected.
Step 1: Restart your computer.
Step 2: At the moment when the computer is powered on, immediately and continuously press the F8 key until the screen shows Advanced Boot Options.
Step 3: Select the Safe mode with Networking and press Enter.
Step 4: Login and then press Win + R.
Step 5: Type in msconfig and click on OK.
Step 6: Switch to the General button and then tick off the box next to the Selective Startup option.
Step 7: Uncheck the Local Startup items option.
Step 8: Switch to the Services button and uncheck the box next to Hide all Microsoft services.
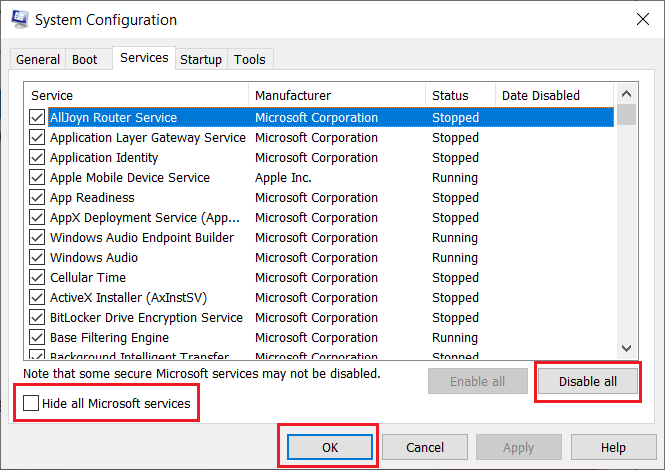
Step 9: Click on the Disable all button, click on OK, and then restart the computer.
Solution 5: Uninstall Incompatible Software
If you have recently installed some program that came from an untrustworthy source and then you came across kernel data inpage error, you should consider uninstalling it, because incompatibility between software can definitely cause the issue. To uninstall a program, you can use the following guide:
Step 1: Type in Control Panel in the search bar and then open it.
Step 2: Select Programs and Features.
Step 3: Click on the Installed On button to sort the list.
Step 4: Uninstall suspicious programs.

Step 5: Reboot the computer to see whether the error persists.
Solution 6: Run Anti-Virus Software
According to the possible causes we have mentioned before, Virus attacks are likely to trigger the kernel data inpage error issue. You had better run a reliable anti-virus program to scan your PC and eradicate lurking viruses. Users of Windows 10 can use Windows Security to do the trick, as the following steps show.
Step 1: Press Win + I to launch Settings.
Step 2: Navigate to Update & Security > Windows Security.
Step 3: On the right page, click on Virus & threat protection.
Step 4: Click on Quick Scan to scan your computer.
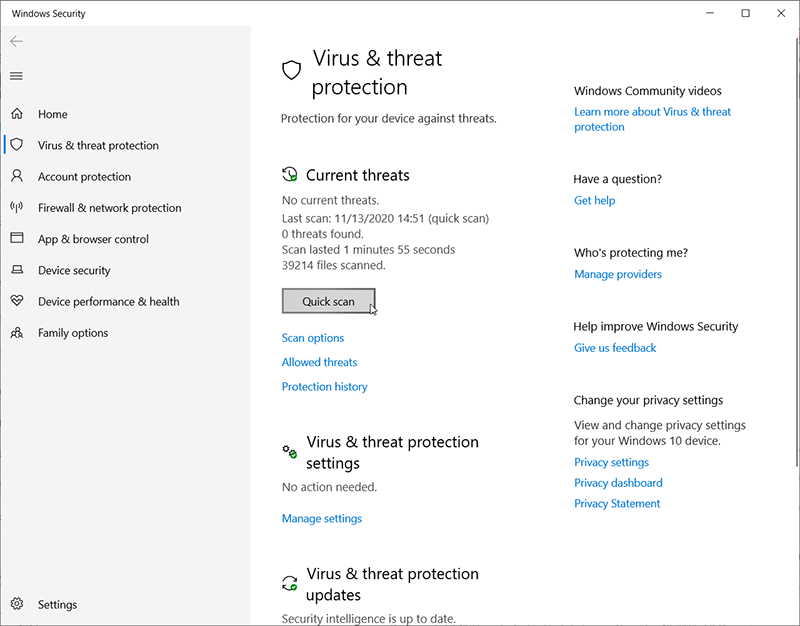
Step 5: Or you can click on the Scan options button under it and select the desired mode.
Step 6: After the scanning is complete, check whether the issue still goes on.
Bring Lost Data Back Using Bitwar Data Recovery
As we have discussed in the beginning part of this article, kernel data inpage error is highly likely to induce data loss issues. If you can’t find those files that you were using or editing after the error has put a halt to the computer, don’t worry as you can use the powerful and reliant software, Bitwar Data Recovery, to bring back your precious data. Here is a simple guide that shows how it works like magic.
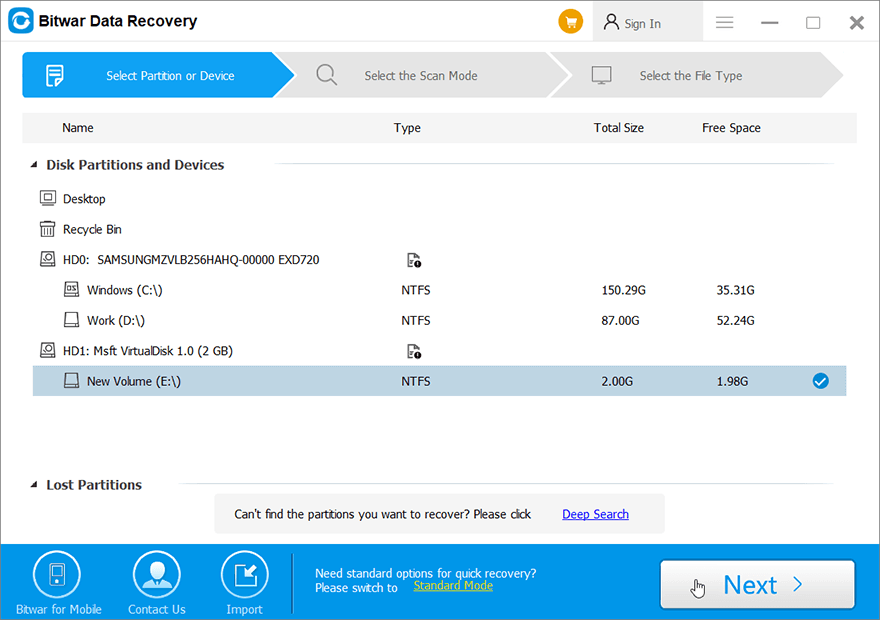
Step 1: Download Bitwar Data Recovery from the official website and install it.
Step 2: Launch the software. Tick off the partition or drive where the data got lost and click on Next.
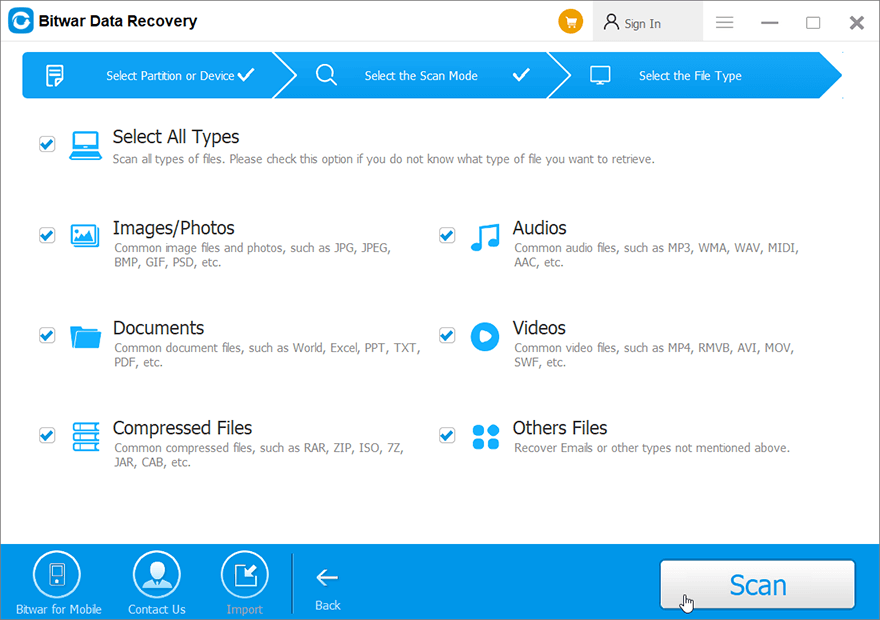
Step 3: Select a scan mode. We recommend you to use Quick Scan at first, which can scan a whole drive in a few minutes and is capable of handling most data loss problems. If the mode doesn’t work on your computer, then you can try using Deep Mode, which is more effective.

Step 4: Select the types of files you want to recover and then click on Next.
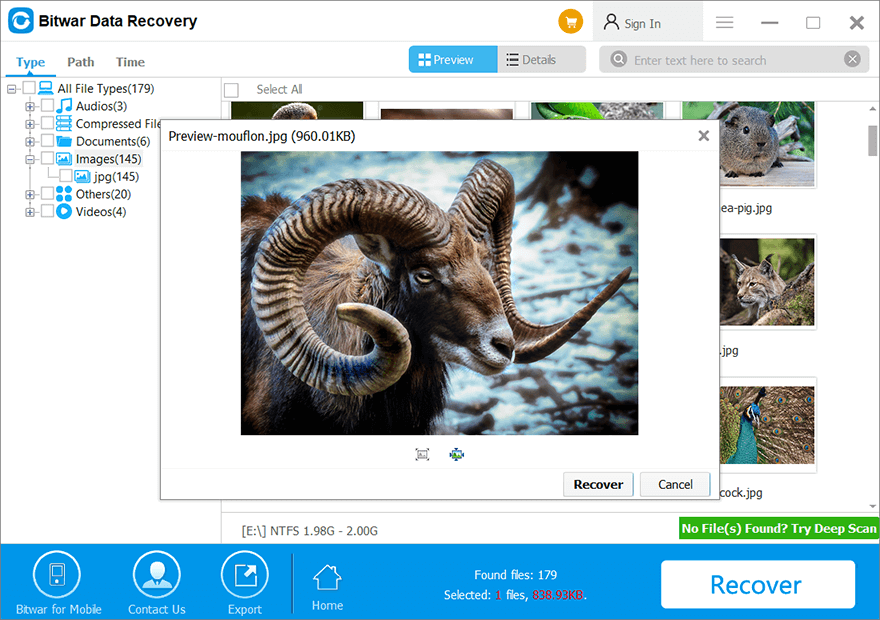
Step 5: Double-click a file to preview it. Select the wanted files and click on Recover to retrieve them.
Advanced Solutions
Solution 7: Use Disk Repair Tools
There are a plethora of repair tools you can find on the Internet. But to spare you from the trouble of further download and installation, here we introduce only two built-in repair tools offered by Windows, which are usually effective enough to handle most issues.
Error Checking
This tool can be found in Windows 10/8/7/Vista/XP. It’s the graphical version of the next tool, CHKDSK.
Step 1: Press Win + E to open File Explorer.
Step 2: Right-click on a disk drive and then select Properties.
Step 3: Switch to the Tools tab and then click on the Check button within the Error Checking box.
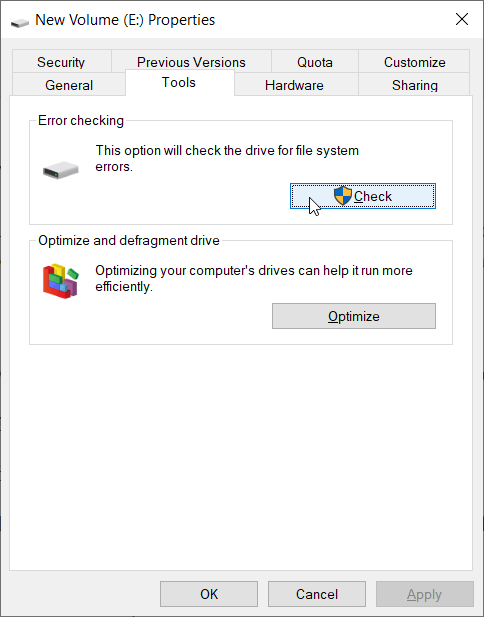
Step 4: Click on Scan Drive to confirm your operation.
CHKDSK
It is a command-line tool and has been widely used since its birth. It boasts more advanced options than Error Checking.
Step 1: Right-click the Start Menu button and then select Command Prompt (Admin).
Step 2: Type in the following command: chkdsk X: /f /r
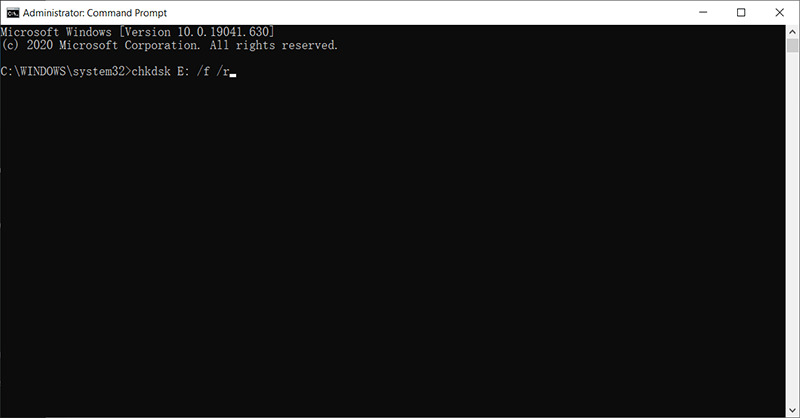
Step 3: Wait for the process to end and reboot your computer to see whether this solution works.
Solution 8: Run SFC Scan
Short for System File Checker, SFC is a repair tool offered by Windows that serves to help users scan the operating system, replace damaged or corrupted versions with the correct versions, and restore files. To run it, follow these steps:
Step 1: Right-click the Start Menu button and select Command Prompt (Admin).
Step 2: In the Command Prompt window, type in the following command: SFC /scannow and then press Enter.

Step 3: After the SFC scan, exit Command Prompt and reboot your PC.
Solution 9: Run DISM
DISM, the shorthand for Deployment Image Servicing and Management, is more powerful than SFC when it comes to solving computer problems and is hailed as the tool to fix what SFC can’t. If the kernel data inpage error issue keeps harassing you after you have run SFC, you can use this solution to run a deeper scanning and to root out more elusive problems.
Step 1: Press Win + Q, type in Command Prompt and right-click on it to choose Run as Administrator.
Step 2: Type the following command and then press Enter.
Step 3: If no problem is found after you have entered the above-mentioned command, you can run a more advanced mode to check out the health status of the component store. Type the command and then press Enter:
Step 4: If the scanning result shows that problems do exist, You can use the following command to repair those problems. Note that the whole process could take up to 10 minutes if necessary.
Step 5: Once the process is done, restart your computer to see whether this solution works.
Solution 10: Use the Memory Diagnostic Tool to Check RAM
Memory Diagnostic Tool, which is a built-in program, serves to test and verify the RAM. It helps users to determine whether there are any errors resulted from hardware failures, including motherboards, RAM, and others. Before using this tool, you should save the files you have opened and close other unnecessary applications you are using. After that, use the following steps:
Step 1: Press Win + Q, type in Windows Memory Diagnostic, and open it.
Step 2: Click the Restart now and check for problems option.
Step 3: Your PC will reboot and do a series of scanning operations, don’t interfere with it or interrupt it. After the process is complete, the computer will reboot again.
Step 4: You should use the Event Viewer to check out the results of the scanning and to find out whether there is an issue related to RAM. Hence, type in eventvwr in the search bar and open it.
Step 5: Expand the Windows Logs folder.
Step 6: Right-click on System and then select Find.
Step 7: Type in MemoryDiagnostics-results in the bar of the new window and click on the Find Next button.
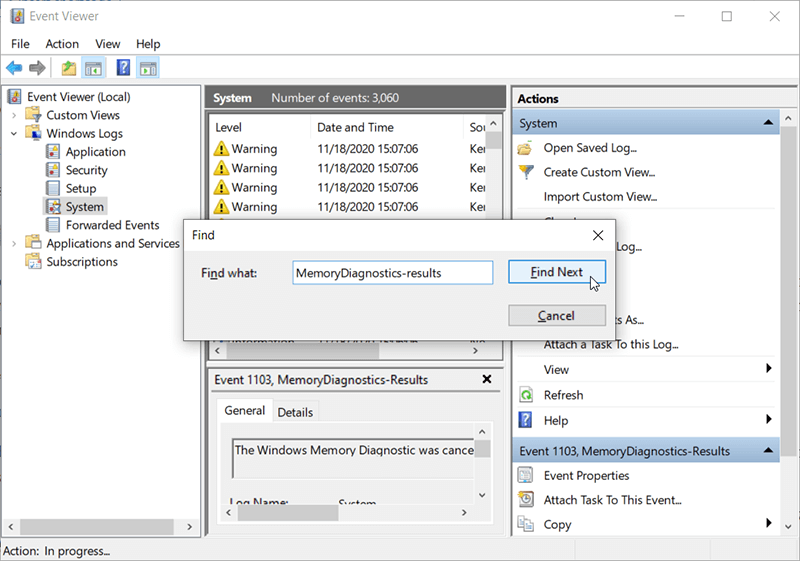
Step 8: Double-click on the Memorydiagnostic-Results option to check the result. If the result says “The Windows Memory Diagnostic tested the computer’s memory and detected no errors,” then there is no problem with RAM.
Step 9: If the result claims that the scanning has found several errors, It’s highly likely that the RAM modules are damaged. To corroborate the result, you can use other test tools to scan your RAM and recheck the result. Once the result is verified, you may need to replace it to avoid the kernel data inpage error.
Solution 11: Change Paging File Management to Automatic
As one of the possible factors for the kernel data inpage error issue, paging file corruption can lead to bad blocks or sectors in a paging file. To fix the problem, you can use these steps:
Step 1: Press Win + E to open File Explorer.
Step 2: Right-click on This PC on the left panel and then select Properties.
Step 3: Click on Advanced system settings on the left part.
Step 4: Switch to the Advanced tab and then click on Settings within the Performance section.
Step 5: Switch again to the Advanced tab and then click on Change within the Virtual memory section.
Step 6: Tick off the box next to the Automatically Managem paging file size for all drives option.
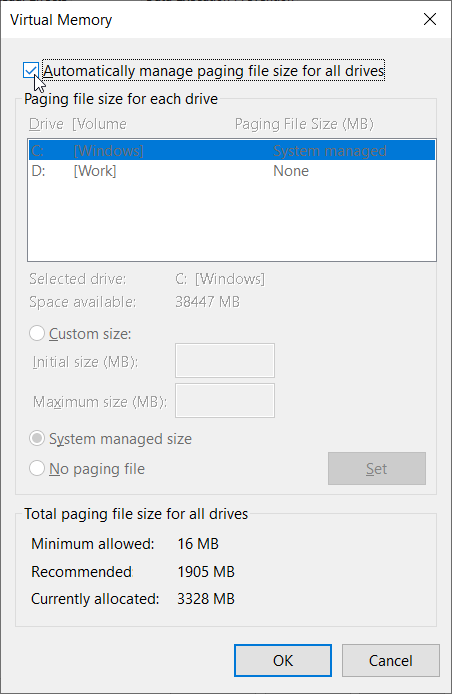
Step 7: Click OK to save the change.
Solution 12: Reboot Windows in Safe Mode
If none of the solutions mentioned above works, Safe Mode may serve your need. It’s a particular way users can use to launch Windows. The aim of Safe Mode is to allow users to troubleshoot Windows and find out the causes behind critical system problems, hence enabling you to solve them. Once problems get solved, you can reboot the computer in the normal way. To boot Windows 10/8.1/8/7 in Safe Mode, you can use these steps:
In Windows 7:
Step 1: Restart the computer and continuously press F8 right after the computer is powered on.
Step 2: You will see a page titled Advanced Boot Options, on which there are three options: Safe Mode, Safe Mode with Networking, and Safe Mode with Command Prompt.
Step 3: Depending on what you need, press F4, F5, or F6 to select one of the three options.
In Windows 8/8.1/10:
Since Windows 8/8.1/10 usually boot more quickly, deterring users from using the traditional way, we can use two other ways to do the trick instead of pressing F8 to boot Windows in Safe mode.
Via Settings:
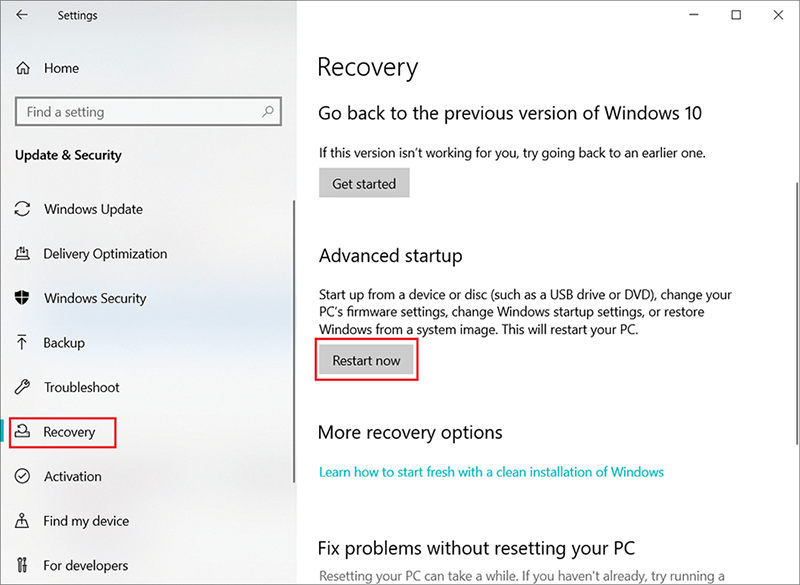
Step 1: Press Win + I to open Settings.
Step 2: Navigate to Update & Security > Recovery > Restart Now
Step 3: After entering the Windows Recovery Environment, navigate to Troubleshoot > Advanced Options – Startup Settings > Restart
Step 4: Based on what you need, select one of the three Safe Mode options.
Via msconfig:
Step 1: Press Win + R to open the Run box. Type in msconfig and press Enter.
Step 2: Switch to the Boot tab and then tick off the box next to the Safe boot option.
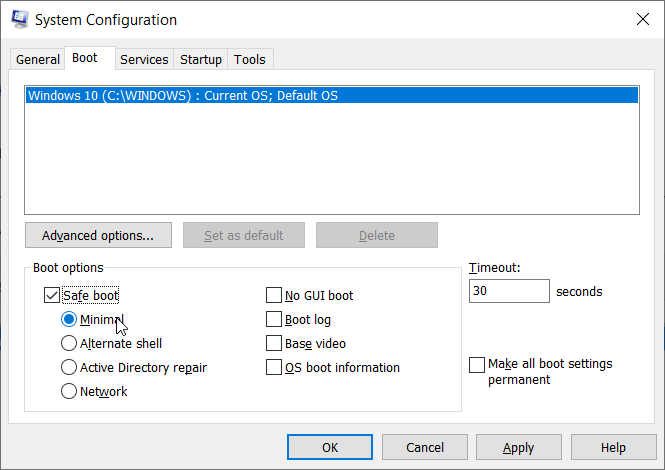
Step 3: Select the desired Safe Mode and click OK.
Step 4: A message will come up, asking whether you want to restart immediately.
Step 5: This change to the settings will make the computer boot in a safe mode every time from now on. To annul it you can uncheck off the box next to Safe boot option.
Conclusion
Kernel data inpage error, one of the Blue Screen of Death (BSOD) error codes, is notorious for inducing computer crashes, cutting short your work, and at times causing vexed data loss issues. It’s usually hard to pin down the main culprit behind this conundrum since there is a staggering list of possible causes.
Hence we post this article, which is intended to include as many feasible and effective solutions as possible, and hope it can help every user to grapple with the error in his/her particular scenario. On top of that, in case you are confronted with some data loss issue, we also introduce a powerful and user-friendly tool, Bitwar Data Recovery, to help recover your significant files.
Previous Article
How to Solve One of Your Disks Needs to Be Checked for Consistency Summary: Have you ever faced Blue Screen of Death (BSOD) accompanied by an error message: kernel data inpage error? The...Next Article
Full Guide to Fix Can’t Access USB Drive Windows 10 Error Summary: Have you ever faced Blue Screen of Death (BSOD) accompanied by an error message: kernel data inpage error? The...
About Bitwar Data Recovery
3 Steps to get back 500+ kinds of deleted, formatted or lost documents, photos, videos, audios, archive files from various data loss scenarios.
Learn More


