7 Solutions to Fix Windows Detected a Hard Disk Problem
Summary: The error message Windows detected a hard disk problem is a more or less common problem that many users run into due to various causes. You can dismiss the message and later the computer still works fine. However, one of the disks is likely failing and the error can entail various and severe harms to the computer if you chose to ignore it. Hence, for users who are persistently annoyed by the problem, this article comprises the 7 useful solutions and the data recovery method for you to walk through.
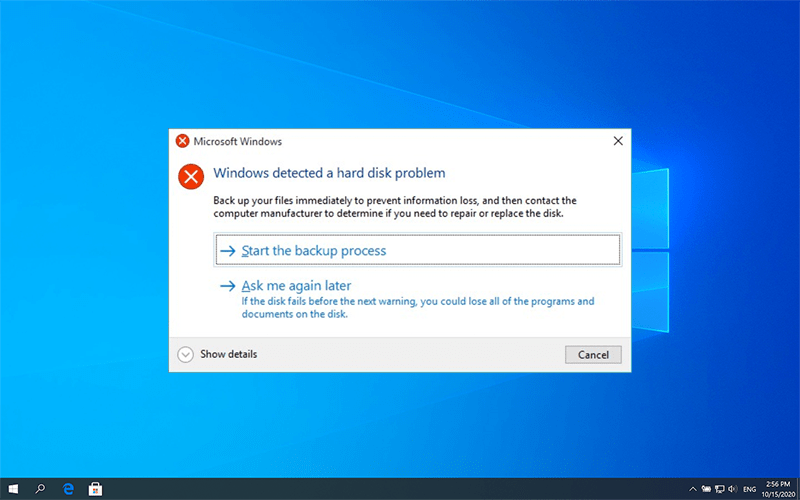
Table of Contents
Possible Reasons for the Error
Usually, hard drive failure is the main culprit. But it has been reported that other causes can generate the error. Below are a few examples:
- Hard disk/drive failure
- System file damage
- Virus attack
- Mechanical or logical error
- Bad sectors on the drive
- Improper human operations
Possible Consequences of the Error
If you encounter the error, below are a few consequences it could result in.
- Blue screen of death
- Computer freezes frequently
- Damage to the system files
- Data loss from the drive
How to tackle Windows detected a hard disk problem
After knowing the possible causes that encounter the Windows detected a hard disk problem error, then please read the solutions carefully and slowly and make sure you have backed up the important data before going through the steps described below.
Solution 1: Use System File Checker
System File Checker is one of the basic tools offered by Windows to help users fix errors. Its main purpose is to help users check system files and tackle integrity issues.
Step 1: Type in Command Prompt in the Search Bar and then choose Run as administrator.
Step 2: In Command Prompt, type sfc/scannow and press the Enter key.
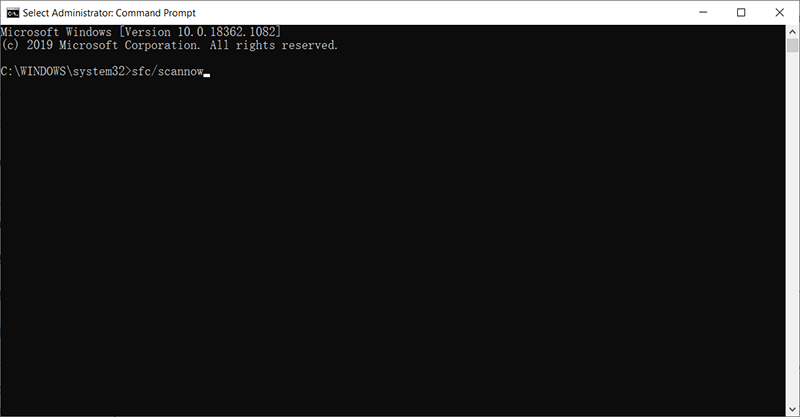
The scanning process should be fast, and the result tells whether there is a system file integrity issue. It scans system files and replaces corrupted ones with the backup stored in the cache. You shouldn’t close the window until the verification has been 100% complete.
Note: If the computer fails to find the system file in the cache, it will ask for a Windows installer to access the inaccessible system file. You can grant permission to allow it to do so.
Solution 2: Run DISM
When your computer is experiencing unexpected issues that you fail to tackle using the SFC command, the next best choice is to use DISM to fix the issues. Note: Before instructing Command Prompt to carry out DISM, you should do a full backup of the important files stored in the disk because the command may alter the data on it.
Step 1: Run the Command Prompt (Admin) from the Start Menu.
Step 2: Enter the following commands in order:
- Dism /Online /Cleanup-Image /CheckHealth
- Dism /Online /Cleanup-Image /ScanHealth
- Dism /Online /Cleanup-Image /RestoreHealth
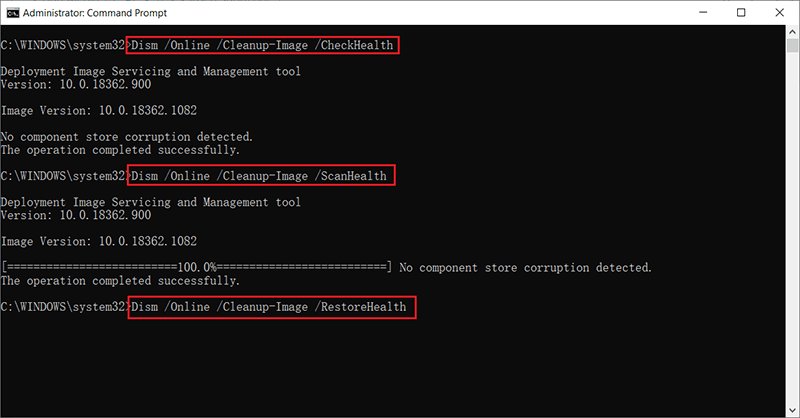
Step 3: After the completion of the process, reboot your computer to save changes.
Solution 3: Run CHKDSK
CHKDSK is a system tool that can be used to check and repair errors for NTFS and FAT file systems. To use the tool, refer to the following steps:
Step 1: Type in Command Prompt in the search bar, right-click on the application and select Run as administrator.
Step 2: Type in CHKDSK /F /R X: You should replace the X with the partition drive letter that you want to check.
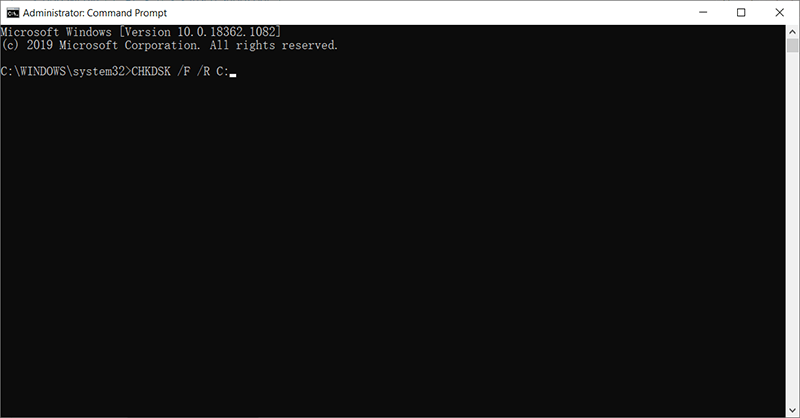
The tool will automatically fix the problem if it detects any issue. After the process has ended, restart the computer.
Note: You should back up those important files before using the command as running CHKDSK risks losing the data on the drive.
Solution 4: Change SATA Configuration
Step 1: Turn off your computer.
Step 2: Power on it and enter into the BIOS setup by pressing the BIOS key, which is set up by your computer’s manufacturer and could be F1, F2, F10, F12, or DEL.
Step 3: Look for the setting called SATA configuration.
Step 4: Click on the brackets next to Configure SATA, and then select AHCI.
Step 5: Press F10 to save the change and exit.
Recover Lost Data Using Bitwar Data Recovery
Many hard disk issues or system failures wind up causing serious data loss problems. So, if you are experiencing Windows detected a hard disk problem, in addition to trying all the solutions recommended above, doing a backup of your data is equally important. However, in case that the data has been lost and the hard drive has stopped working properly, use Bitwar Data Recovery to bring your files back.
First, you need to make sure the hard drive isn’t physically damaged in this way: Press Win + R and type in diskmgmt.msc, check whether the hard drive shows in the Disk Management or not; if yes, you need to follow the below steps as soon as you can to prevent the data from being overwritten by the new data. Reminder: Stop using your hard drive during the scanning!
Step 1: Go to the official website to download Bitwar Data Recovery for Win version and install it.
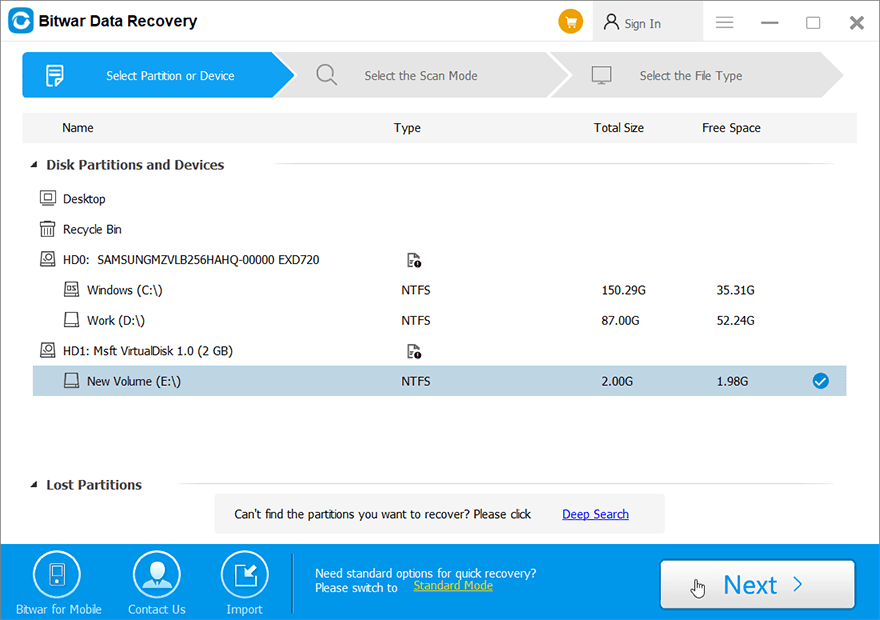
Step 2: Select the disk/partition where your lost files were deleted. Click Next.
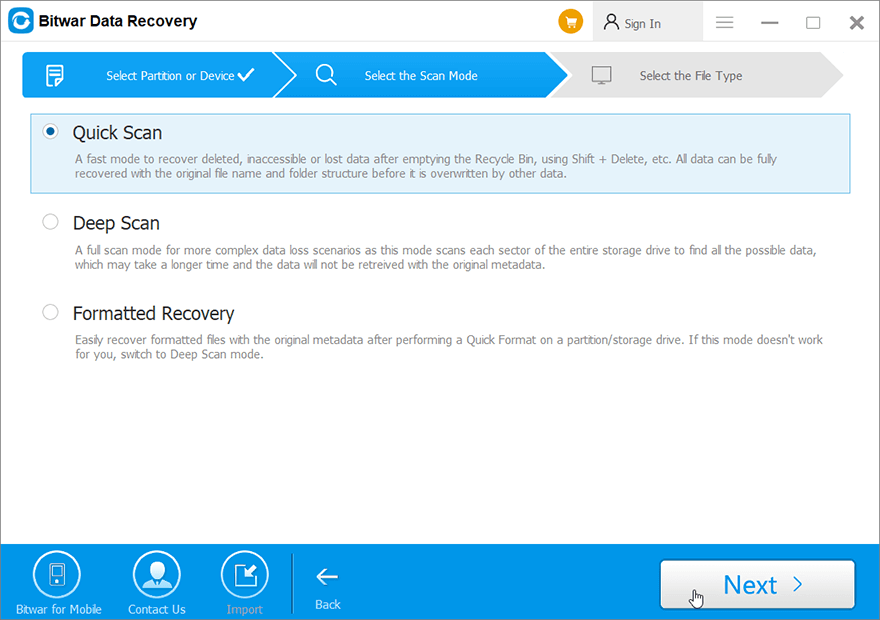
Step 3: Here, we should select a recovery mode. We strongly recommend Quick Mode, in which the whole disk can be scanned in a few minutes. However, if this scan mode doesn’t work on the drive, you can try Deep Scan next time.
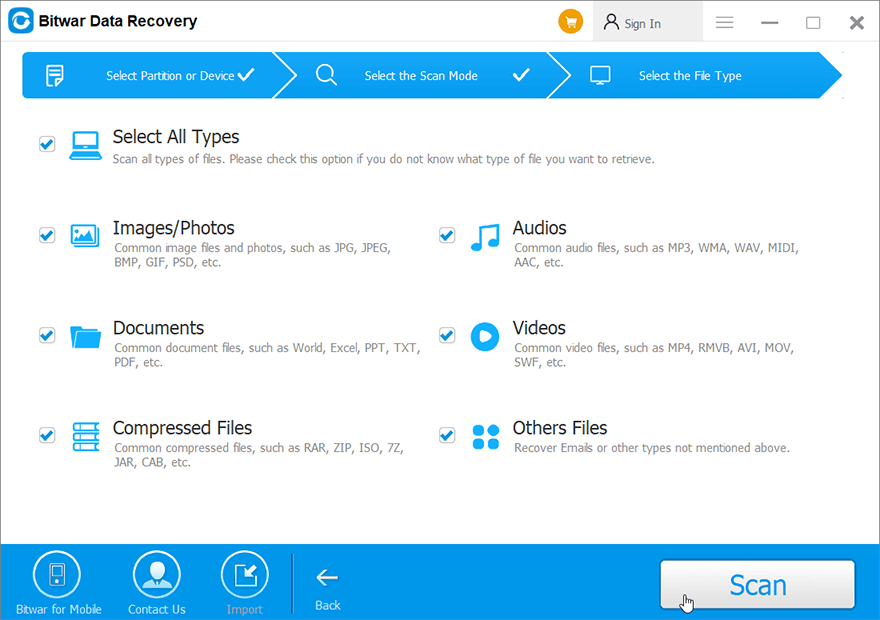
Step 4: Select file types and then click Scan.
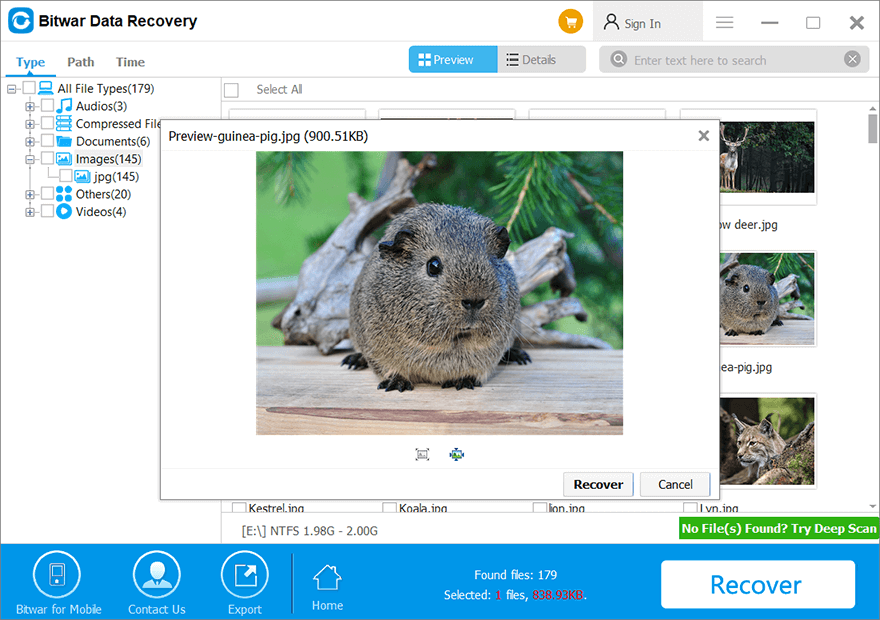
Step 5: Double-click on a file to preview it, and then select the wanted files to be recovered.
Other Workable Solutions Worth A Try
Solution 5: Run an Anti-Virus Program
Since one of the causes of the error is a virus attack, it’s sensible to try running anti-virus software to scan the drive and remove its malicious content and malware.
Solution 6: Check Bad Sectors for the Drive
If the attempts to repair the system and to root out malware fail, you can start to look into the health state of the hard drive. “bad sectors” is a common problem facing many computer users. There are two types of bad sectors, which are often divided into physical and logical bad sectors. To get a comprehensive view of your hard drive, download a reliable third-party tool that helps users check disk heath.
Solution 7: Reinstall Windows (Final Solution)
One of the easiest and outright ways to fix any intractable computer problem is to reinstall the operating system. Make sure that the partition where you are going to install the OS has enough space to store it and that you have backed up all the important files.
How to Disable the Error Message
If you have tried out all the solutions mentioned above and are sure that all your disks are healthy, you may want to disable the Windows detected hard disk problem message. Use the following steps to do so:
Step 1: Press Win + R to open the Run dialog box.
Step 2: Type in Gpedit.msc and click on OK.
Step 3: Navigate to Administrative Templates > System > Troubleshooting and Diagnostics > Disk Diagnostics.
Step 4: On the right page, double-click on the Disk Diagnostics: Configure execution level.
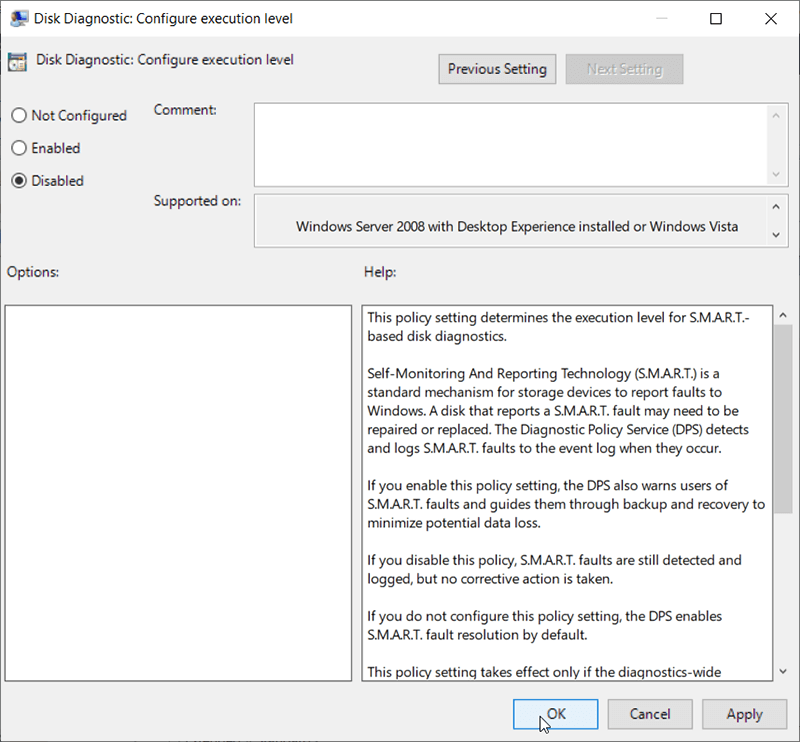
Step 5: Tick off Disabled and click on OK.
Note: In most cases, this is not a solution we would like to recommend because having a feature that warns users of potential drive risks is central to keeping your disk healthy. If your hard drive is experiencing an issue, disabling the error message will definitely worsen the situation. Make sure the error message is completely wrong before disabling it.
Conclusion
This article lays out how to tackle the error of Windows detected a hard disk problem and comprises everything that you need to know related to this error; however, we strongly recommend you not to hurry for fixing the hard disk error before making sure whether you have the important data stored on it, at least, retrieve the data before everything goes wrong. After that, use any solutions mentioned above to get everything right! Remember to backup your data first.
Previous Article
How To Copy Text From Screenshot Summary: The error message Windows detected a hard disk problem is a more or less common problem that many users...Next Article
An Introduction To Internet Protocol Suite Summary: The error message Windows detected a hard disk problem is a more or less common problem that many users...
About Bitwar Data Recovery
3 Steps to get back 500+ kinds of deleted, formatted or lost documents, photos, videos, audios, archive files from various data loss scenarios.
Learn More


