10 Solutions to External Hard Drive Not Detected Issue
Summary: The most frustrating thing is when you are trying to connect the external hard drive with the computer, but it fails to be recognised, and all of the data stored on it cannot be accessed. Don’t worry; this article has comprised the full guide on how to fix the External Hard Drive not detected error and everything you need to take care of.
According to a study, the hard drive failure rates has jumped to 11.8 percent per year. You might be curious why the failure rates can be so high as the hard drive storage technology should be as powerful as enough; however, we’ll have to realize that no matter the top-end hard drive brands such as Toshiba, Seagate, Western Digital, the failure rate is still reaching up to 3.32% per year. And you can find more and more complaints published in many different forums and communities: External hard drive not working/showing up/recognized in Windows 10/8/7.
First of all, we need to calm down immediately and start to troubleshoot why the hard drive stops working if the external hard drive isn’t physically damaged and can be shown in This PC/My Computer/Disk Management, we still have the chance to get the data back.
Hence, we’ve included everything you need to know about the external hard drive not detected error and offered the step-to-step guide that you can easily follow.
Table of Contents
Causes of the External Hard Drive Not Detected Issue
Although the primary concern of this article is to tell users how to tackle the external hard drive not detected issue, it will still be helpful to learn how external hard drives could run into problems and how to prevent risks of making mistakes.
- Corrupted file system
- Accidental interruption of programs
- Remove the external hard drive without safely ejecting.
- Use of malicious programs
- Power Outage/Unstable voltage
- Virus/Malware attacks
- Interruption during firmware updating
- Physical Damage
How to Fix the External Hard Drive Not Detected Issue
Although the causes of the mishap may be too varied to be hunt down, the solutions to fix the external hard drive not detected issue are not complicated as long as the damage is not critical. Here we present seven solutions for users facing the problem to try out.
Solution 1: Check the Connection
Not every disk drive can be connected to a PC with a common USB port, not least those requiring grid power as a prerequisite for activation. If there is an AC power adapter on the drive that you haven’t plugged in the PC, try to connect it with the PC. And if the drive has two USB plugs, make sure that they are all properly plugged in the PC. If you’re lucky enough, the drive will start to work.
Solution 2: Try Another PC (or Another USB Port)
If the previous solution fails you, this is another one to check whether the problem lies in hardware. Connect it with another different USB port, or one of a different standard. For example, If the previous one is a 3.0 USB port, try a 2.0 USB port. If you used a USB hub to connect the drive, try to connect it differently to the computer without the USB hub. You may also connect it to another PC/Operating System, since the problem may lie in the PC.
Solution 3: Update Your Drivers
Driver issues are other possible causes of external hard drive not detected. Refer to the following steps to learn how to check the information about drivers and update them.
Step 1: type Device Manager in Search and open it.
Step 2: Expand the Disk drives tree.
Step 3: Find whether a yellow exclamation mark on the drive’s icon, right-click it, choose uninstall device.
Step 4: After that, right-click on the blank space and choose Scan for hardware changes.
Step 5: If this step fails you, right-click on the external hard drive and choose update driver.

After those proceedings, reboot your computer to see whether the external hard drive not detected issue persists.
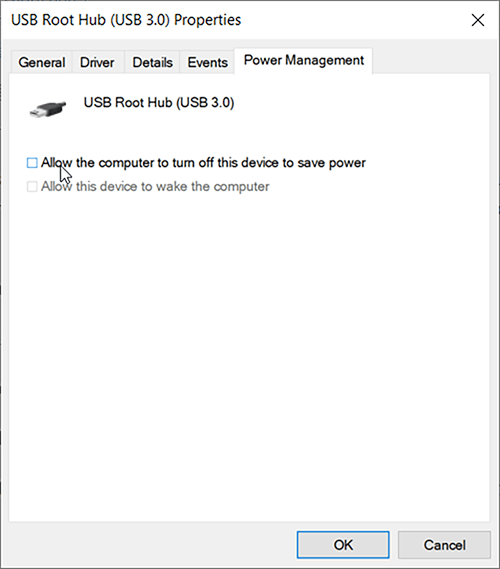
Solution 4: Disallow the System to Save Power
Another common failure that causes external hard drives to fail is multiple devices connected through the same USB hub. In this case, the system may turn off the idle device to save the power, then by disabling this feature in your computer should be able to save the drive from getting suspended:
Step 1: Right-click Start Menu, and then click on Device Manager.
Step 2: Expand the Universal Serial Bus controllers tree.
Step 3: Right-click on USB Root Hub (USB 3.0 or USB 2.0) and select Properties.
Step 4: Click on the Power Management tab.
Step 5: Uncheck the box next to Allow the computer to turn off this device to save power.
Solution 5: Disable USB Selective Suspend Settings
Step 1: Type Control Panel in Search and open it.
Step 2: Navigate to Hardware and Sound > Power Options.
Step 3: Click on Change plan settings on the right page.
Step 4: Click on Change advanced power settings.
Step 5: Expand the USB setting entry and then expand the USB selective suspend settings entry.
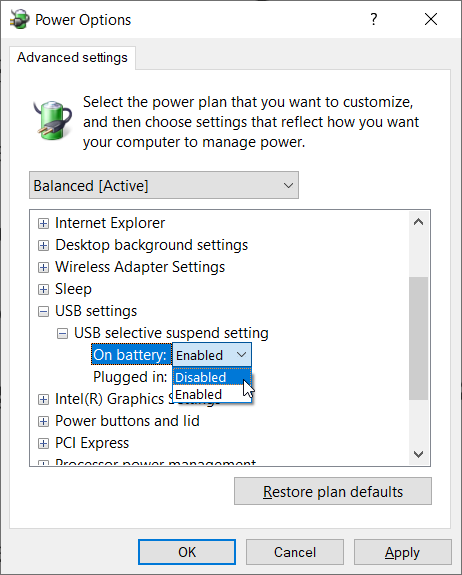
Step 6: Choose Disable from the drop-down menu.
Step 7: Click on Apply.
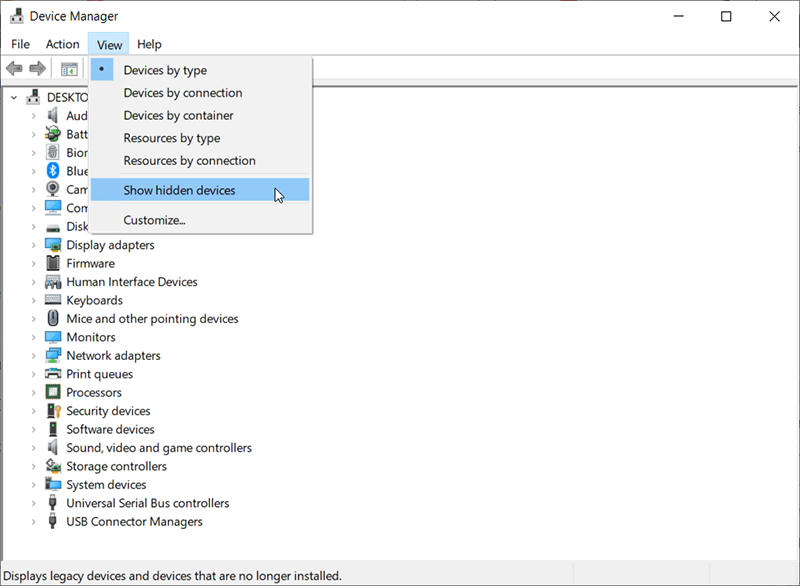
Solution 6: Show Hidden Devices in Device Manager
One possible reason why an external hard drive doesn’t show in File Explorer is that users haven’t shown hidden devices in the Device Manager. Use the following steps to enable the setting.
Step 1: Press Win+ Q to open Search, type in Device Manager, and open it.
Step 2: Click View on the upper-left corner, and then select Show hidden devices.
Step 3: Expand all device trees.
Step 4: Look for any greyed-out entry in the window, right-click on it and click on Uninstall.
Step 5: Restart your computer and check whether the device is shown in File Explorer.
Solution 7: Run Antivirus Software
If the computer has been afflicted with certain nasty malware that is capable of making external hard drives inaccessible or undetectable, you should install a reliable antivirus program to scan the computer and delete those treacherous files. After that, restart your PC and reconnect the external hard drive.
Generally, you should be able to get the external hard drive worked as normal as usual; however, if your external hard drive has turned to a Raw device, the external hard drive is showing up only in Disk Management or the partition has been lost and makes the external hard drive failed to be accessed. Relax, here is still the best external hard drive data recovery software – Bitwar Data Recovery that can be applied to retrieve the vital documents, photos, videos, audio, and archive files in just a few clicks.
How to Recover Data From External Hard Drive
Please remember that the files on the external hard drive are at risk of getting lost as there are many different reasons that can cause the data to be overwritten, especially that if there were a Windows tip asking: Please format the disk in drive before you can use it. Please don’t do it! And Don’t reuse the external hard drive again before getting the files back with the following steps:
Step 1: Go to the website to download and install Bitwar Data Recovery.
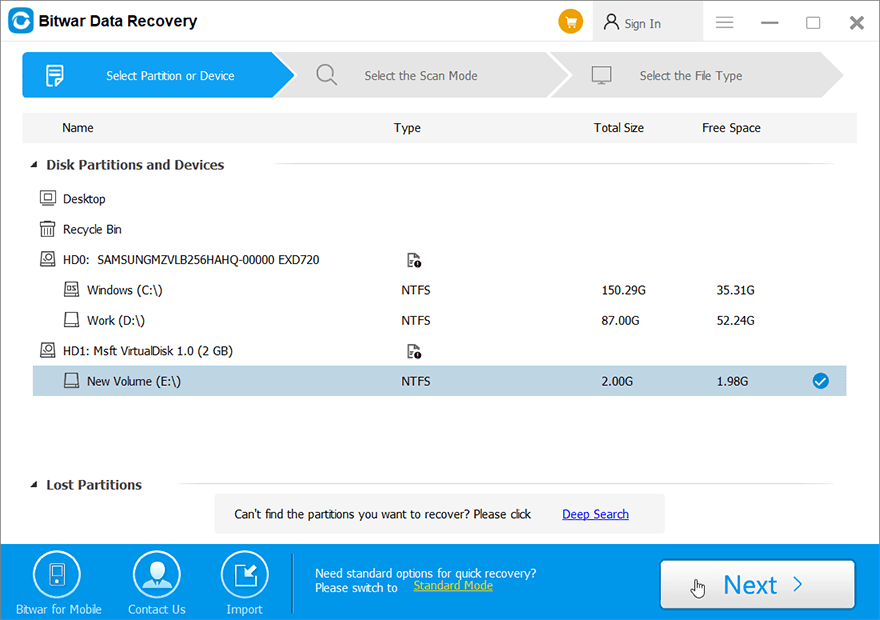
Step 2: Launch the Bitwar Data Recovery software, select the external hard drive on the main interface, and then click on OK.
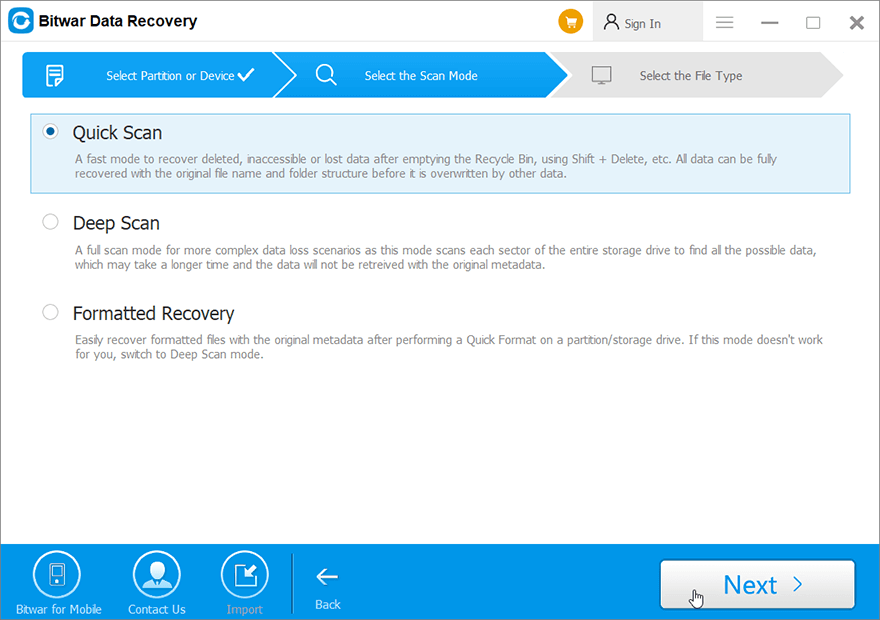
Step 3: Here, we should choose a recovery mode. We strongly recommend Quick Mode, with which the whole drive can be scanned in a few minutes. However, if this scan mode doesn’t work on the drive, you can try Deep Scan next time.
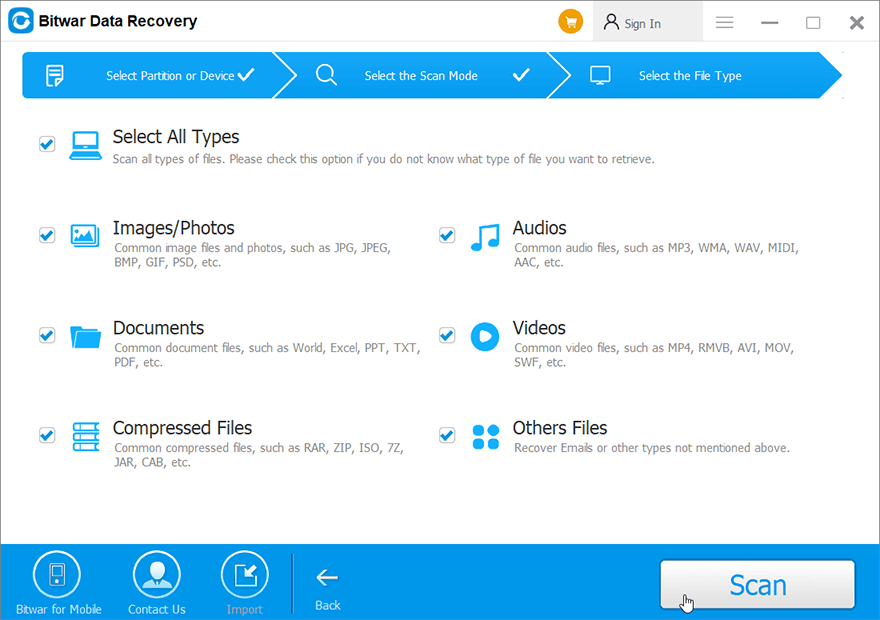
Step 4: Select file types and then press Scan.
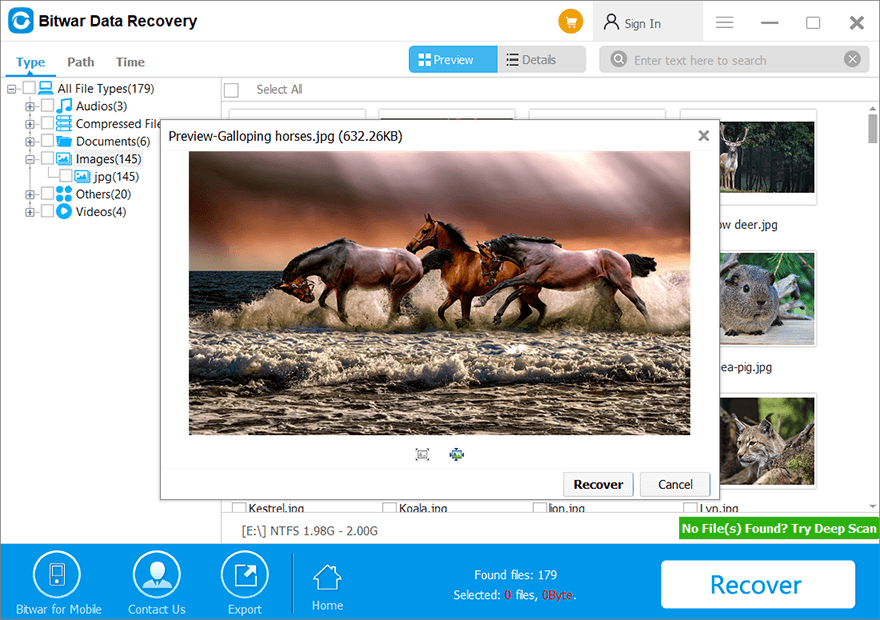
Step 5: Double-click on a file to preview it, and then select the wanted files to be recovered.
Note: Since the later solutions could easily wipe the data out. The users should restore files first on the external hard drive using Bitwar Data Recovery and then move to the next step to get the external hard drive not detected error fixed.
Advanced Fixes
Keep it in mind that the following solutions could cause the data on the external hard drive to get lost. So, before proceeding, make sure that you have manually backed up those files using the Bitwar Data Recovery mentioned above.
Fix 1: One-Stop Repairs in Disk Management
If the external hard drive still wouldn’t appear on File Explorer while powered on, you can open Disk Management right-clicking on the Start Menu and then choose Disk Management, after that, fix your external hard drive
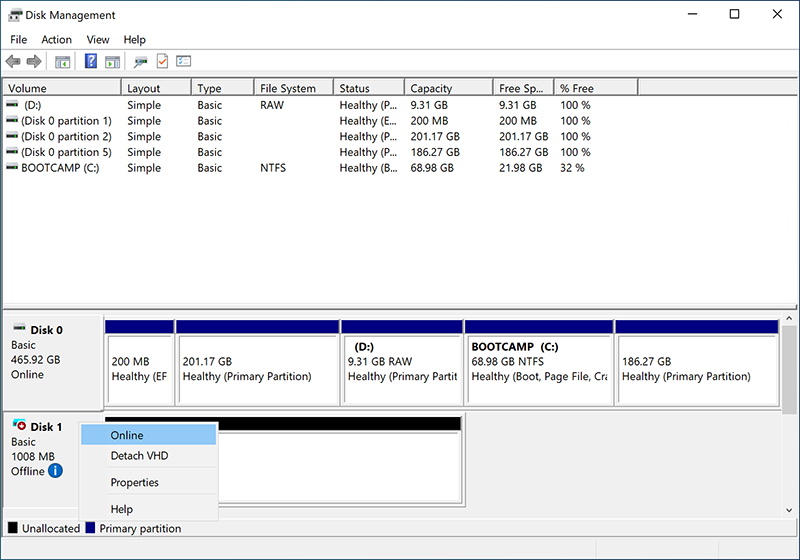
Set the External Hard Drive to Online
If the disk is on the list, check whether it’s online and formatted. If it’s offline, right-click on the name of it and select Online.
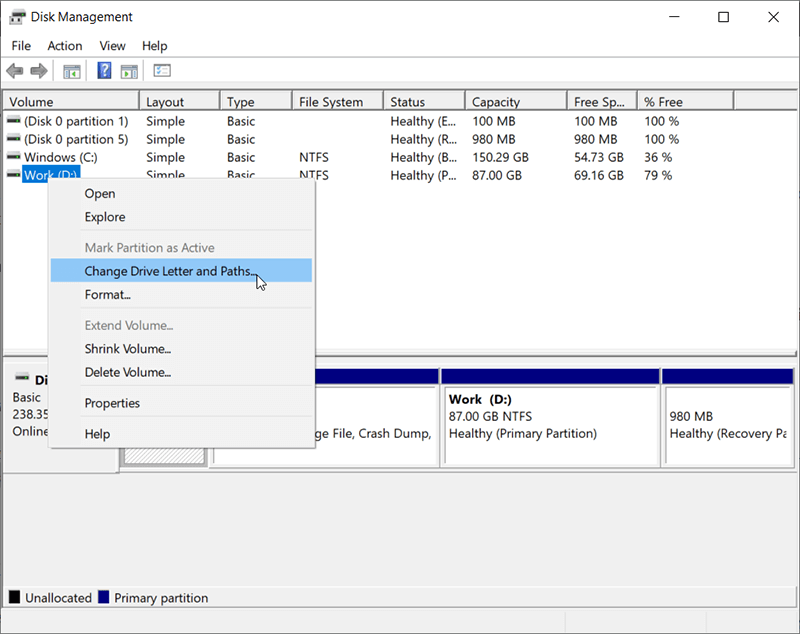
Assign a New Drive Letter
Sometimes a conflict drive letter may also cause the external hard drive not detected, we need to right-click on the drive and select Change Drive Letter and Paths, then grant it a name. With luck, you should get a new drive.
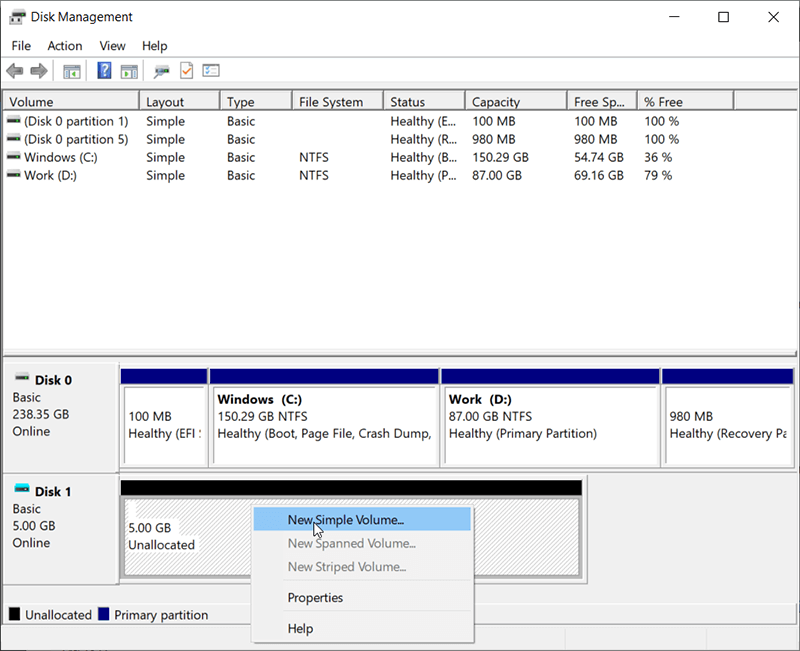
Repair Unallocated Drive
If the drive is shown as unallocated, right-click on it and select New Simple Volume. This will solve the issue if the drive has been formatted for other operating systems.
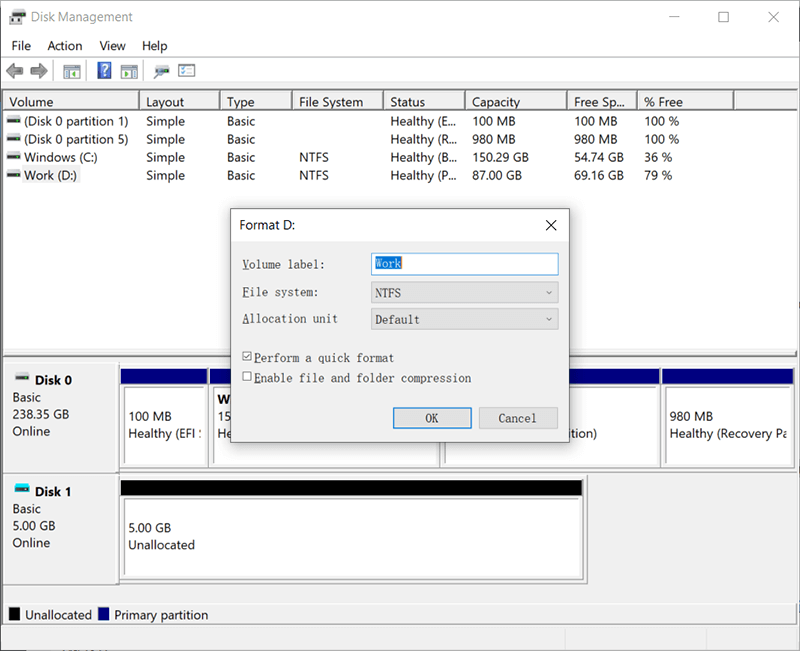
Convert the Raw Drive/Shows 0 Bytes Issue
Right-click Raw partition and then choose Format, select NTFS or other formats to perform a quick format.
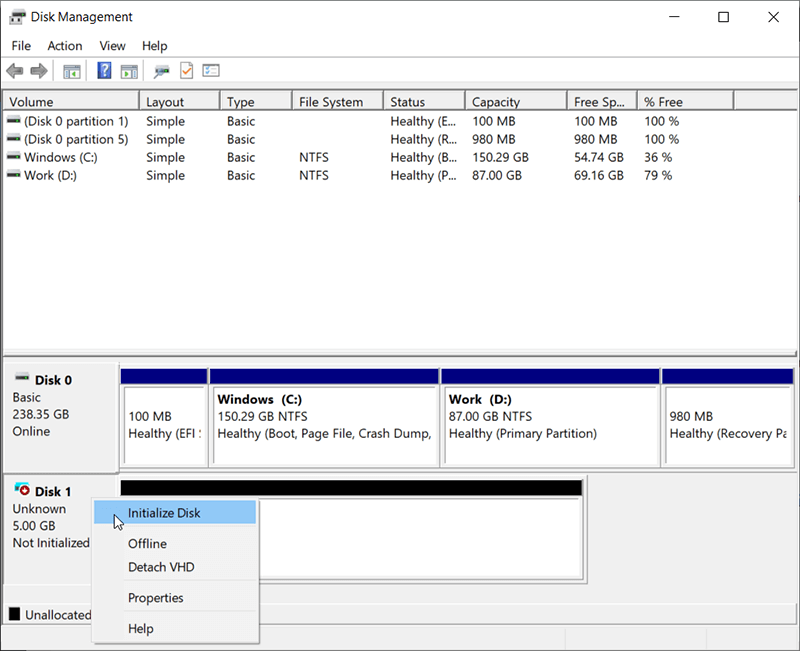
Fix the Disk Not initialized Error
Right-click on the not initialized disk and then choose Initialize Disk, select MBR or GPT accordingly, click on OK.
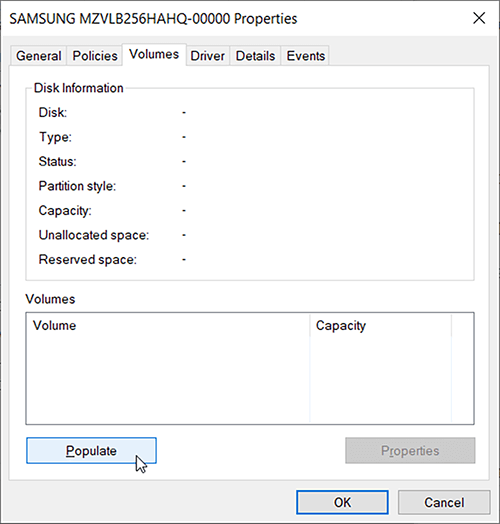
Fix No Media Issue
Step 1: Right-click on the disk and choose Properties in Disk Management.
Step 2: Navigate the Volume, select the no media volume and hit on Properties.
Step 3: After that, navigate the Hardware tab, select the no media drive and choose Properties.
Step 4: Turn to Volume and click on the Populate button.
Fix 2: Reformat the Drive Using Diskpart
Some users may face the problem that the drive does show in Disk Management, but the formatting doesn’t work. If that’s the case, the diskpart solution is worth a try:
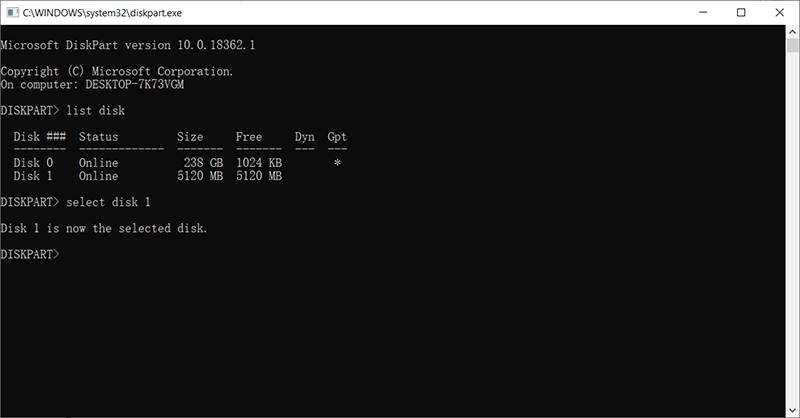
Step 1: Press Win + R to open Run, enter Diskpart.
Step 2: In the Diskpart windows, please type below commands separately:
- list disk
- select disk X (disk X should be replaced with the name of the external hard drive)
- clean
- online disk (If your disk showing as online already, skip to the next command)
- convert gpt (Change GPT to MBR accordingly as your need)
- create partition primary
- format fs=ntfs (Replace NTFS if you want to format in exFAT or other formats)
- assign letter F
- exit
Note: You should be able to see your external hard drive finally showing up in your computer/This PC; however, please be careful that by entering all the above-mentioned commands will erase every bit of data on the external hard drive. Then, it’s very important for you to select the correct disk.
Fix 3: Delete Certain Files in Registry
Since the following steps may put the computer at risk, especially when users inadvertently and irrevocably delete wrong keys in Registry, we suggest you make a backup in case a manual restoration of Registry is necessary.
Step 1: Enter regedt32 in the search bar, open it and click on Yes.
Step 2: Navigate to HKEY_LOCAL_MACHINE\SYSTEM\CurrentControlSet\Control\Class\{4D36E967-E325-11CE-BFC1-08002BE10318}
Step 3: Delete any upperfilter or lowerfilter on the right page.
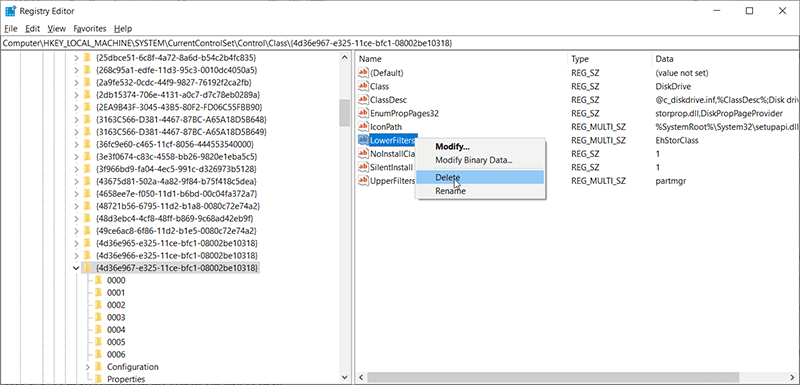
Step 4: Reconnect the external hard drive to see whether it’s accessible.
Ways to restore the backup if any errors encountered
Step 1: Type in Regedit.ext in the search bar and open it.
Step 2: Click on the File tab at the upper-left corner and then select Import.
Step 3: Select the backup file you have saved beforehand.
Step 4: Restart your computer.
Hopefully, the above solutions have already brought your external hard drive back to normal, and we also hope that below extra tips are useful when you have entirely no ideas on how to make a good habit of using the external hard drive.
Extra Tips For Using the External Hard Drive
Avoid Physical Damage
The health status of the external hard drive is subject to several factors, such as temperature, dust, or magnetic materials. This tip is one of the most important you should keep in mind since the damages it causes generally make it impossible to repair the disk or to recover any files from it.
Avoid Overloading an External Hard Drive
One way to keep an external hard drive to work optimally is to regularly remove unwanted files from it, hence keeping its capacity from being stretched to limit and reducing its wear and tear.
Monitor the Health of an External Hard Drive
The health of a drive is an important indicator of possible failure. To monitor its health, users of Windows systems can run a built-in program called chkdsk. Plus, with the help of the S.M.A.R.T. program, users can get comprehensive knowledge about the key aspects of the health of an external hard drive.
Remember to Eject the Drive Before Unplugging It
The external hard drive does not work exactly like the internal hard drive, and even if the computer notifies you that the process associated with the drive has completed, the drive may still be in the process of writing/reading when it is disconnected from the computer. To make sure that every time the drive is safely unplugged, use the Safely remove hardware end eject media icon that lies in the system tray.
Place It on a Proper Surface
Just because the external hard is more portable than some other drives doesn’t mean that we can place it on any surface when it’s running, not least on rough places that can cause vibrations. Materials such as paper, cloth, towels, or other cloth items should be avoided.
Back up the External Hard Drive
Some users may use an external hard drive for backup and delete original files because of the reliance on the drive. That’s imprudent since external hard drives can and do fail and they seldom make any warnings. So, make sure that the data stored on an external hard drive is always duplicated and stored in other places.
Conclusion
Given its popularity and storage capacity, the external hard drive is a highly reliable and dominant storage device. Many users may take it for granted that once they connect an external hard drive to a computer, it should appear in File Explorer. That situation holds true in most cases until one day, the External Hard Drive not detected issue occurs. This is a relatively common issue among external hard drive problems.
When an accident occurs, the first thing is staying calmly and don’t rush to reuse the external hard drive, and then remember to recover the data stored on the external hard drive before following the solutions laid out in this article, you should be able to fix most of the drive recognition issues.
Previous Article
How To Convert Word To Image on Computer Summary: The most frustrating thing is when you are trying to connect the external hard drive with the computer, but...Next Article
Something You Need To Know About Sound Card Summary: The most frustrating thing is when you are trying to connect the external hard drive with the computer, but...
About Bitwar Data Recovery
3 Steps to get back 500+ kinds of deleted, formatted or lost documents, photos, videos, audios, archive files from various data loss scenarios.
Learn More


