Effective Solutions to the kernel_security_check_failure Error
Summary: Many Windows users are used to a problem where their computer randomly shuts down, displaying a BSOD (Blue Screen of Death) error with a code: KERNEL_SECURITY_CHECK_FAILURE. When a BSOD error comes up, Many central files on your computer don’t remain the same again. No user likes to be interrupted when working on a very important assignment to be delivered within a pressing timeframe. To help you tackle this particular BSOD problem, we will lay out several solutions to it. Besides, if you are running into any data loss issue accompanying this issue, you could always turn to Bitwar Data Recovery for help.
Table of Contents
What Are the Causes of KERNEL_SECURITY_CHECK_FAILURE?
The error of KERNEL_SECURITY_CHECK_FAILURE may happen due to:
- Outdated drivers
- Virus attacks
- Corrupted or damaged hard drives
- Memory problems
- corrupted Windows system
BSOD errors not only lead to a loss of progress and data but, in this case, also prevent an affected user from using malfunctioning programs. On the other side, the KERNEL_SECURITY_CHECK_FAILURE error, like many BSOD ones, is completely fixable. but there is no one universal cause behind this problem, there are quite a few different things that can bring about this problem, as we have mentioned above. Hence you could refer to the following solutions to try and resolve this problem:
How To Solve the Error of KERNEL_SECURITY_CHECK_FAILURE?
Solution 1: Change the Default Graphics Processor
In most cases, the malfunctioning computer has two graphics cards. the cause of this problem is that some programs the affected user tries to launch immediately before they run into this error are trying to use the integrated graphics processor instead of the more powerful NVIDIA GPU. If that is the case, you can solve this error by simply changing the default graphics processor for any and all applications. Hence, only users with computers that have both an Intel HD graphics processor and an NVIDIA GPU can use this solution. Refer to the following steps to learn how it works:
Step 1: Right-click on the shortcut to the program that triggers the error of KERNEL_SECURITY_CHECK_FAILURE.
Step 2: Click on Run with graphics processor on the dropdown menu.
Step 3: Click on the Change default graphics processor option.
Step 4: The NVIDIA Control Panel will pop up in the right section and have the malfunctioning application selected.
Step 5: Bring up the dropdown menu under Select the preferred graphics processor for this program.
Step 6: Click on the High-performance NVIDIA processor option on the dropdown menu to select it.
Step 7: Click Apply to save the changes you have made.
Step 8: Restart your computer.
After your computer has booted up, launch the malfunctioning application for which you just changed the default graphics processor and check whether it runs successfully. If you see the KERNEL_SECURITY_CHECK_FAILURE error again, try one of the other solutions listed and described.
If this error is affecting more than one program on your computer, you should repeat the process described above for every single one of those programs.
Solution 2: Update Your NVIDIA GPU’s Driver
One of the other causes of this issue that concern related to GUP is a bug in the version of your NVIDIA GPU’s driver software that has been installed on your PC. Many versions of driver software released for NVIDIA GPUs have harbored this bug, and this bug has, in turn, ravaged the computer. If it turns out that this issue is being caused by a specific version of your NVIDIA GPU’s driver that your computer has, the easiest way to fix it should be to update the GPU’s driver software to the latest version. Use the following steps to do so:
Step 1: Navigate to the NVIDIA GeForce website using a browser.
Step 2: Click on Drivers.
Step 3: In the Manual Driver Search section, choose the kind of NVIDIA GPU that you have, its series and exact model number, the Operating System, and your preferred language, and then click on Start Search.
Step 4: The search will show the four most recently-released drivers for your NVIDIA GPU. Click any one of them.
Step 5: Click Agree & Download.
Step 6: Download the installer for the driver.
Step 7: After the installer for the driver is downloaded, launch it and follow the instructions it shows to install the latest version of your NVIDIA GPU’s driver software. During the installation, the installer will uninstall the older driver on your computer and install the latest one.
Step 8: After the upgrade has been successful, check whether the issue has been fixed.
Solution 3: Roll Back the Driver
In some cases, the specific version of a device’s driver might be at fault, hence the solution is to roll back the driver to an older version. The advantage of older versions of driver software is that they are pretty stable. If Solution 2 fails to work because there were no available updates for your NVIDIA GPU’s driver, you may try solving this problem by rolling back to an older but more stable version of your NVIDIA GPU’s driver. If you want to solve this issue by rolling back to an older version of the NVIDIA GPU’s driver, use the following steps:
Step 1: Right-click on the Start Menu button and then select Device Manager.
Step 2: Double-click on the Display Adapters tree to expand it.
Step 3: Right-click on your NVIDIA GPU driver.
Step 4: Click on Properties on the dropdown menu that comes up.
Step 5: Switch to the Driver tab.
Step 6: Click on Roll Back.
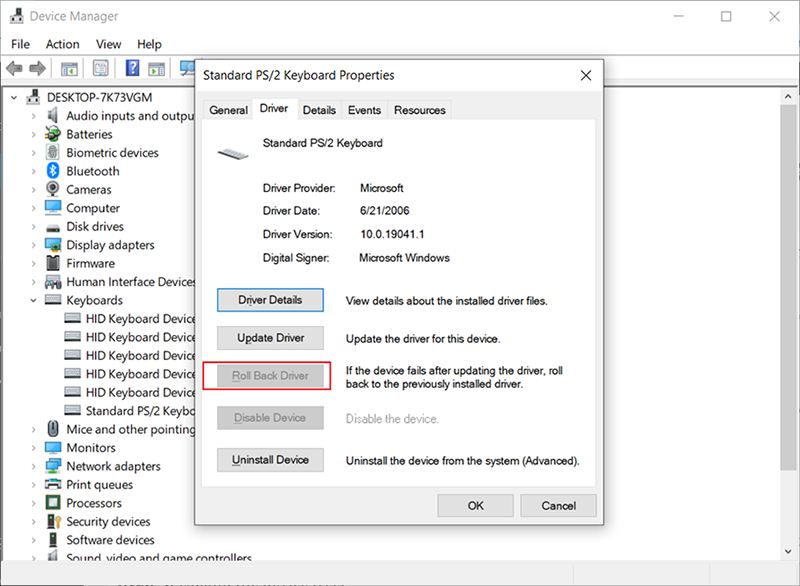
Step 7: Click on Yes.
Follow the on-screen instructions to roll back your NVIDIA GPU’s driver to the version that was previously installed on your PC.
Solution 4: Delete the sniffer.exe file
For users facing this issue who in particular ran into it when launching Photoshop, they can try fixing this issue by deleting a file named sniffer.exe (or sniffer_gpu.exe) from the directory where Photoshop is stored. Use the following steps to do so:
Step 1: Press the Windows + E to launch the File Explorer.
Step 2: Navigate to the following directory:
Step 3: Locate a file named exe. The file may also, in some cases, be named sniffer_gpu.exe.
Step 4: Move this file to your Desktop.
Step 5: Restart your computer.
Step 6: After your computer has booted up, try launching Photoshop. If Photoshop runs successfully and the KERNEL_SECURITY_CHECK_FAILURE error doesn’t pop up, delete the sniffer.exe (or sniffer_gpu.exe) file from your Desktop.
How to Recover Lost Files Using Bitwar Data Recovery
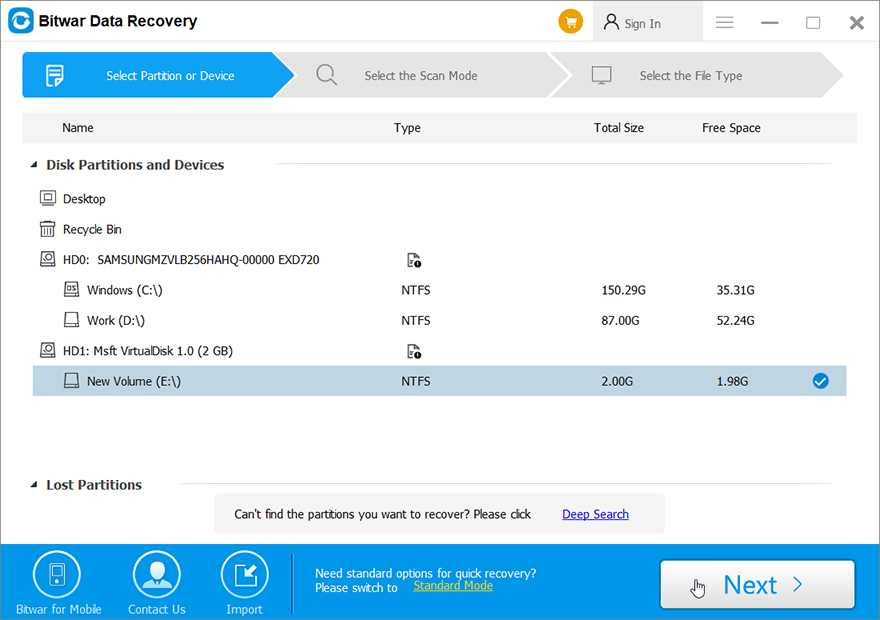
The KERNEL_SECURITY_CHECK_FAILURE error can cause a blue screen, which may later lead to data loss on your PC. Imagine a scenario when you are working on a critical work file, and suddenly your PC brings up a BSOD error, triggered by the KERNEL_SECURITY_CHECK_FAILURE. The file you were working on will be lost, and you will have to work on a new file again. This can be a grievous inconvenience. Fortunately, a data recovery tool like Bitwar Data Recovery can help you recover the lost files. It will scan your computer to look for lost and deleted files and then recovers them. Refer to the following steps to learn how it works.
Step 1: Go to our official website, download Bitwar Data Recovery and then install it on your PC.
Step 2: Open the tool, choose the disk drive where your lost files were stored, and then click Next.
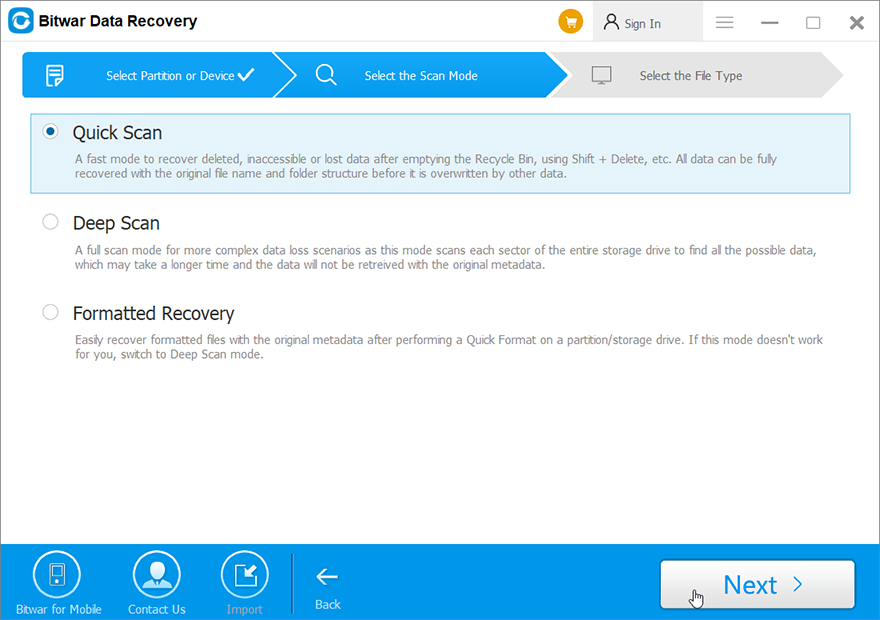
Step 3: You can select a scan mode in this stage. We would like to recommend Quick Scan, which can retrieve a healthy number of lost files. If it fails, you can re-run the program again and choose Deep scan, which is more effective.
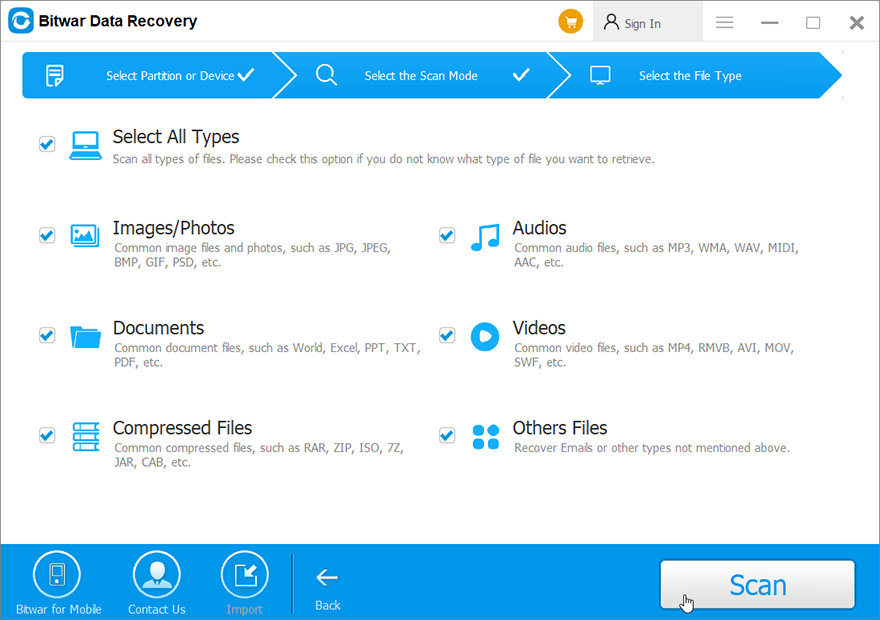
Step 4: Select the types of files you want to bring back and click Scan.
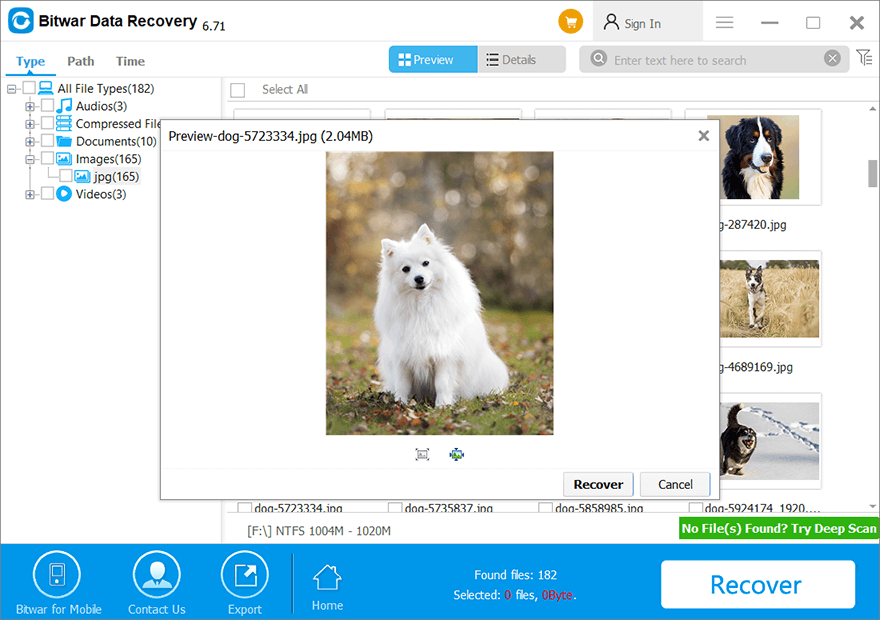
Step 5: Preview desired files and see their intactness. Select those intact files and then click Recover.
Conclusion
KERNEL_SECURITY_CHECK_FAILURE is a common BSOD error that can lead to serious consequences. It can afflict the health of your device and may well trigger the loss of your valued data. The article above discusses the causes of the error and several solutions to it. To recover the lost data due to the error, you can choose an effective and user-friendly data recovery program like Bitwar Data Recovery.
Previous Article
How to Fix the These Items Are Too Big to Recycle Error Summary: Many Windows users are used to a problem where their computer randomly shuts down, displaying a BSOD (Blue Screen...Next Article
6 Effective Solutions to the PAGE_FAULT_IN_NONPAGED_AREA Error Summary: Many Windows users are used to a problem where their computer randomly shuts down, displaying a BSOD (Blue Screen...
About Bitwar Data Recovery
3 Steps to get back 500+ kinds of deleted, formatted or lost documents, photos, videos, audios, archive files from various data loss scenarios.
Learn More


