6 Effective Solutions to the PAGE_FAULT_IN_NONPAGED_AREA Error
Summary: For many computer users, Windows is a user-friendly OS. But, despite that, it has lots of BSOD (Blue Screen of Death) errors that can drive you crazy. The PAGE_FAULT_IN_NONPAGED_AREA is one of the most common BSOD errors you can run into while using your PC. When this error occurs, it will automatically shut down your computer and turn the background of your computer’s screen into blue, along with a stop error code. But, the good news is that we will expound on several solutions to it in this article. Besides, If you run into data loss problems triggered by this error, you could always turn to Bitwar Data Recovery for help.
Table of Contents
The Causes of PAGE_FAULT_IN_NONPAGED_AREA
There could be multiple causes of this error:
- The Nonpaged area causes the impairment of crucial data for system operation. The error happens when your PC can’t find the data that should be in the nonpaged area.
- Page Fault In Nonpaged Area error could also happen when some incorrect system service or wrong driver code is installed on the PC.
- You can run into the error if there is faulty hardware on the PC.
- Corrupted NTFS and antivirus software could well be the culprit.
- Damaged or corrupted system files
How to Solve the PAGE_FAULT_IN_NONPAGED_AREA Error
Solution 1: Recreate Page File
To speed up your system, your computer uses disk space on your hard drives. For this purpose, it creates a page file that it refers to for speedy access to your frequently used procedures. Hence, disabling the page file can help get rid of the issue. To do so, use the following steps:
Step 1: Press Windows Key + R to open the Run box. Type in SystemPropertiesAdvanced.exe and then press Enter to open it.
Step 2: In the System Properties window, switch to the Advanced tab.
Step 3: Within the Performance section, click on Settings. Then switch to the Advanced tab on the new window that pops up.
Step 4: Click on the Change button within the Virtual memory section.
Step 5: Uncheck the box next to the Automatically manage paging file size for all drives option.
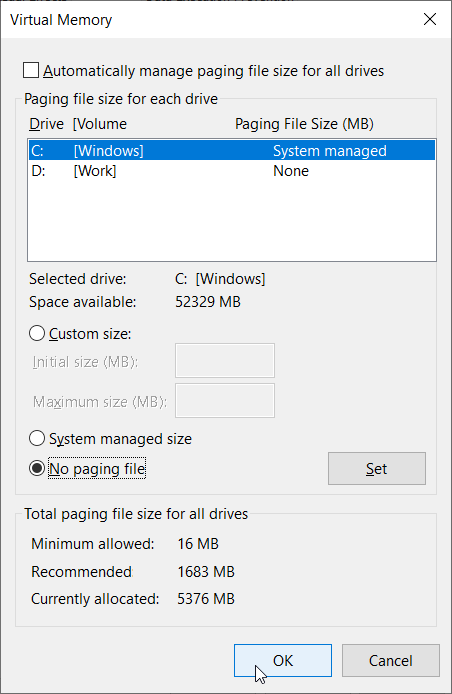
Step 6: Select No paging file. Click on Set and confirm any warning message. Click OK > OK > OK to exit all windows. Reboot your system.
After you have rebooted the computer, repeat the above-mentioned steps to go back to Virtual Memory. select System managed size and then click Set. Tick off the Automatically manage paging file size for all drives box at the top. Click OK > OK > OK to exit all windows and reboot your system. After that, Any corrupt chunk in the page file should be deleted. However, If you’re still getting the BSOD error, move on to the next solution.
Solution 2: Run Chkdsk
Chkdsk is a disk checking utility offered by Windows that is designed to help users to search and fix errors in the file system. Refer to the following content to learn how to use it.
Step 1: Type in cmd in the search bar, right-click on cmd and then choose Run As Administrator.
Step 2: Type in the following command and then press Enter.
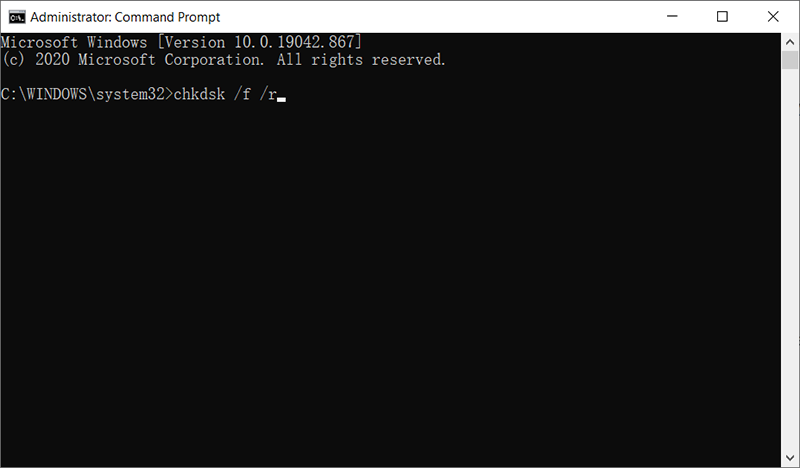
Step 3: Wait for the command to finish. If you get a message that reads “The drive is locked and if you would like to schedule a chkdsk on the next restart, type in Y for yes”, type in Y, and then press Enter.
Step 4: Restart your computer and let the chkdsk command run. It will automatically detect and fix errors it finds.
Solution 3: Update Windows
Microsoft also keeps releasing updates to fix these errors. So a healthy number of computer issues can be solved if you just update your Windows. Use the following steps:
For Windows 7 and 8:
Step 1: Press Windows key + Q to open the search bar and type in check for updates. Click Check for updates in the search results.
Step 2: Let the PC check for updates for your computer and make sure that you have all of them installed.
For Windows 10:
Step 1: Press Windows Key + R to open the Run Box. Type in ms-settings:windowsupdate and then press Enter.

Step 2: Now check for updates for your PC and make sure that you install all of them.
Solution 4: Run SFC
As we have mentioned before, damaged or corrupted system files could be another cause of the PAGE_FAULT_IN_NONPAGED_AREA error. To cope with this sort of problem, there are two programs you can use, one of which is SFC. This tool well known for its ability to look into all of the important system files on your PC and replace any faulty files it finds with healthy ones. Use these steps to run an SFC scan:
Step 1: Press Win + Q. type in Command Prompt, right-click it, and then choose Run as administrator.
Step 2: In the command prompt window, type in the following command and then press Enter.
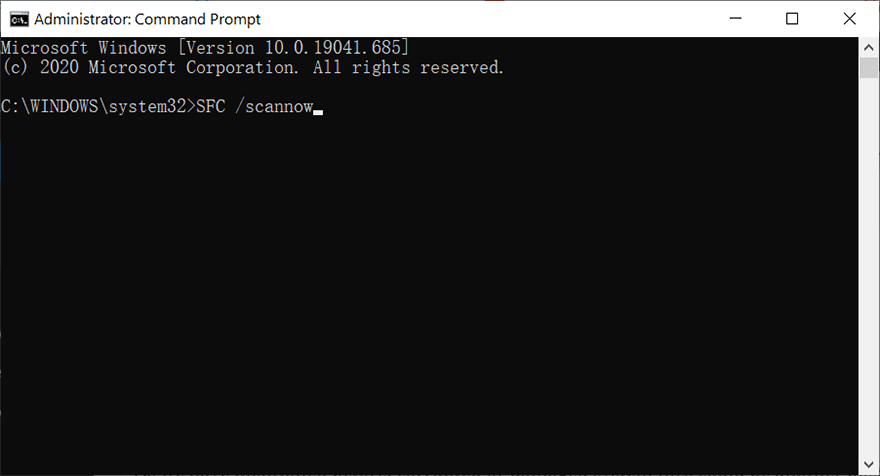
Step 3: Restart the computer to check if the problem is fixed.
Solution 5: Run DISM
If SFC doesn’t work, there is another working tool, DISM, which users can use when faced with the problem of corrupted or damaged system files. DISM, short for Deployment Image Servicing and Management, is designed to fix some thorny problems that SFC can’t. Refer to these steps to learn how to run DISM:
Step 1: Type in Command Prompt in the search bar, right-click on it and then choose Run as administrator.
Step 2: Type in the following command line in order and then press Enter at the end of each line.
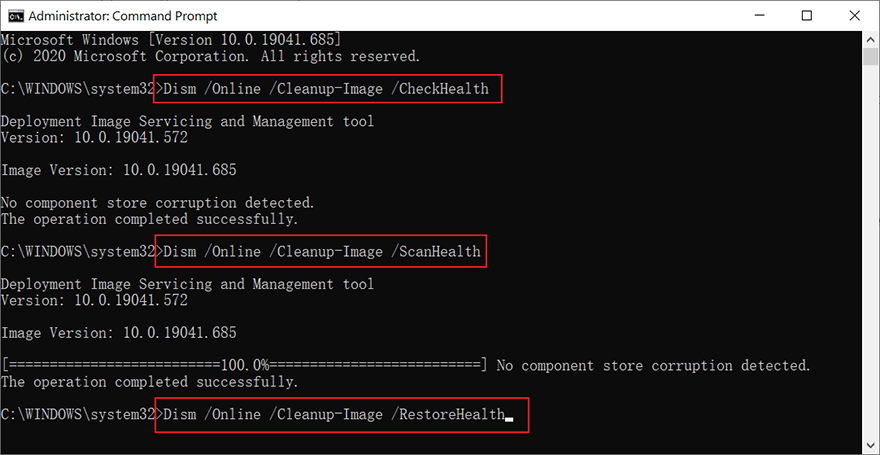
Step 5: After the process is complete, restart your PC to see if this solution works.
Solution 6: Windows Memory Diagnostic
RAM is the chief component that is used for paging. A Faulty RAM could well trigger the PAGE_FAULT_IN_NONPAGED_AREA error. In this case, you can try using the Windows Memory Diagnostic tool to fix the problem. Use these steps:
Step 1: Press Windows key + R to open the Run box.
Step 2: In the run dialog type in mdsched.exe and then press Enter.
Step 3: A dialog box will come up asking whether you want to reboot and check RAM now or later. Click on the option that suits you better.
How to Recover Lost Files Using Bitwar Data Recovery
Has your computer ever ended up losing some important files due to the PAGE_FAULT_IN_NONPAGED_AREA error? Don’t worry! With the help of Bitwar Data Recovery, getting back unsaved or lost data on the computer is pretty easy and quick. You can use this powerful data recovery software to rescue any type of file, including photos, videos, audio files, documents, etc. Refer to the following steps to learn how it works like magic.
Step 1: Visit our official website to download Bitwar Data Recovery and install it on your PC.
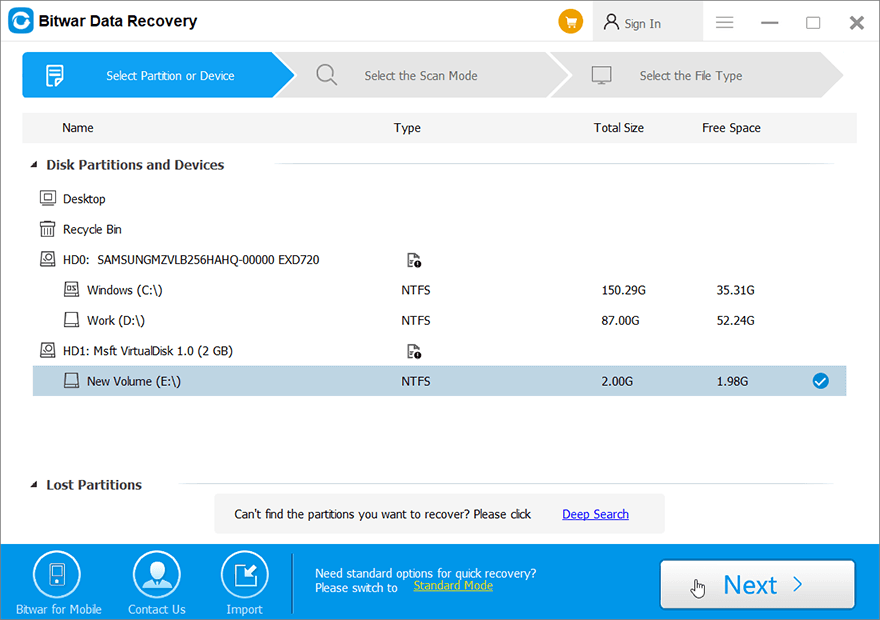
Step 2: Open the program and select the drive where the lost files were stored and then click on Next.
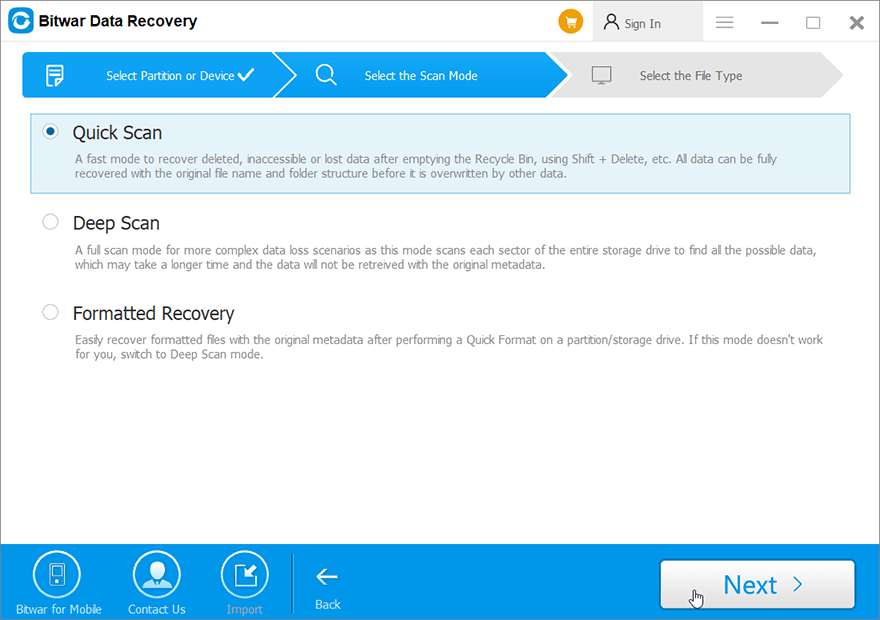
Step 3: Select a scan mode in this phase. We would like to recommend Quick Scan, which is able to retrieve a healthy number of lost files. If it fails to work, you can re-run the tool and use Deep scan, which is more effective.
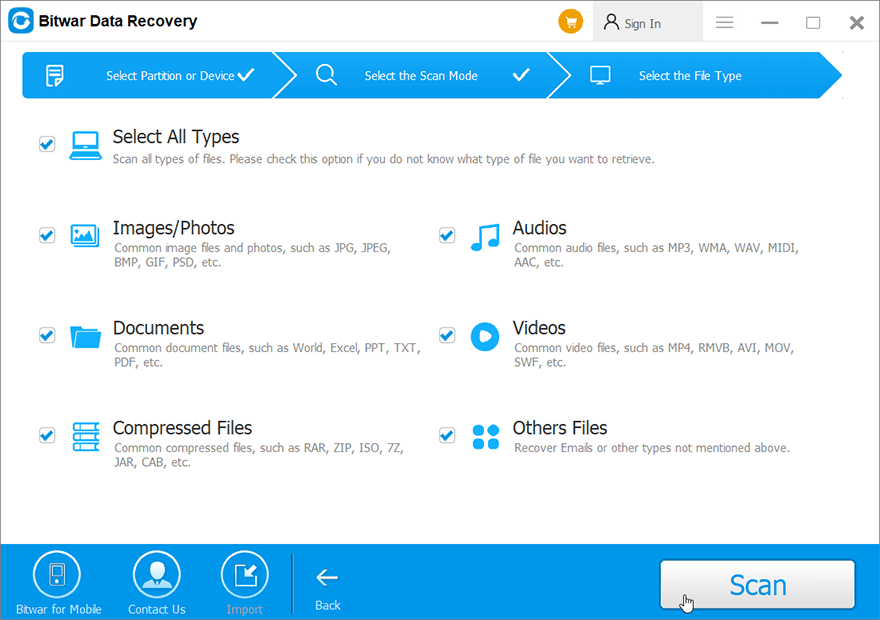
Step 4: Choose the types of files you want and then click Next.
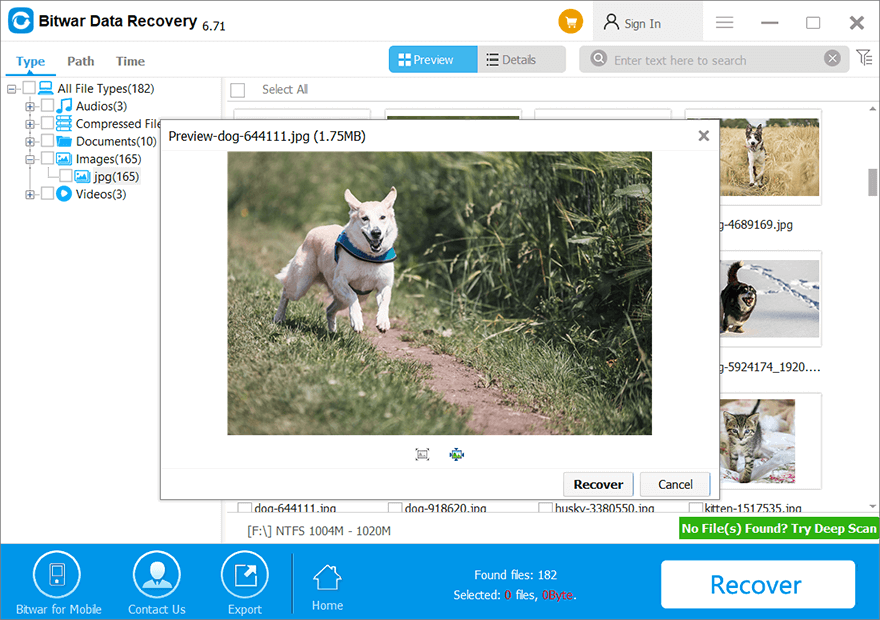
Step 5: Preview wanted files to check their intactness. Select then and then click Recover.
Conclusion
Ultimately, after reading this article, you should know how to fix the PAGE_FAULT_IN_NONPAGED_AREA error. As you can see, there are several solutions to this error, so there is no need for you to panic if running into it. Just try the aforementioned methods one by one until the error is thoroughly solved. Besides, if you encounter any data loss problems, don’t forget to use Bitwar Data Recovery to rescue your lost or unsaved files with ease.
Previous Article
Effective Solutions to the kernel_security_check_failure Error Summary: For many computer users, Windows is a user-friendly OS. But, despite that, it has lots of BSOD (Blue Screen...Next Article
6 Methods of Solving the Error Code 0xc0000225 in Windows Summary: For many computer users, Windows is a user-friendly OS. But, despite that, it has lots of BSOD (Blue Screen...
About Bitwar Data Recovery
3 Steps to get back 500+ kinds of deleted, formatted or lost documents, photos, videos, audios, archive files from various data loss scenarios.
Learn More


