How to Fix the BSOD Error 0x00000024
Summary: In this article, we will expound on several solutions to one of the BSOD stop error messages, 0x00000024. It’s notorious for being both persistent and intractable. To tackle this problem users sometimes need to try out several solutions, inevitably involving the possibility of data loss. So, to help users to rescue those inadvertently deleted files, we also introduce an effective and user-friendly program, Bitwar Data Recovery, and delineate how to use it.
Table of Contents
What Causes the BSOD Stop Error 0x00000024?
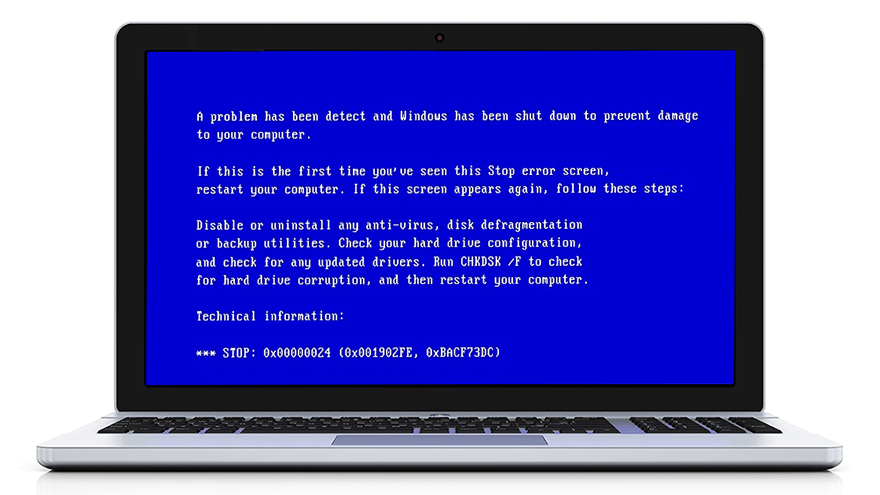
BSOD, shorthand for Blue Screen of Death, is generally triggered by various and multiple system errors. Although it’s nearly impossible to get your head around the leading cause of this problem by poring over the message on the blue screen, BSOD always presents some stop error messages, for example, 0x00000024, which signals that the operating system has been failing to show the correct image. With the stop error message showing what the problem is, we have managed to narrow down its possible causes and put down a list of them:
- Virus and malware attack.
- Logical errors related to SSD/HDD.
- Outdated/ corrupted device drivers.
- Corrupted or damaged system files/ hard disks.
- RAM corruption
- Windows registry corruption
- incompatibility between the software and the computer.
Read more: Solutions to BSOD problems with other stop error codes
Basic Solutions to the BSOD Stop Error 0x00000024
Solution 1: Update/Reinstall Device Drivers
Since outdated or corrupted device drivers are reportedly able to trigger this problem and fixing driver-related problems isn’t tricky compared to other cases, the first step we would like to recommend is to update or reinstall device drivers. Several users reported that after reinstalling or manually updating certain drivers, the error stopped annoying them. If you can’t decide which drivers you should update and reinstall, try looking into the device drivers and graphics drivers. Use these steps to update/reinstall a device driver:
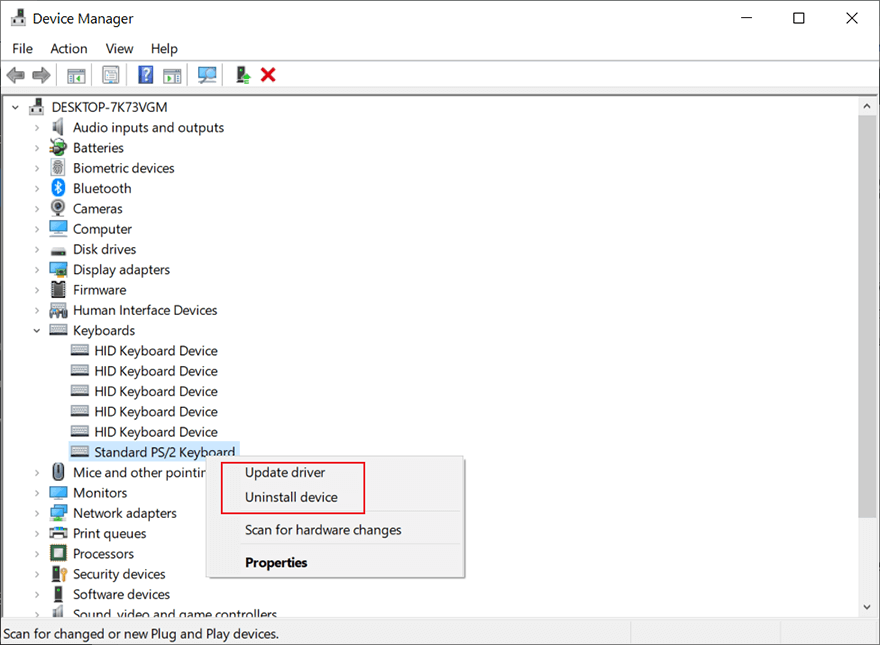
Step 1: Type in Device Manager in the Search bar and open it.
Step 2: Expand the targeted device driver tree.
Step 3: Right-click on the driver entry and select Update driver.
Step 4: Click on Search automatically for drivers.
Step 5: If the driver is already updated, right-click on the driver entry and then click on Uninstall device.
Step 6: Go to the manufacturer’s website. Download and install the latest driver of this device.
Step 7: Reboot your PC and check whether the error persists.
Solution 2: Run Anti-Virus Software
This is another simple but effective solution, which inflicts no harm to your computer if it fails to work. Users can try any working anti-virus tool, for example, Windows Security. You can use the scan feature provided by it to eradicate computer viruses, as the following steps show:
Step 1: Press Win + Q, type in Windows Security and open it.
Step 2: Click on Virus & threat protection on the right pane.
Step 3: Click on Start action and then Quick scan.
Step 4: If you want a more specific scan, click on the Scan options link.
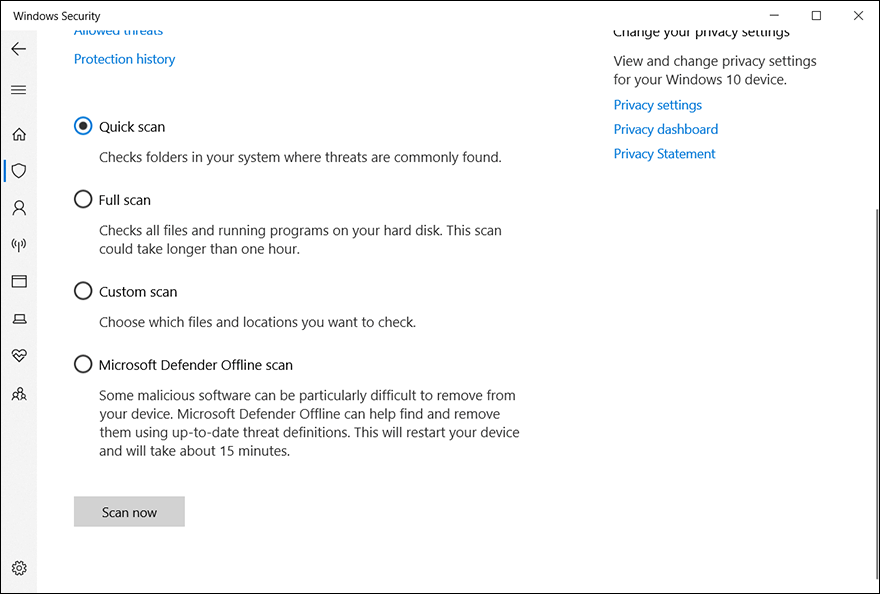
Step 5: Choose the scan mode you like and click on Scan now to start it.
Step 6: After rooting out those malicious viruses, reboot your PC to check the efficacy of the solution.
Solution 3: Perform a Clean Boot
When it comes to potential software problems, a more complicated scenario is the incompatibility between some software and the computer. A local app or a new driver iteration may well bring about system instability, at last winding up triggering the 0x00000024 error. To identify the faulty application and eliminate it, you can repeatedly reboot your PC in clean boot and re-enable a previously-disabled application. You can refer to these steps to learn how to perform a clean boot:
Step 1: Press Win + R to open the Run box, type in msconfig, and press Enter.
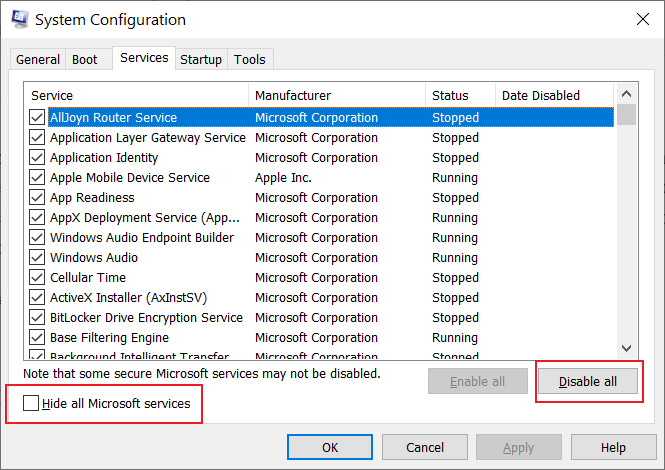
Step 2: Switch to the Services tab.
Step 3: Tick off the box next to Hide all Microsoft services option.
Step 4: Click on Disable all and then OK.
Step 5: A message will come up asking when to restart. Select Restart later.
Step 6: Reopen System Configuration again using the same steps written above and switch to the Startup tab.
Step 7: Click on Open Task Manager.
Step 8: Right-click and disable startups with High Startup impact.
Step 9: Reboot your computer, and one by one, re-enable those disabled programs until you find and eliminate the faulty one.
Recover Lost Data Using Bitwar Data Recovery
Based on what some users faced with the 0x00000024 error have reported, this error, besides repeatedly cutting short your work, could induce another unwelcome result, data loss. Hence, to help users cope with the tricky problem, we would like to introduce a reliable and effective data recovery tool, Bitwar Data Recovery. With the help of it, you will be able to recover files that have vanished or been deleted inadvertently. Take a look at the following steps to see how the tool works like magic.
Step 1: Download Bitwar Data Recovery from the official website and install it.
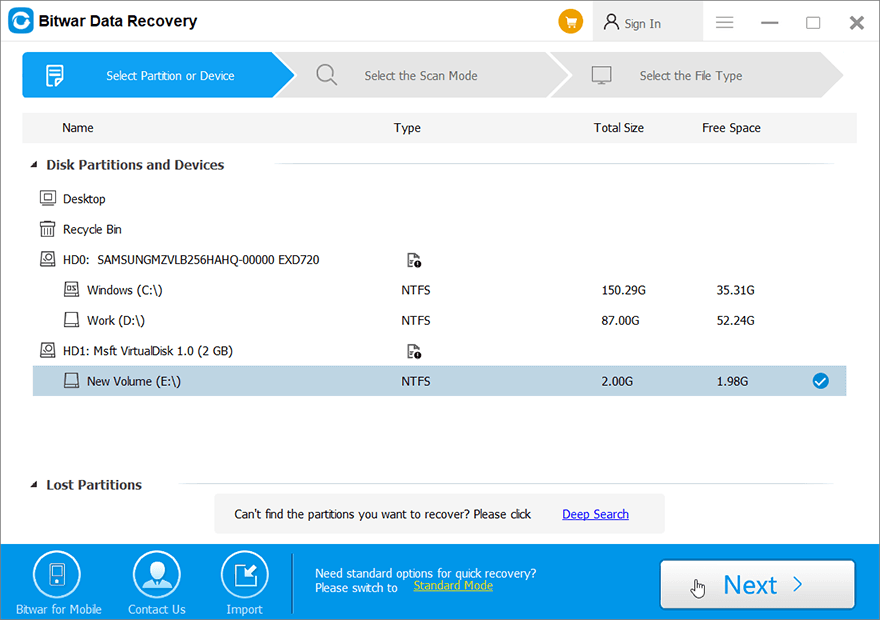
Step 2: Launch the program and select the disk drive where the missing data were stored and then click on Next.
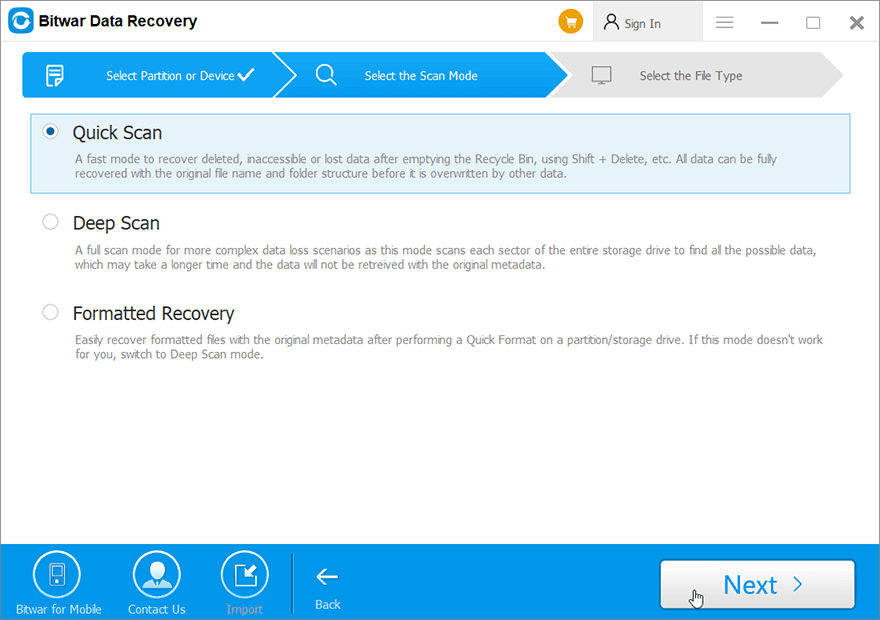
Step 3: Select a scan mode in this stage. We would like to recommend you to use Quick Scan, which is capable of recovering a healthy number of lost files. If it doesn’t work, you can run the software again and use Deep scan, which is more effective.
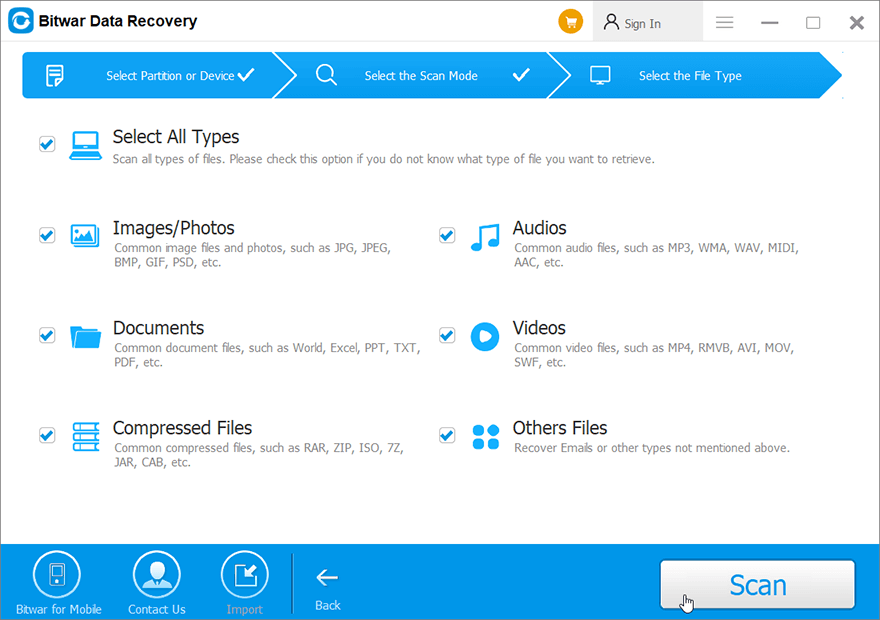
Step 4: Select the types of files you want to recover and click on Next.
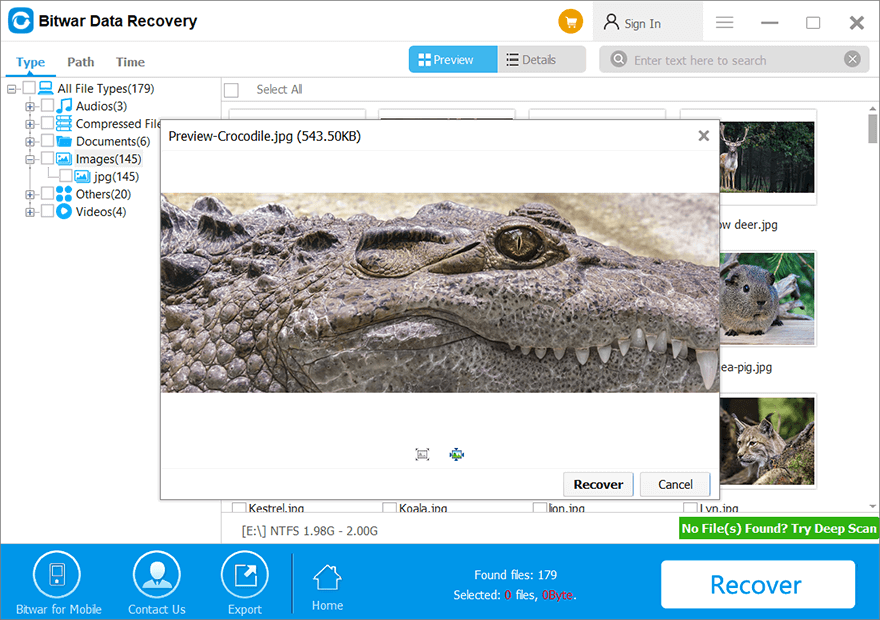
Step 5: Preview the wanted files to check their intactness. Select those files and click on Recover to start the recovery process.
Advanced Solutions to the BSOD Stop Error 0x00000024
Solution 1: Run a Chkdsk Scan
Users who encountered the 0x00000024 error and searched the Web for solutions may have learned that one of the common causes of the error is some problem related to a hard drive or SSD. Issues like bad sectors and hard & solid-state drive inconsistencies abound. This kind of problem may well happen after the user has downloaded or updated an application or game. If you were in a similar scenario, a working solution would be to use Chkdsk to eradicate certain disk-related problems like bad sectors. Refer to these steps to learn how to use it:
Step 1: Right-click on the Start Menu button and then click on Command Prompt (Admin).
Step 2: Type in the command and press Enter:
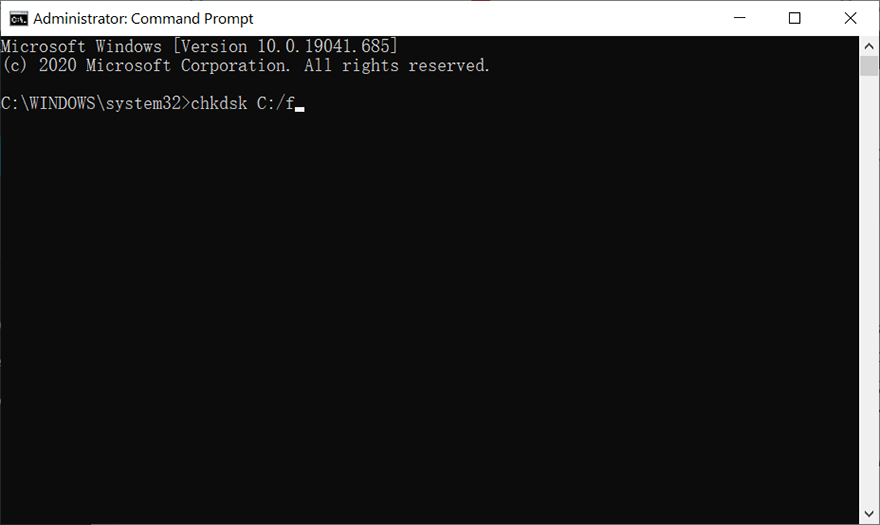
Step 3: Wait for the process to end.
Step 4: Reboot your computer to see whether the error persists.
Were you to encounter any problems when utilizing the chkdsk such as Chkdsk cannot open volume for direct access error, you could click on the link to learn how to solve it. On top of that, you can also use Error checking, a graphical version of Chkdsk, by following these steps:
Step 1: Press Win + E to open File Explorer.
Step 2: Right-click on the disk drive/partition that you want to check out and then click on Properties.
Step 3: Switch to the Tools tab.
Step 4: Click on Check within the Error checking section.
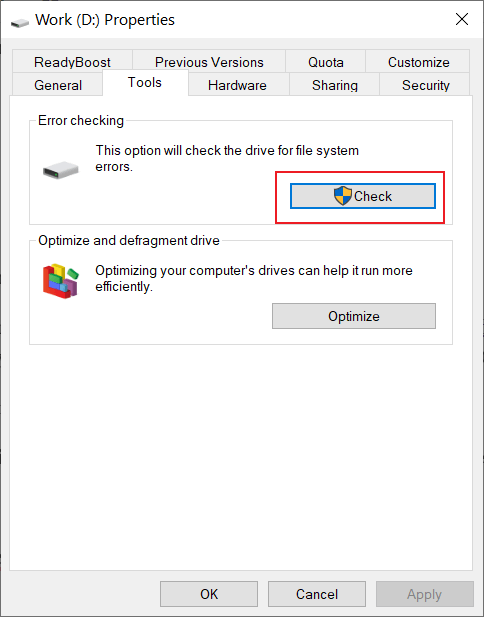
Step 5: Click on Scan drive to confirm your operation.
Solution 2: Run SFC
As we have mentioned before, corrupted or damaged system files could be another possible culprit of the 0x00000024. To address this sort of problem, there are two tools you can use, one of which is SFC, shorthand for System File Checker. It’s well known for its ability to look into all of the important system files on your computer and replace any faulty files with healthy ones. Use these steps to run SFC:
Step 1: Press Win + Q. type in Command Prompt, right-click on the search result and then select Run as administrator.
Step 2: After running the command prompt, type in the command mentioned below and then press Enter.
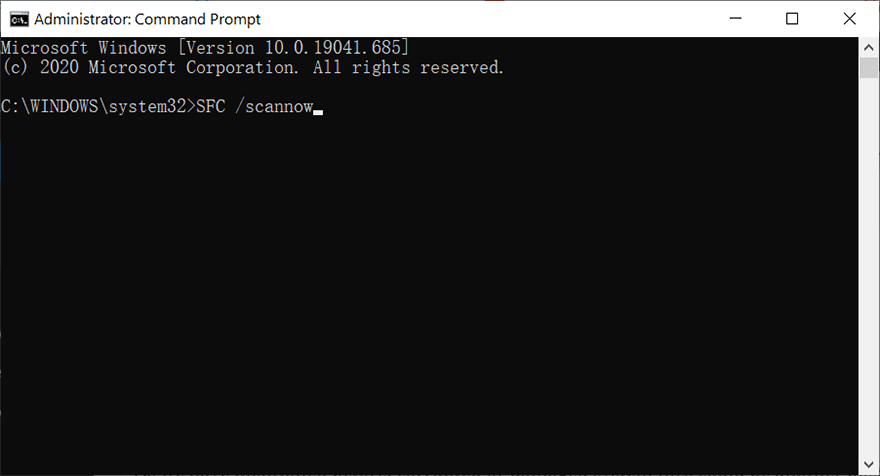
Step 3: Reboot the computer to check whether the problem is fixed after the operation is complete.
Solution 3: Run DISM
If SFC fails to work, there is another working tool, DISM, which users can deploy when faced with the problem of corrupted/damaged system files. DISM, shorthand for Deployment Image Servicing and Management, is always used to fix some thorny problems that SFC can’t. To check out whether this method will work for your PC, use these steps:
Step 1: Type in Command Prompt in the search bar, right-click on the search result and then select Run as administrator.
Step 2: Enter the following command to see whether there are any problems.
This step is intended to inform the user whether it’s worth proceeding with the next step. Use the following steps only when corruption does exist.
Step 3: Type in the following command and then press Enter.
Unlike CheckHealth, the outcome of which can be brought about in seconds, this step might well take several minutes. To ensure a complete scan, you should avoid interruption.
Step 4: Type in the following command and then press Enter.
Likewise, this step may take minutes or even hours on the basis of the capacity of the disks on the computer.
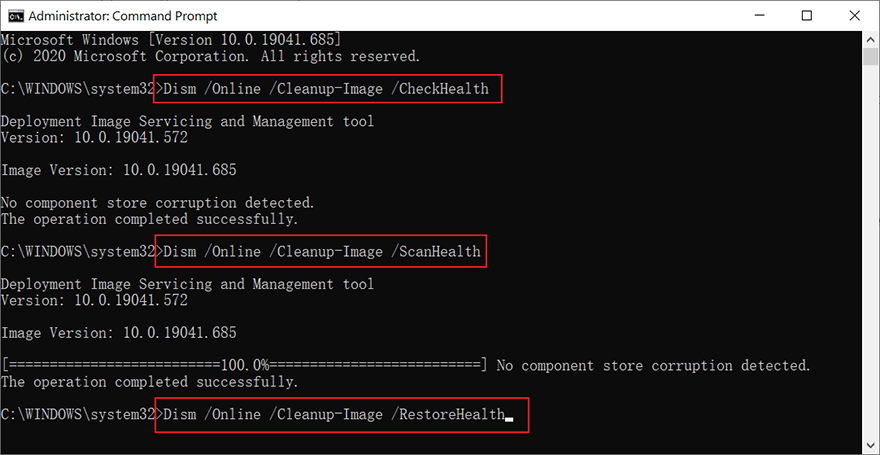
Step 5: After the restoration is complete, reboot your computer to see whether this solution works.
Solution 4: Use System Restore
Since we have already delineated several solutions that are highly related to programs and device drivers, using those solutions should be able to eliminate the error or prove that none of the drivers and programs is the cause. However, some users cleave to the belief that a certain installation or update has brought about the 0x00000024 error. And then they exhausted all the solutions listed above but none of them worked. In this unusual case, we would like to suggest that you use system restore to return your computer to a healthy state.
Step 1: Press Win + Q, type in Create a restore point and open it.
Step 2: Click on System Restore.
Step 3: Select the Choose a different restore point option and then click on Next.
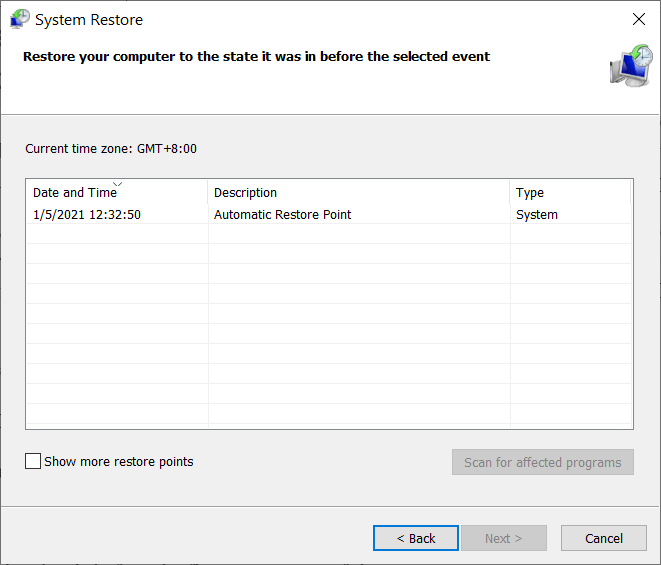
Step 4: Select a restore point that is before the first occurrence of the error.
Step 5: Click on Next to revert to the selected state.
Step 1: Press Win + Q, type in Create a restore point and open it.
Step 2: Make sure the state of the protection for your system drive is On.
Step 3: If the state is off, select the disk and then click on Configure.
Step 4: In the new window, select the Turn on system protection option and click on OK to confirm the change.
Solution 5: Disable Overclocking
If the problem occurs after you have overclocked your CPU, it’s likely that enabling overclocking has brought about overheating, triggering system errors like BSOD. The solution to this kind of problem is to disable overclocking to cool down the CPU, as the following steps show.
Step 1: Reboot your PC and press the BIOS key preset by your manufacturer, which might be F1, F2, F10, F12, or DEL.
Step 2: Change the overclocked frequency and the voltage to its default value.
Step 3: Depending on the kind of BIOS you have entered, there might be an option labeled Load Optimized Defaults. You can click on it to change the overclocked frequency to its default value.
Conclusion
In this article, we have discussed a common type of BSOD, the 0x00000024 stop error message. Since BSOD is so common that we could list a staggering list of causes without the stop error message. Owing to the error message, we are able to narrow down the possible causes and accordingly find several straightforward and effective solutions to help users cope with this error. Furthermore, given the possible data loss, we introduce a reliable and effective data recovery tool, Bitwar Data Recovery. Users whose work has been cut short thanks to the annoying error can use the tool to bring their valuable data back.
Previous Article
How to Fix This Memory Card Cannot Be Used Summary: In this article, we will expound on several solutions to one of the BSOD stop error messages, 0x00000024. It's notorious...Next Article
4 Effective Solutions To Fix Seagate External Hard Drive Not Showing Up Mac Issue Summary: In this article, we will expound on several solutions to one of the BSOD stop error messages, 0x00000024. It's notorious...
About Bitwar Data Recovery
3 Steps to get back 500+ kinds of deleted, formatted or lost documents, photos, videos, audios, archive files from various data loss scenarios.
Learn More


