Windows/Mac에서 Word 문서에 확인란을 삽입하는 방법은 무엇입니까?
개요: The article below will teach users how to insert a checkbox in Word document on both Mac and Windows!
Microsoft Word is the best document software as it provides a lot of uses and tools for users. It allows users to edit text or documents in different types of formats and fonts. When it comes to doing application forms, tick boxes, and to-do lists, many users find difficulties in how to insert clickable boxes in Word!

Before we are going on with the steps, users don’t have to worry about the operating system because the article below will provide effective methods for both Windows and Mac operating systems.
Take Note: All the steps below work for Microsoft 365, Word 2019, Word 2016, Word 2013, and Word 2010 on both Windows and Mac versions!
목차
Insert Checkbox In Word Document On Windows
Method 1: Developer Tab
Step 1: Type out the Text list.
Step 2: Go to Developer and select the Check Box Content Control at the beginning of the first line.

Step 3: Change the default X to others and make changes to the checkboxes.
Step 4: Copy and paste the checkbox at the line of text needed.
Method 2: Home Bullets Button
Step 1: Select the 홈 menu and choose the Bullets button.
Step 2: Select Define New Bullet from the menu.
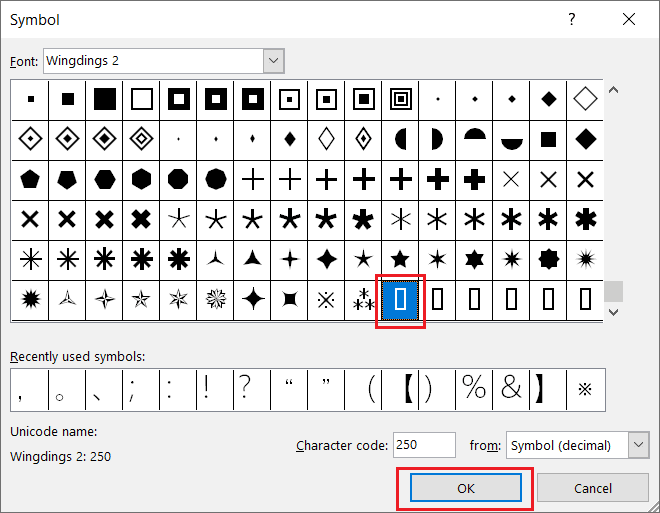
Step 3: Click on Symbol and choose the box character to replace the character. Then, press 확인 twice.
Suppose that the checkbox symbol couldn’t be found, please change the Font to Wingdings or Segoe UI Symbol.
Method 3: Insert Menu
Step 1: Click the exact location in the document where you need to insert the single checkbox.
Step 2: Choose the Insert menu and continue with the Symbol option.
Step 3: Click on More Symbols and find the Checkbox symbol you want to insert in.
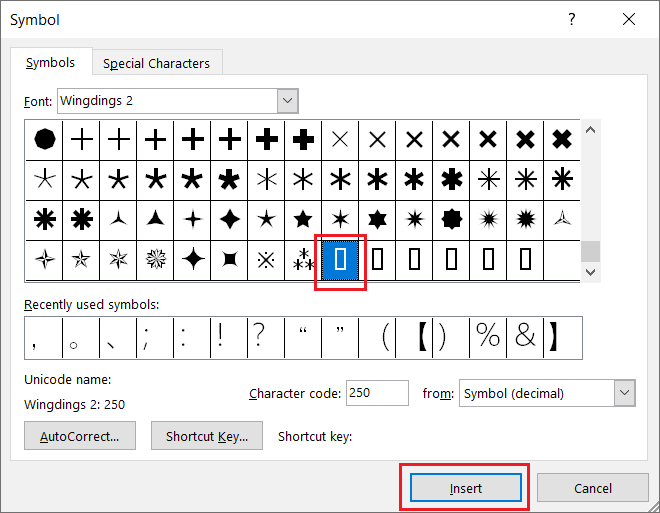
Step 4: Finally, click on Insert.
Insert Checkbox In Word Document On Mac
Method 1: Developer Tab
Step 1: Type the text document and place the cursor at the start of the first line.
Step 2: Choose Check Box from the Developer tab.

Step 3: Press Tab or Spacebar to create space after the checkbox.
Method 2: Home Bullets Button
Step 1: Select the whole text.
Step 2: Choose the Bullets button from the 홈 menu.
Step 3: Select Define New Bullet.
Step 4: Select Bullet and choose the Checkbox symbol like the three-dimensional box or open box.
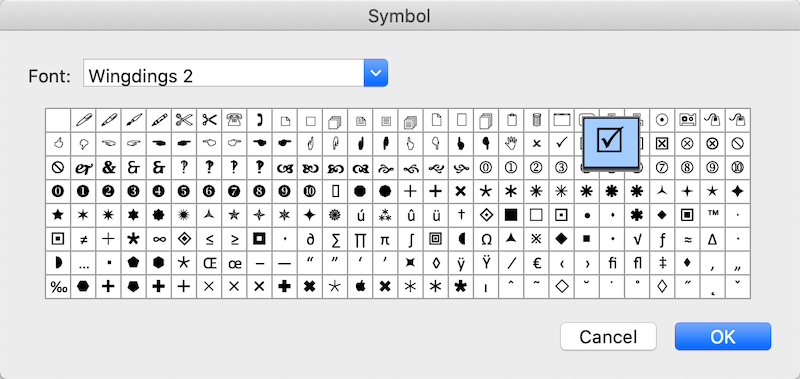
5 단계: Finally, press 확인 과 확인 again to add the checkbox!
How to Add Developer Tab in Microsoft Word
Just in case some of the users the Developer tab isn’t displayed on their Word, then users can add it manually by following the steps below:
On Windows
Step 1: Go to the File tab and choose Options 과 Customize Ribbon.
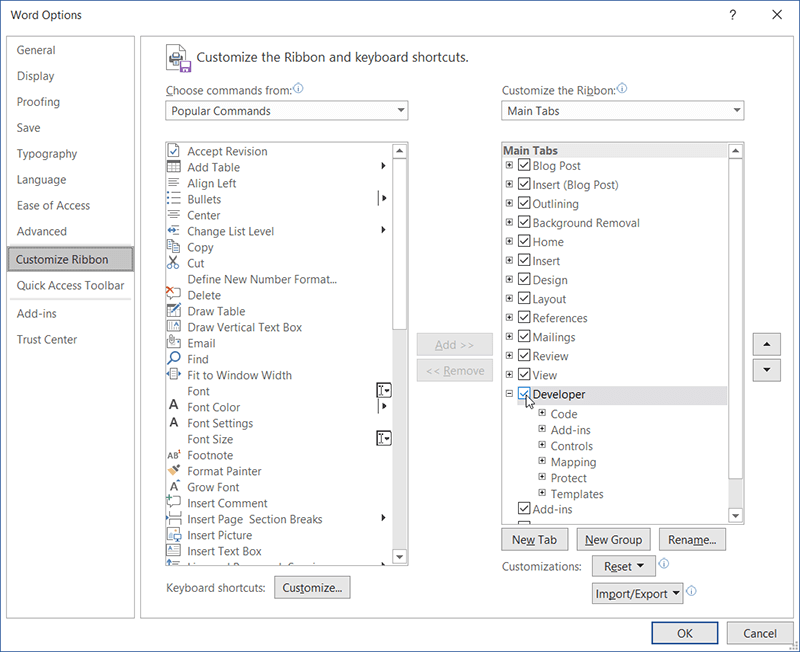
Step 2: Select the Developer check-box under the Main Tabs from the Customize the Ribbon menu.
On Mac
Step 1: Navigate to the Word tab on the top-left of the menu bar, click it, and choose Preferences.
Step 2: Click Ribbon & Toolbar and look for the Developer tab to customize the Ribbon section.
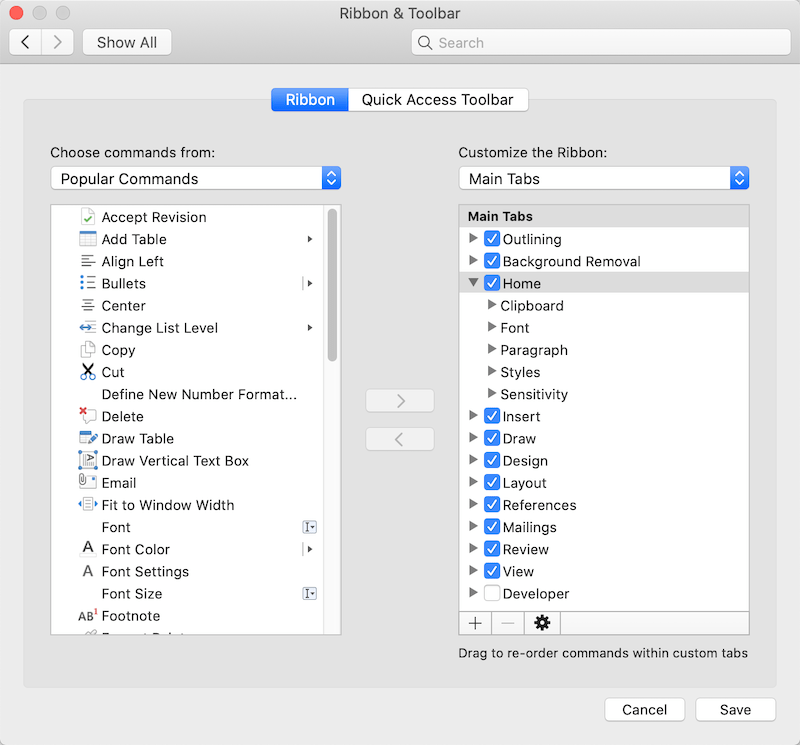
Step 3: Check off the Developer tab and then click Save.
Insert Checkbox Now!
Hopefully, all users can insert the checkbox in Word document on Windows or Mac successfully by following the provided methods above! Please click on the following links for more articles about Word:
이전 기사
How To Download WhatsApp For Windows 10? Summary: The article below will teach users how to insert a checkbox in Word document on both Mac and Windows!...다음 기사
What’s New in Bitwar iPhone Data Recovery V1.5.6.0 Summary: The article below will teach users how to insert a checkbox in Word document on both Mac and Windows!...
About Bitwar Data Recovery
3 Steps to get back 500+ kinds of deleted, formatted or lost documents, photos, videos, audios, archive files from various data loss scenarios.
더 알아보기


