9 Methods Of Solving The 0xc00000e9 Error
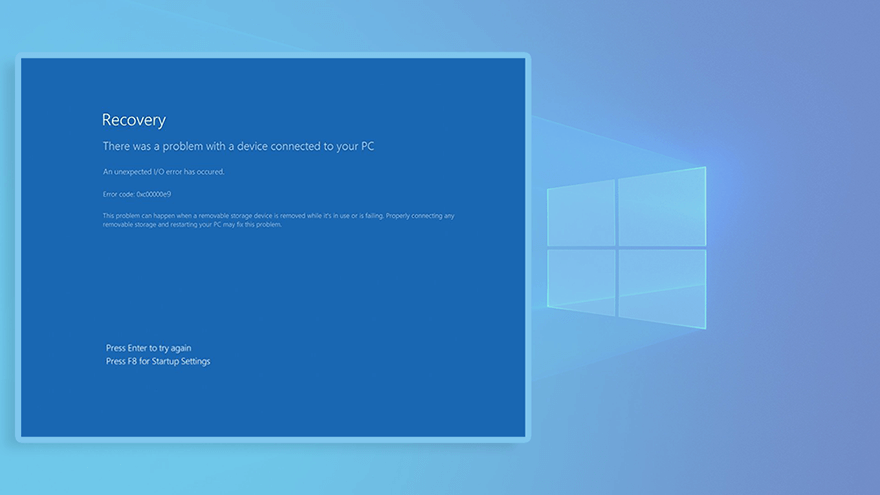
Summary: The Windows error code 0xc00000e9, which indicates Boot manager error in Windows, is not an unusual problem, yet except for the enigmatic code, Windows reveals nothing noteworthy about this error when the blue screen comes up. To add to the muddle, Windows doesn’t provide an official solution to the scourge. Hence, to help those concerned about the error, we will delineate several solutions and also layout how to use our Bitwar Data Recovery to recover lost files that may concur with the 0xc00000e9 error.
Table of Contents
Common Causes of the Error Code 0xc00000e9
In most cases, this error brings about a blue screen when users try to boot their computers. And users learn nothing except the error code. So, to have a better understanding of the error, take a look at its common causes:
- The system files of the PC’s disk drives have got corrupted.
- The connection between the motherboard and the hard disk has failed.
- Damaged/corrupted registry files.
- Damaged hard drive.
- Virus attacks.
Basic Methods
Method 1: Disconnect All Peripherals/External Devices
Shut down the computer and take off all the removable hardware connected to the PC, such as USB disk, external hard disk, keyboard, wireless mouse. Make sure that only the monitor is connected to the computer. Boot the computer to see if that solves the issue.
If it does, then connect one of the external devices to your computer to check whether it will cause the issue. if not, repeat the process until you find out the faulty one. With luck, after the disconnection and reconnection, the issue might even disappear magically.
Method 2: Check Your SATA Cables
Some users have reported that incompatibility between the SATA cable and SATA port might lead to insufficient data transfer rate. In this scenario, the operating system will fail to communicate with the hard drive, resulting in this issue. To fix it, use these steps:
Step 1: Shut down your PC.
Step 2: Open the computer case and find the hard drive, and the SATA port to which it’s connected.
Step 3: Replace the old cable with a newer one.
Step 4: If this solution works, it demonstrates that you simply need a newer version SATA cable.
Method 3: Update Drivers
At times a corrupted or outdated device driver may be accountable for the issue. In that scenario, you can use these steps:
Step 1: Right-click on the Windows button in the taskbar and select Device Manager.
Step 2: Double-click on Disk Drives to display a list of disk drives connected to the PC.
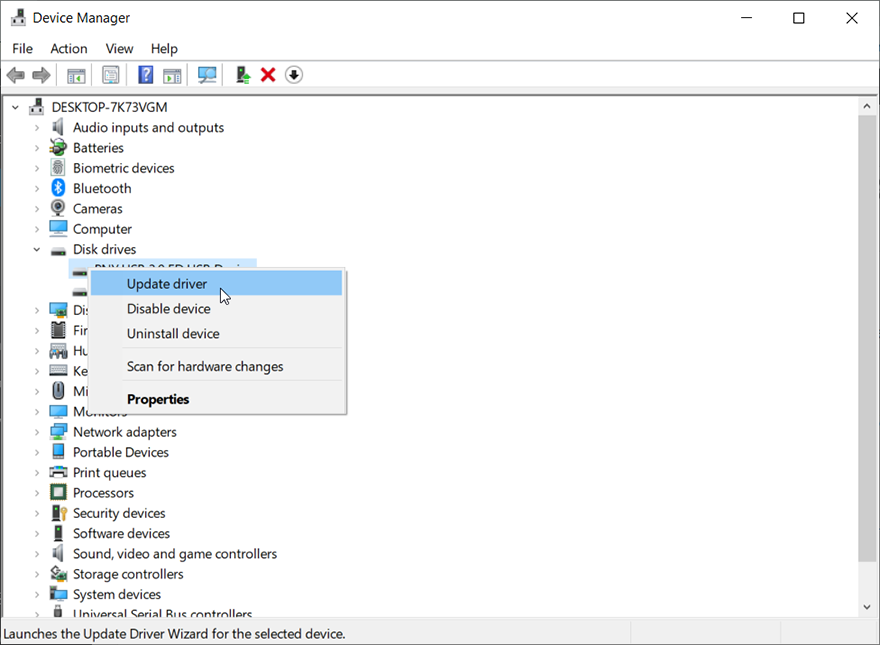
Step 3: Right-click on the bad drive and select Update Driver from the drop-down menu.
Method 4: Scan Your PC for Virus
As we have mentioned before, virus attacks might lead to the 0xc00000e9 error. If you have any anti-virus software on your computer, run it to scan all the disk drives. If not, you could use the built-in anti-virus tool provided by Windows.
Follow the instructions below to start the scanning:
Step 1: Type in Windows Security in the search bar and then open it.
Step 2: Click on Virus & threat protection.
Step 3: Click on the Start action button and then click on Quick scan.
Step 4: If you intend a more specific scan, click on Scan options.
Step 5: Choose a scan mode and click on Scan now to start it.
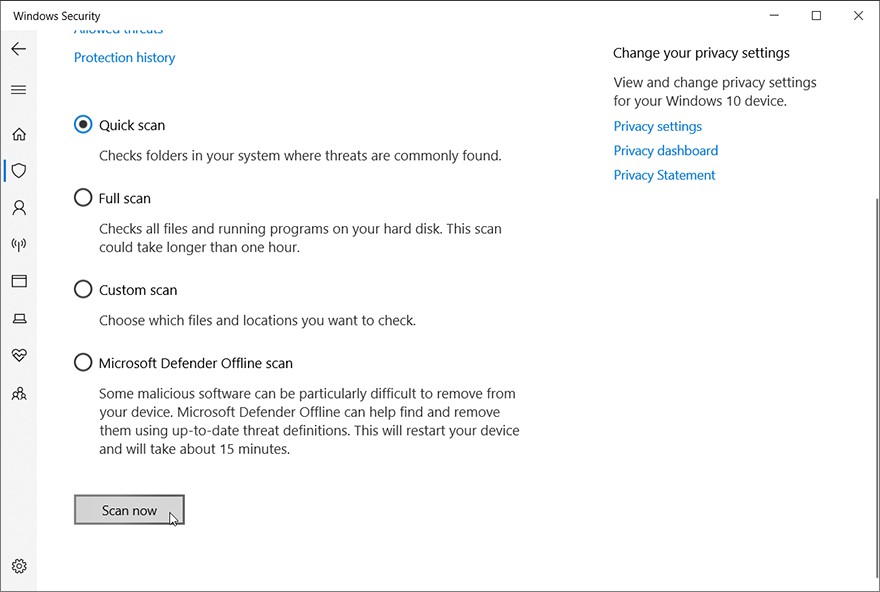
Step 6: After eliminating malicious viruses, reboot your PC to check whether the method works.
Method 5: Run a CHKDSK Scan
Issues such as bad sectors or hard & solid-state drive inconsistencies might well lead to the 0xc00000e9 error. To check whether there are problems related to your disk drive, you can use CHKDSK, a built-in tool provided by Windows. Refer to the following steps to learn how to use it:
Step 1: Right-click on the Start button and click on Command Prompt (Admin).
Step 2: Type in the following command and press Enter:
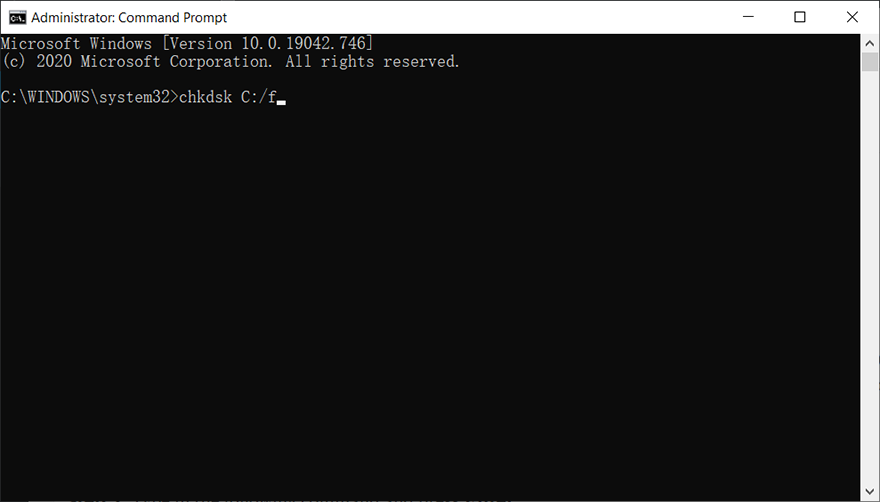
Step 3: Wait for the process to finish.
Step 4: Reboot your computer to see whether the error persists.
If you encounter any problems when using chkdsk, such as Chkdsk cannot open volume for direct access error, you could click on the link to learn how to solve it. Besides, you can also use Error checking, a graphical version of Chkdsk, according to these steps:
Step 1: Press Windows key + E to open File Explorer.
Step 2: Right-click on the faulty disk drive and then click Properties.
Step 3: Click on the Tools tab.
Step 4: Click on the Check button within the Error checking section.
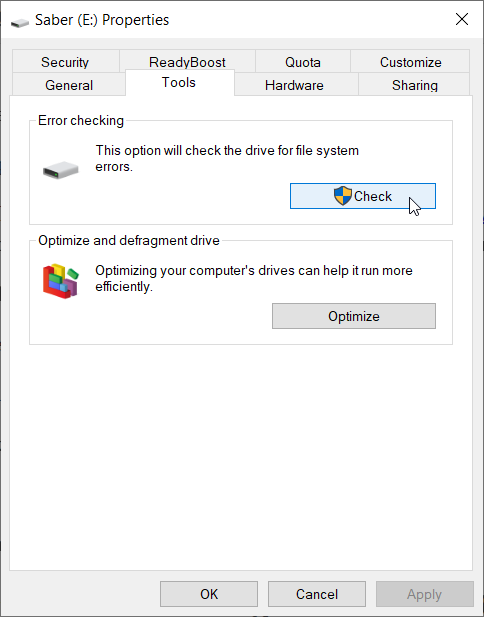
Step 5: Click on the Scan drive button to confirm your operation.
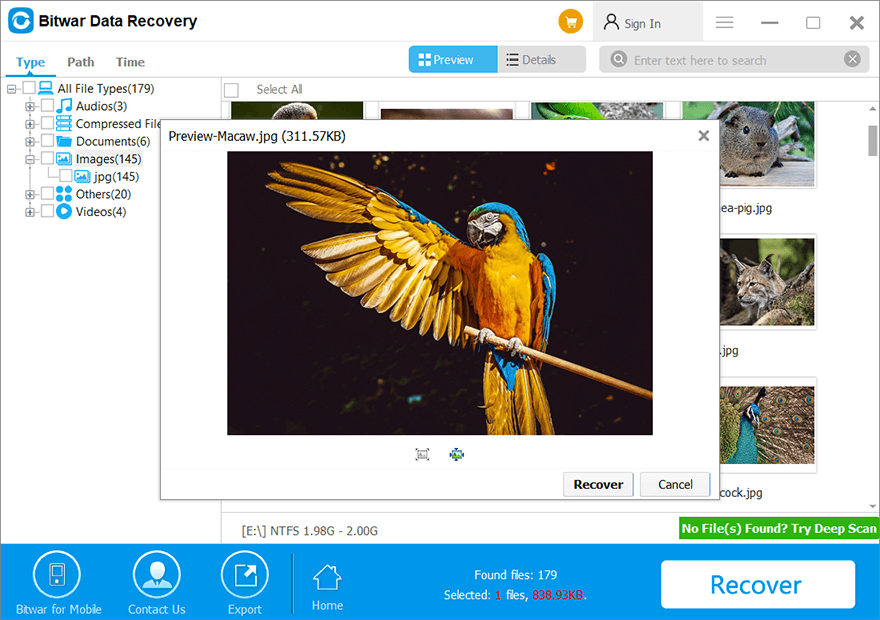
Recover Lost Files Using Best Data Recovery Software
Since the 0xc00000e9 error comes up without any warning, it usually cuts short users’ work. Consequently, some of their files may well wind up getting lost. To cope with the problem, you need a reliable and effective recovery tool, such as Bitwar Data Recovery.
With the help of it, you can easily get back your lost files by using the following steps:
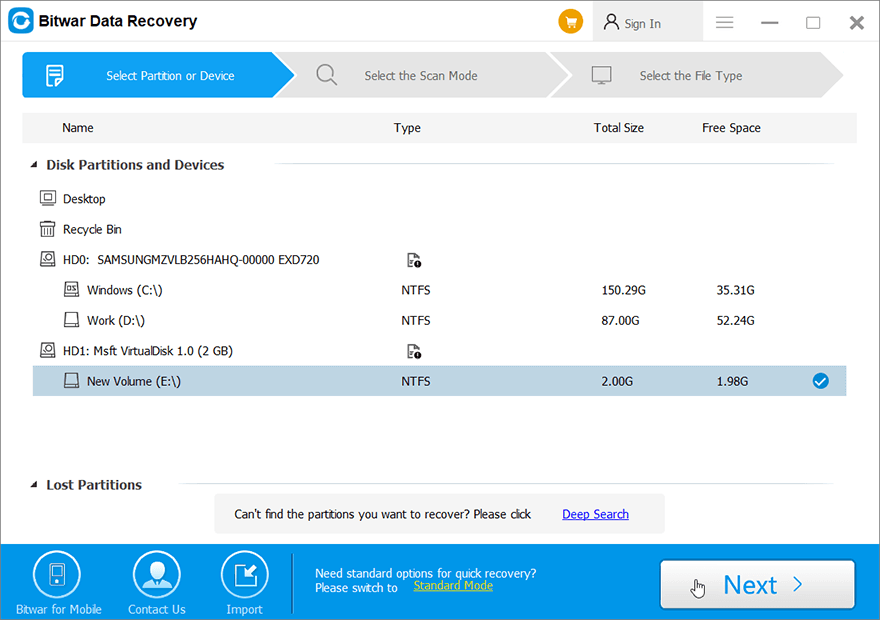
Step 1: Download Bitwar Data Recovery from Bitwarsoft Download Center and install it on your PC.
Step 2: Launch the software, choose the disk drive where the lost files were stored and then click on Next.
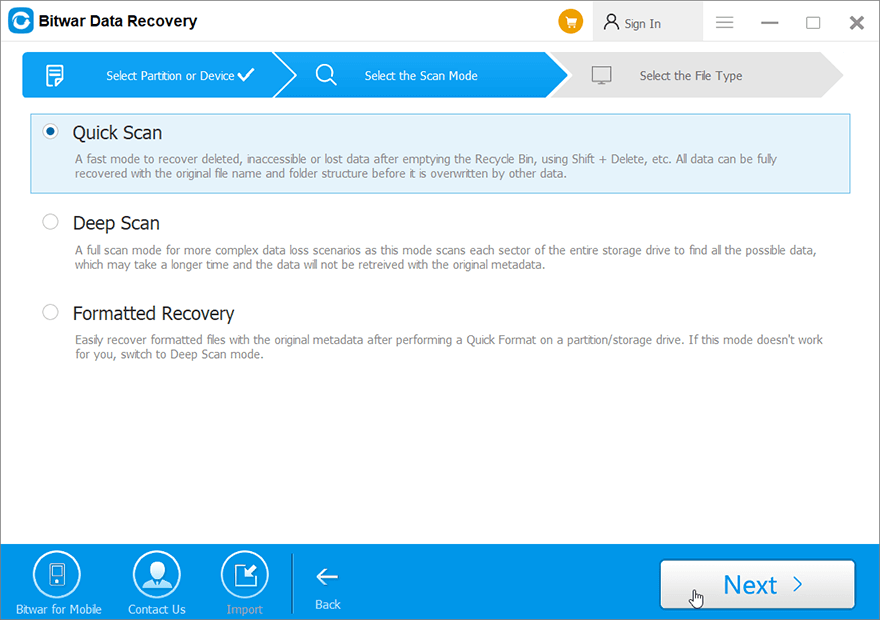
Step 3: In this stage, you can select a scan mode. We would like to suggest Quick Scan, which is capable of recovering most lost files. If it fails, you can come back to this stage and then use Deep Scan, which is more effective.
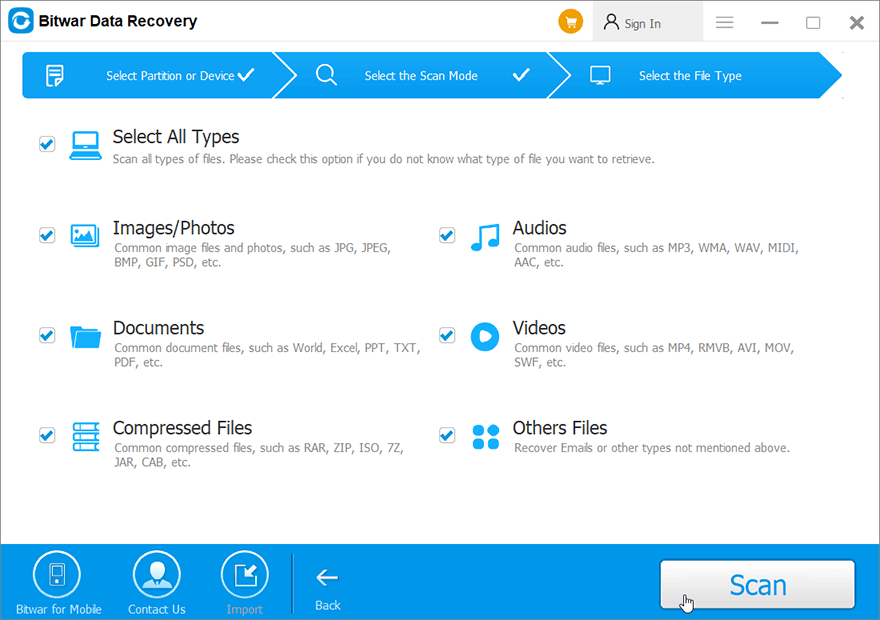
Step 4: Select desired file types and click on Next.
Step 5: Preview scanning results to check their intactness. Select files you want and click on Recover.
Advanced Methods
Method 1: Set Your Hard Drive as the First Boot Device
Many users have reported that the issue can be fixed by making the hard drive the primary boot device via BIOS/UEFI.
Step 1: Reboot the computer to enter BIOS. This is done by immediately pressing a preset button after the computer is powered on. The button can be either ESC, F12, F2, Backspace, etc.
Step 2: Once entering BIOS, look for and click on the Boot options.
Step 3: Look for boot priority. Check whether the first boot device is the hard drive. If not, Use the navigation instructions to put the hard drive on the top of the boot devices list.
Step 4: Save your changes and exit.
Step 5: Reboot the computer to see whether the problem persists.
Method 2: Use Windows PE
Users who tried to install a Windows system without properly setting the MBR reported that they encountered the error 0xc00000e9. If you run into the same problem, you can try setting the drive C: as the MBR to fix the problem by using these steps:
Step 1: Connect the external drive with the Windows PE to your computer.
Step 2: Launch Windows PE and then set drive C: as the MBR.
Step 3: Restart your computer.
Step 4: Try reinstalling Windows and see whether the issue has been fixed.
Method 3: Rebuild Windows BCD
Broken BCD is one of the causes that might lead to the 0xc00000e9 error. Rebuilding or repairing the BCD can help you tackle the problem. To rebuild Windows BCD, you need to prepare a Windows Installation Media and type in a few commands. Refer to the following steps to learn how to rebuild Windows BCD:
Step 1: Power off your computer and let it boot from the media to recovery mode.
Step 2: Launch the Command Prompt.
Step 3: Type in the following command lines one by one and then press Enter at the end of each line.
bootrec.exe /FixMbr
bootrec /fixboot
bootrec /scanos
bootrec /rebuildbc
If you come across Command Prompt not working issue during the operation, you can click the link of the article to look for methods: [FIXED] Methods to Fix Command Prompt Not Working Issue.
Method 4: Use System Restore
It’s a good habit to regularly back up your system using the built-in System Restore Point tool provided by Windows. Having a restore point allows users to roll back the system to a previous working configuration. Given that hardware is fine, this method tremendously saves a lot of time when you are troubleshooting the system. Refer to the following instructions to learn how to use system restore:
Step 1: Type in Create a restore point in the search bar and then open it.
Step 2: Click on System Restore.
Step 3: Click on the Choose a different restore point option and then click on Next.
Step 4: Select a restore point on the list.
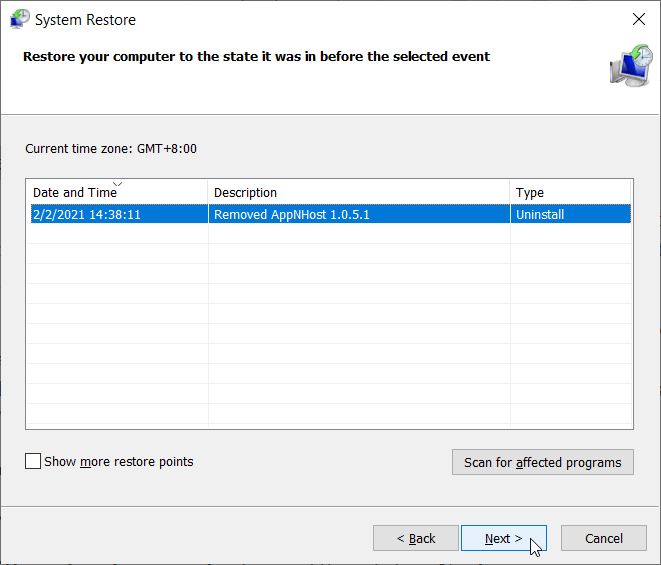
Step 5: Click on Next and then confirm the restore point to start the restoration.
Step 1: Type in Create a restore point in the search and open it.
Step 2: Ensure that the state of the protection for your system drive is On.
Step 3: If the state is off, select the system drive and then click on Configure.
Step 4: In the new window, select Turn on system protection and then click OK to confirm the change
Conclusion
After trying out those aforementioned methods, you should be able to fix the 0xc00000e9 error since all those methods are not difficult to apply. In most cases, what really matters when users run into the 0xc00000e9 error is not the temporary failure of the computer, but the possibility of losing valuable files, which may well come hard on the heel of the issue. Hence, to preclude the possibility, the best way is to develop a habit of backing up the system and important files.
However, if the backup is not available or obsolete, you could use Bitwar Data Recovery, our user-friendly and effective recovery tool, to help recover files that get lost because of the 0xc00000e9 error.
Related article
Are you troubled by other BSOD problems with seemingly cryptic error code? Check out the following articles to learn how to solve them:
Fix: Thread Stuck in Device Driver Error [16 Solutions]
[SOLVED] Windows Stop Code Kernel Data Inpage Error
How to Fix the BSOD Error 0x00000024
11 Methods of Solving the 0xc00000e Error
[Solved] Blue Screen of Death 0xc0000428 Error
10 Solutions to Blue Screen of Death Error 0x000000c5
[Fixed] The Application Was Unable To Start Correctly (0xc0000005)
Previous Article
[Fixed] Files Not Showing In External Hard Drive Summary: The Windows error code 0xc00000e9, which indicates Boot manager error in Windows, is not an unusual problem, yet except...Next Article
6 Solutions To Fix External Hard Drive Takes Forever To Load Issue Summary: The Windows error code 0xc00000e9, which indicates Boot manager error in Windows, is not an unusual problem, yet except...
About Bitwar Data Recovery
3 Steps to get back 500+ kinds of deleted, formatted or lost documents, photos, videos, audios, archive files from various data loss scenarios.
Learn More


