[SOLVED] Computer Restarted Unexpectedly
Summary: Virtually every user would like to update their computers to the latest most improved version of the Windows system. No matter how great a version of Windows is, it may still face challenges just like other versions. The computer restarted unexpectedly error is a problem that keeps hassling users. If you are running into it and hankering for a reliable solution to it, you have come to the right place. In this article, we will explain to you how to grapple with the computer restarted unexpectedly error. On top of it, if you run into any data loss problems triggered by this error, you can also refer to this article to learn how to use Bitwar Data Recovery to bring back your lost files.
Table of Contents
How To Fix the Error of Computer Restarted Unexpectedly
Method 1: Edit Windows Registry to Change Value of Setup.exe
Change the value of setup.exe via Windows Registry Editor. Use the following steps:
Step 1: When the error pops up saying that your computer restarted unexpectedly appears, press Win + R to open the Run box.
Step 2: Type in Regedit and then press Enter to open it.
Step 3: If a User Account Control window prompts you, click on Yes.
Step 4: In the new window, navigate to:
HKEY_LOCAL_MACHINE\SYSTEM\Setup\Status\Child\Completion
Step 5: On the right pane, click on the setup.exe key twice.
Step 6: change the value of Value Data from 1 to 3. Click on OK to save your change.
Step 7: Close this window and restart your PC.
Method 2: Disconnect All Your USB Devices
If you have connected several different USB devices to your computer, then this could be your problem. The reason is that the devices may be interfering with your computer’s functions, therefore resulting in the computer being restarted unexpectedly issue. So, check your computer to see if you have connected several USB devices to your computer such as printers, flash drives, etc. Disconnect all these accessories, including your mouse and keyboard.
Restart your computer to see if this error is fixed.
Method 3: Check Your Hard Drive drives
There is a chance that this computer restarting unexpected error is caused by your computer’s hard drives. Therefore, you can try checking your hard drive cables to see if there are any physical problems with them. If there is, disconnect the malfunctioning drive.
Also, if you cannot see any physical problems but aren’t sure that those drives work normally, then you can change the cables connecting your motherboard with your other hard drives. This solution might work too because a lot of users have tried this and it worked.
Again, keep in mind that once you open your computer case, you have rendered its warranty void. Thus, if your computer is still under the warranty window period, then you could visit the official repair center to ask for help.
Method 4: Reset your operating system
This method will reset your Windows OS to resolve the errors in the system. During the reset process, you can choose whether to keep your files or delete them. Both options are available. Refer to the following steps to learn how to do so:
Step 1: Press Win + Ito open Settings.
Step 2: Select Update & Security.
Step 3: Select the Recovery button.
Step 4: Go to the section labeled as Reset this PC and click on Get Started.
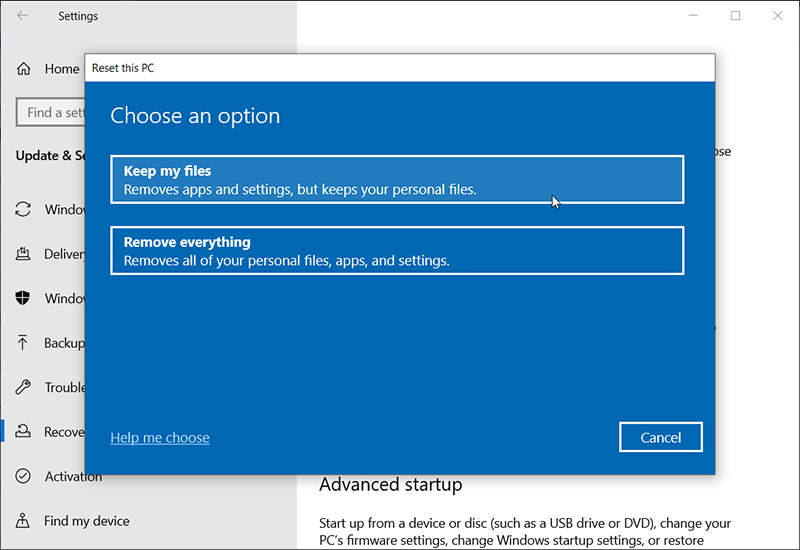
Step 5: To keep all your files, click on the Keep my files option and then select Next.
Step 6: Meanwhile, if you want to see the programs that will be removed due to this reset, click on the List of apps to be removed option.
Note: Bear in mind that when the computer is resetting the operating system, all third-party apps you have installed will be removed, only the system files and apps will survive the removal. Thus you had better take note of all the apps that you will need to reinstall after the resetting.
Step 7: On the other hand, if you want to delete everything on your system, choose the second option in the Choose an option window and then click Remove everything.
Step 8: You can also check the drives that are going to be affected due to this reset to make sure that the resetting will not delete the files you want. you could do so simply by choosing the Show me the list of drives that will be affected option.
Step 9: Choose to return to the previous window. Then move on to the next phase.
Step 10: Finally, complete the process by selecting the Reset button.
Step 11: After the resetting has finished, reboot your computer and check whether the error is fixed.
Method 5: Run Automatic/Startup Repair
You could also try fixing the error by setting up Windows to automatically repair and fix the problem by using these steps:
Step 1: Insert the bootable media into your computer and then press any key on your keyboard to continue.
Step 2: Select the option Repair your computer.
Step 3: Instead of moving to the next window for installation, click on Troubleshoot.
Step 4: Click on the Advanced option.
Step 5: Choose either Startup Repair or Automatic Repair.
Method 6: Update Your BIOS
BIOS (Basic Input Output System) is critical in the process of your computer booting. If it is out of date, the computer may see the error of the computer restarting unexpectedly even while the user is still using it. Thus, in this case, you need to update your BIOS.
However, bear in mind that the process of updating your PC’s BIOS is not easy therefore you have to be careful about how you go about it. This is because while the computer is in the process of updating its BIOS, you may put your PC at risk or even inflict permanent damage to the motherboard.
To download a new version of BIOS, you need another working computer since yours doesn’t work well for now. After you have downloaded it on the working computer, copy or move it to your USB drive. Launch Command Prompt and perform the BIOS update from there. Your motherboard manual should contain detailed instructions on how to update the BIOS. Follow the instructions to carry out the update.
After the update is done, check if the issue is solved.
Method 7: Use Windows Recovery Drive
With a Windows recovery drive, you can restore your PC’s original state without the need for you to install it again. Recovery Drive is a feature you will find pretty useful in this scenario since it will help you restore your PC to factory settings while maintaining it.
Although some PCs have a recovery drive on their own hard drives, others don’t. If your computer does not have one, you can create one on another computer with a working Windows system. To do this, follow the steps below:
Step 1: Get a USB drive of at least 8GB storage capacity. To be safe, we recommend you get a 16GB USB drive because sometimes, even a drive of8GB storage capacity isn’t enough.
Step 2: Connect the drive to your computer.
Step 3: Press Win + Q to open the search bar, type in create a recovery drive.
Step 4: Click on the Create a recovery drive tool.
Step 5: Decide to create the recovery drive on the USB drive.
Step 6: Decide to back up your system files to the recovery drive you are creating and then click on Next.
Step 7: Choose the USB drive you have prepared and once again, click on the Next button.
Step 8: After you click on Create, the process of creating the recovery drive will begin.
Now that you have created a recovery USB drive, it’s time to use it. Use the following steps:
Step 1: Connect the USB drive to the computer ravaged by the problem.
Step 2: Go to the Advanced Boot screen by restarting your PC multiple times when it’s carrying out its boot phase.
Step 3: Click on Troubleshoot。
Step 4: Navigate to Advanced Options > System Image Recovery.
Step 5: Restore your PC by following the on-screen instructions.
It is important to bear in mind that the recovery drive created on another PC may not work for your computer, even with the same Windows version. This is why we recommend you always have a recovery drive when your PC is in perfect working condition before any issues pop up.
Method 8: Perform a Clean Windows Installation
Finally, you can choose to perform a clean Windows installation. If you haven’t figured out the problem by now, this is a method that will wipe out all your files, folders, and computer settings. Thus, if you have any data you want, it is time to back them up before performing a clean installation.
Step 1: Create a USB bootable drive using an online tool.
Step 2: Change your boot order via BIOS settings, then insert the bootable drive into your PC to enable your PC to start from the drive.
Step 3: Perform a clean installation by following the instructions presented on the screen after you select Install Now.
How To Recover Unsaved Files Due to the Computer Restarted Unexpectedly
If your PC restarted while you were still working on some documents, there is a chance that you might lose important files in light of the computer restarted unexpected issue. If this is your case, you could rely on our recovery tool after fixing the error. With this tool, you can recover files in whatever format they are: audio files, documents, zipped, video, images, etc.
Bitwar Data Recovery is the third-party software that can recover your unsaved files in an intact state. It can recover lost files resulting from system errors such as the one we have discussed, memory card errors, system crashes, virus attacks, hard drive errors, and so on. The program is so easy to use that beginners can navigate through its interface without difficulty. Use the following steps to learn how it works.
Step 1: Download Bitwar Data Recovery from our official website and install it.
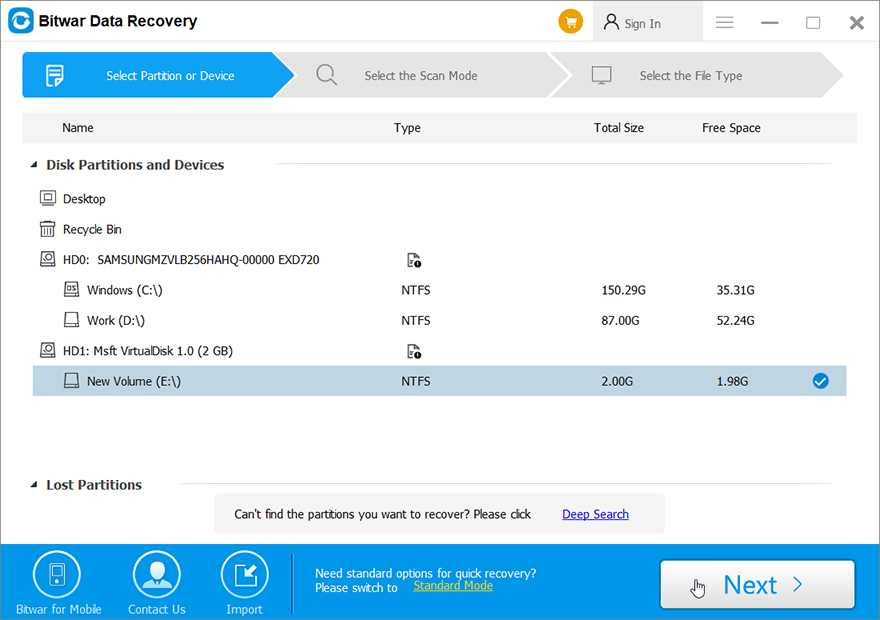
Step 2: Open the program, choose the disk drive where those missing files were stored, and then click Next.
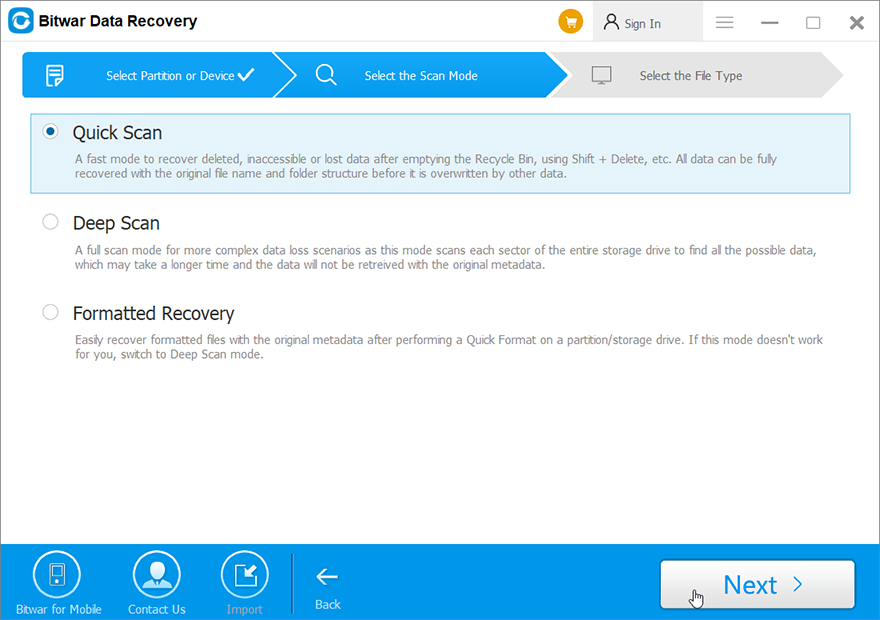
Step 3: You could select a scan mode in this stage. We would like to recommend Quick Scan, which is able to retrieve a great number of lost files. If it fails you, you can re-run the tool again and choose Deep scan, which is more effective.
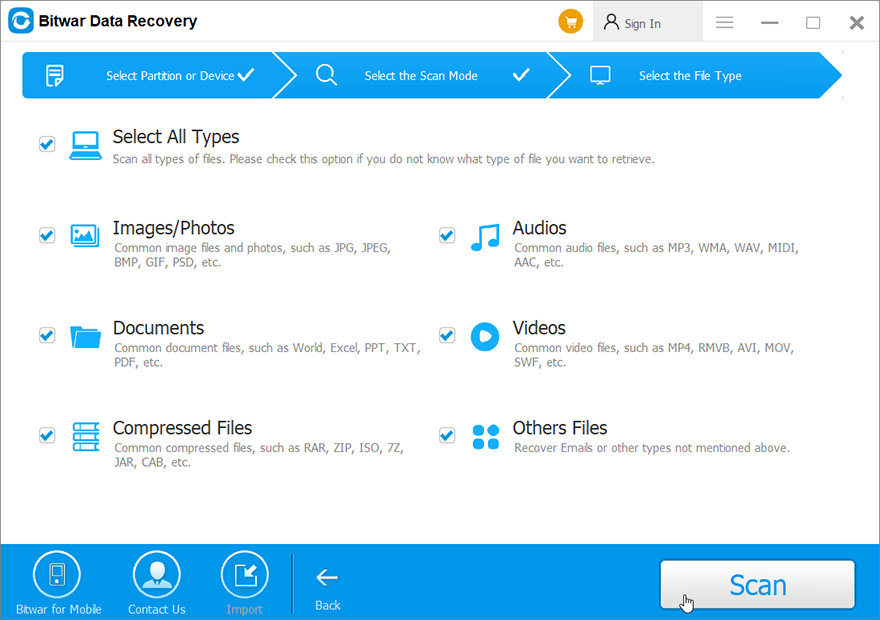
Step 4: Choose the types of files you want to bring back and click Scan.
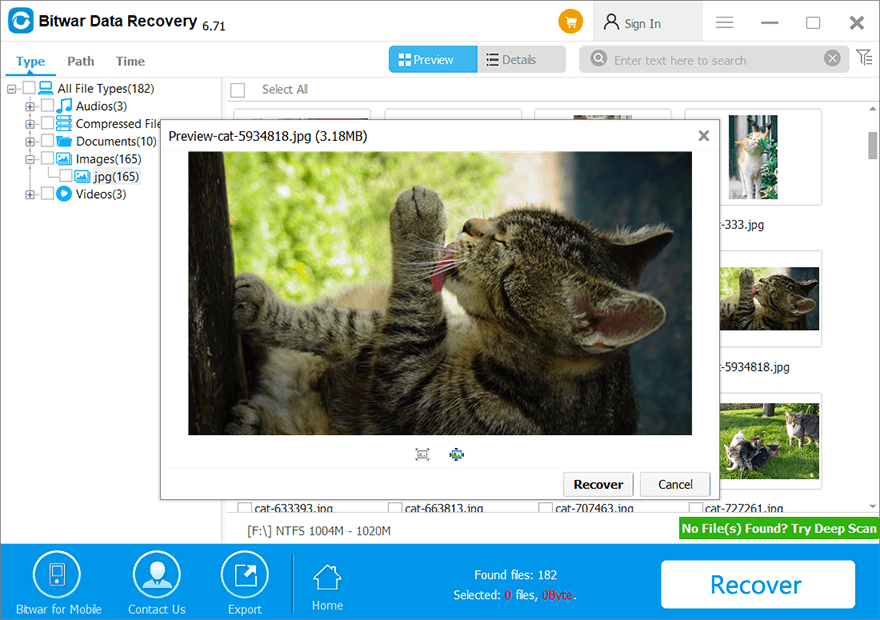
Step 5: Preview files you want to check their intactness. Choose those intact files and click Recover.
Conclusion
How to fix the computer restarted unexpectedly error? In this article, we have offered multiple effective methods for you. Thus, if you meet the error message saying that The computer restarted unexpectedly. Try the methods mentioned above. Besides, it is wise to back up your system when your computer runs in a perfect state so that you can easily restore your system after your computer has crashed. And if you run into any data loss issues when fixing the computer restarted unexpectedly error, bear in mind that you can always turn to Bitwar Data Recovery for help.
Previous Article
How To Fix the Automatic Repair Couldn’t Repair Your PC Error Summary: Virtually every user would like to update their computers to the latest most improved version of the Windows system....Next Article
[Solved] Windows Explorer Keeps Crashing Summary: Virtually every user would like to update their computers to the latest most improved version of the Windows system....
About Bitwar Data Recovery
3 Steps to get back 500+ kinds of deleted, formatted or lost documents, photos, videos, audios, archive files from various data loss scenarios.
Learn More


