9 Methods for The 0x80071AC3 Error: The Volume Is Dirty
Summary: In this article, we will expound on how to fix the 0x80071AC3 error: The volume is dirty. This is one of the common issues associated with external storage media that users may encounter when trying to access the data on the storage medium. In most cases, On top of depriving users of access to the data, this error may well cause another alarming problem: data loss. To help you grapple with this problem, we will also introduce a user-friendly and powerful recovery software, Bitwar Data Recovery.
The error the volume is empty, accompanied by the code 0x80071AC3, signals that the system can neither write nor read the data that the user attempts to write or view. Reportedly, users are more likely to confront the problem particularly when they are transferring data between the PC and the storage device. The devices in the problem are not limited, including USB flash drive, hard disk, SD cards, etc.

Table of Contents
What Causes the Error the Volume Is Dirty?
Either to minimize the risk of damaging other storage devices or to enhance the prospects of fixing the problem, knowing the possible causes behind this error is quite helpful. Hence we would like to post below a list of them:
- Bad sectors on the storage device
- Damaged USB port
- Corrupted/outdated device driver
- File system errors
- Corrupted Windows system files
- Abrupt system crash or shutdown
- Dismount the device without safe removal
- ReadyBoost feature enabled
Thankfully, this problem is not as vexed as it appears. As long as the faulty storage device is not dead, there is a good chance that you can get rid of the error message, fix the error, and recover lost data with the help of Bitwar Data Recovery. Refer to the following part of this article to learn some effective and fleshed-out solutions that can work in most cases.
How to Fix the Error the Volume Is Dirty?
Method 1: Slide the SD Card Lock
If the error occurs when you are using an SD card, it’s likely that the lock embedded on the sd card is faulty. Modern SD cards that are used for DSLR cameras and can be put in SD card adapters have a lock to control writing/reading permissions. You can try sliding the lock back and forth a few times and then reconnect it to the computer to check whether the error message persists.
Method 2: Connect the Device to the PC With Another USB Port
Another possible physical cause you need to check is the USB ports on the computer. Since the device may be plugged in a faulty USB port, you can try mounting the device with another USB port.
Method 3: Reinstall the Driver
As we have talked before, one of the possible causes behind this error is a faulty device driver. To fix the problem you can uninstall the out-dated or corrupted driver and install the latest one. Use these steps to do so:
Step 1: Type in Device Manager in the Search bar and then open it.
Step 2: Look for the disk drivers tree and expand it.
Step 3: Right-click on the driver of the faulty device.
Step 4: Click on Uninstall device and then click on OK to confirm your operation.
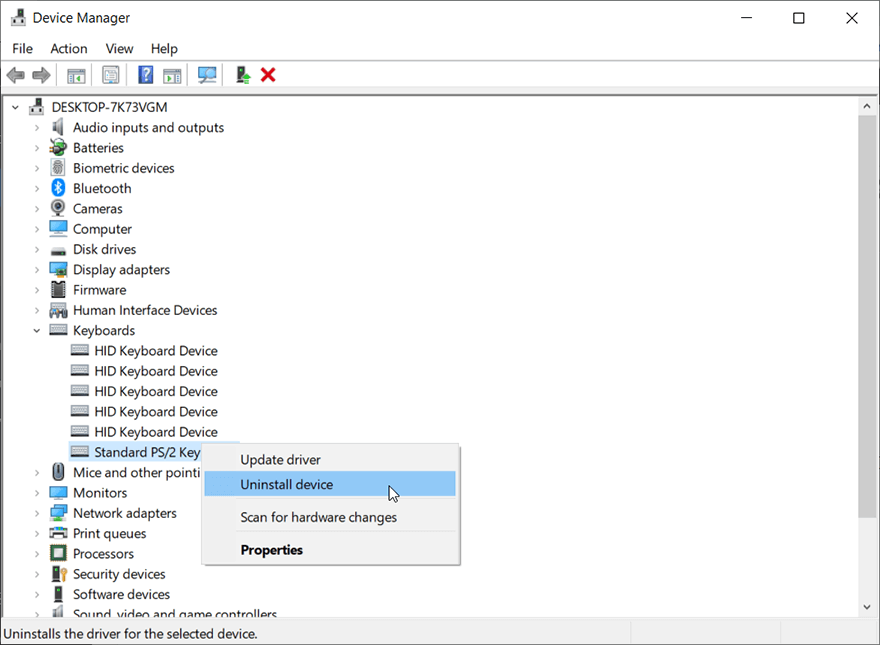
Step 5: Reboot your computer and then open Device Manager again.
Step 6: Click on the Action tab and then select the Scan for hardware changes option.
Step 7: The computer should start installing the latest driver.
Recover Lost Data From the Faulty Disk Using Bitwar Data Recovery
At times valuable data is more precious than the storage medium that stores it. Hence, when it comes to the error message the volume is dirty, which may bring about data loss, some users are concerned about whether the data will be gone forever. Don’t worry, you can bring lost data back with the help of Bitwar Data Recovery, an effective, reliable, and user-friendly recovery tool. To learn how the program works its magic, refer to the following guide:
Step 1: Go to the official website of Bitwar Data Recovery, download, and install it.
Step 2: Launch the program, select the faulty disk on the main interface, and then click on Next.
Step 3: You should choose a scan mode in this stage. We would like to suggest Quick Scan, which is capable of scanning a common disk within a few minutes. If it fails to find out what you want, you can return to this stage and choose Deep Scan.
Step 4: Select the types of files you want to recover and then click on Next.
Step 5: Preview the files you want to recover, select them, and click on Recover.
Advanced Methods
Method 4: Run CHKDSK
If you pore over the accompanying message, when the error the volume is dirty pops up, you will notice that the window suggests you use CHKDSK to fix the problem. It is a built-in tool offered by Windows that checks the file system and its metadata for physical or logical errors. Refer to the following steps to learn how to use it.
Step 1: Right-click the Start Menu button.
Step 2: Click on Command Prompt (Admin).
Step 3: Type the following command written below and press Enter:

Step 4: Wait for the tool to scan the disk.
Step 5: Safely remove the storage device and then connect it to the PC again,
Step 6: Try accessing the device again.
Method 5: Run Error Checking
If the previous command-line based method chkdsk doesn’t work or won’t open for some error such as Chkdsk cannot open volume for direct access error, you can use Error Checking, which is another built-in tool and a GUI version of the chkdsk tool. Use these steps to run it.
Step 1: Press Win + E to open File Explorer.
Step 2: Right-click on the faulty disk and then select Properties.
Step 3: Switch to the Tool tab.
Step 4: Click on Check within the Error Checking section.
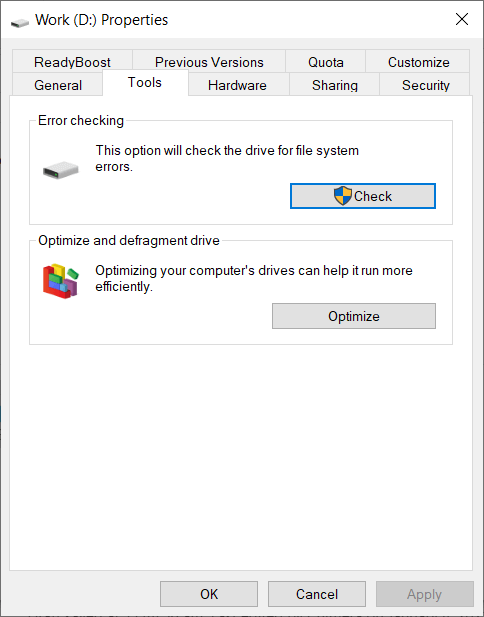
Step 5: Click on Run Scan to confirm your operation.
Method 6: Run SFC
One of the possible causes that we have mentioned before is corrupted system file errors. Although we are not sure whether the problem facing you is triggered by this cause, it’s worth using the SFC, shorthand for System File Checker, to scan the computer and restore corruptions in Windows system files if necessary. Refer to these steps to learn how to do so.
Step 1: Press Win + Q to open the Search bar.
Step 2: Type in Command Prompt and right-click on it to select the Run as administrator.
Step 3: Type in the command and then press Enter.
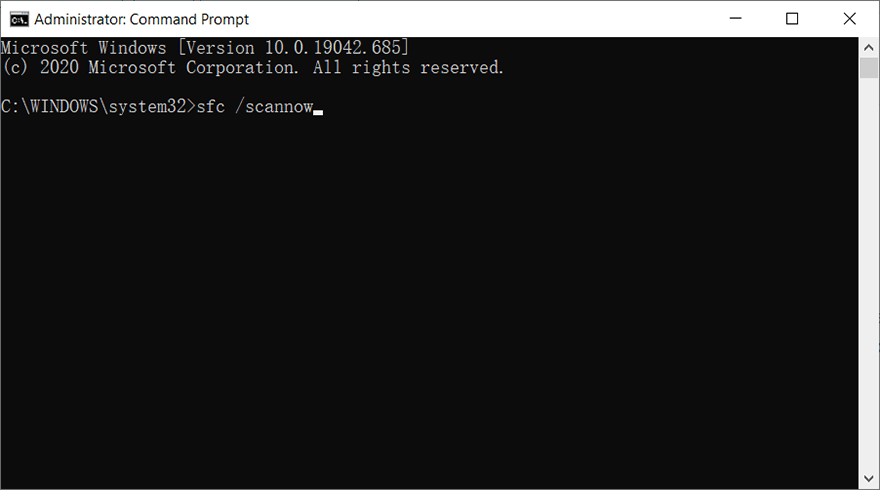
Step 4: Wait until the scan has finished.
Method 7: Use Registry Editor
If the computer’s registry is configured incorrectly, the PC will not be allowed to write data to disk drives. Hence, to ensure that the write permission is granted to your computer, you need to use these steps:
How to back up the registry
Step 1: Type in Registry Editor in the search bar and then open it.
Step 4: Click on Save.
Step 1: Press Win + R to open the Run box.
Step 2: Type in Regedit and open it.
Step 3: Navigate to
Step 5: Double-click on the WriteProtect key on the right pane.
Step 6: Change the value under Value data from 1 to 0.
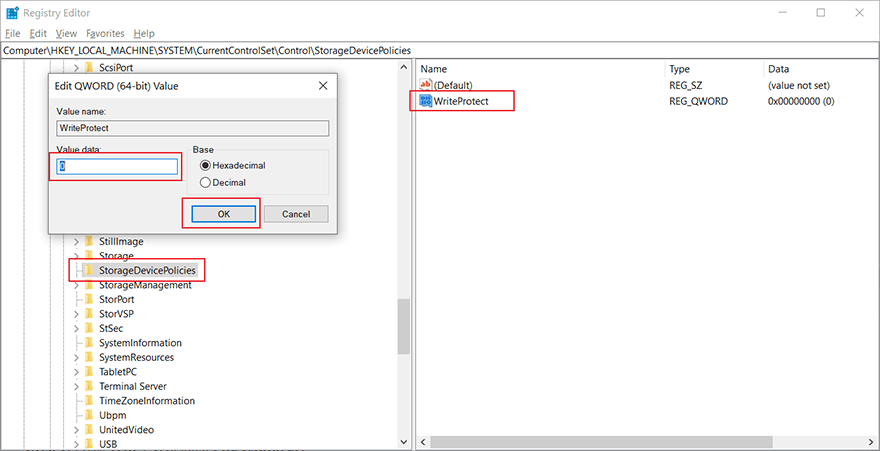
Step 7: Close Registry Editor, reboot the computer and access the faulty disk again to check whether the problem persists.
Method 8: Disable ReadyBoost
ReadyBoost, a disk caching software component, made its debut in Windows Vista and has been included in later versions of Windows OS. It enables several kinds of storage devices, including CompactFlash, USB flash drivers, and SD cards, to serve as a cache between random access memory and a hard drive, which boosts the computer performance of the PC. But its effectiveness could trigger other unfavorable outcomes, one of which is the error the volume is dirty. If the faulty USB drive is used as a cache for ReadyBoost, you can disable it by using these steps:
Step 1: Press Win + E to open File Explorer.
Step 2: Right-click the USB flash drive and then select Properties.
Step 3: Switch to the ReadyBoost tab.
Step 4: Select the radio button next to the Do not use this device option.
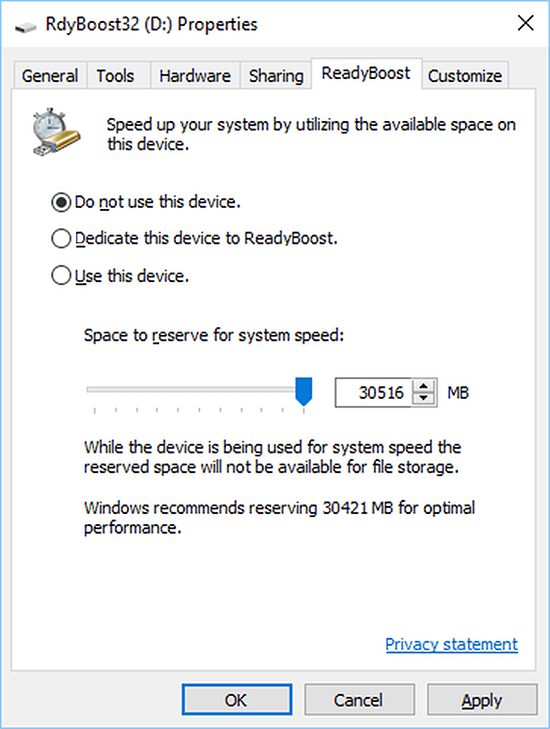
Step 5: Safely remove the drive and then reconnect it to the computer to check whether the method has worked.
Method 9: Format the Disk
If, unfortunately, none of the methods listed above works, the last resort might well be to format the disk. It’s an extremely effective method, but it will wipe out every bit of data on the drive. Hence, before using this method, make sure that you have used the Bitwar Data Recovery software to bring back those lost files and save them to other safe disks. To format the faulty disk, use these steps:
Step 1: Press Win + E to open File Explorer.
Step 2: Right-click on the faulty drive and then select Format.
Step 3: Expand the file system drop-down menu and select a file system.
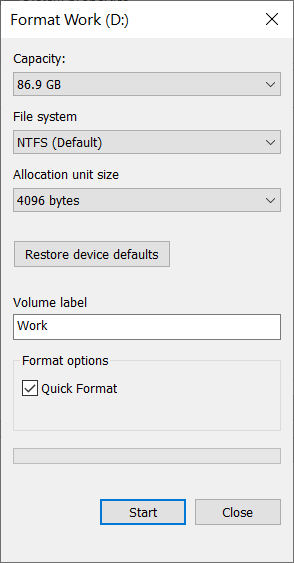
Step 4: Click on Restore device defaults and then Start.
When this way of formatting the faulty disk fails due to some reason, you can refer to the following article where we have listed several fleshed-out ways to format a USB flash drive, some of which can work on other storage media too.
Conclusion
In this article, to help more users solve the error the volume is empty, we have laid out as many methods as possible. It’s a common problem users could encounter when trying to access some storage media, including USB flash drives, SD memory cards, and hard disks.
Although the error has multiple possible causes, most of the solutions are straightforward and effective. But that doesn’t mean it’s not critical, since it’s highly likely to trigger another permanent and thorny problem, data loss. So, for users who are annoyed by the data loss problem, we have also introduced our powerful recovery tool, Bitwar Data Recovery, which can help users recover their valuable files in a remarkably easy way.
Previous Article
How to Fix the Failed to Format the Selected Partition Error [0x8004242d] Summary: In this article, we will expound on how to fix the 0x80071AC3 error: The volume is dirty. This is one...Next Article
What’s New in Bitwar HEIC Converter for Mac V2.1.0 Summary: In this article, we will expound on how to fix the 0x80071AC3 error: The volume is dirty. This is one...
About Bitwar Data Recovery
3 Steps to get back 500+ kinds of deleted, formatted or lost documents, photos, videos, audios, archive files from various data loss scenarios.
Learn More


