[TIPS] How To Solve the Scanning and Repairing Drive Issue
Summary: If you turn off your computer abruptly, It’s highly likely that when you boot the computer next time, you will get a message saying the system is scanning and repairing your drive. When running, the computer is continuously writing and reading data from and to your hard drives, RAMs, etc. If you exit it abruptly, it may encounter hard drive errors or even inconsistency in data. In this article, we will explain to you how to deal with this issue. Besides, at the end of this article, we will also introduce our effective and reliable program, Bitwar Data Recovery, which can help you recover lost files caused by this issue.
Table of Contents
What Are the Possible Causes of This Issue?
Knowing why this particular issue is caused may help you prevent it from happening again. Some of the possible reasons for this issue are given below:
- wrong ways to shut down your PC, such as forced shutdown or power outages.
- bad sectors on hard drives
- virus attacks
- incorrectly configured drivers
What To Do When Encountering the Scanning and Repairing Drive Issue
Generally, the scanning and repairing dialog gets stuck for a rather long time. In some particular cases, the duration could extend to 2-3 hours as the progress bar keeps getting stuck on a single percentage. Indeed, you could choose to wait for the repairing progress to finish. But that may entail a seemingly infinite waiting. Hence, we will lay out several solutions to this issue and try to help you tackle it within no time.
Solution 1: Remove All USB Devices
If several USB devices or external hard drives are connected to the computer, it is likely that the operating system on the computer is trying to scan all of them, which may entail extra time required for the computer to boot.
If your computer gets stuck for a long time on a specific percentage, you should shut down your computer outright and disconnect all the USB devices one by one. Plus, ensure that you also unplug all the external devices including the mouse and keyboard.
After you have disconnected all the devices, reboot your computer to restart the process.
Solution 2: Use Chkdsk in Safe Mode
If the computer keeps getting stuck in the checking disk loop for a considerable amount of time, you can try entering into safe mode to perform the check disk. If any errors are found, you could enter some further commands. With error cleaned off, when Windows reboots in normal mode, the process will be expedited.
Step 1: Use a recovery drive to boot the Windows into safe mode.
Step 2: After you are in safe mode, press Windows + S, type command prompt in the dialog box, right-click on the application, and then select Run as administrator.
Step 3: In the elevated command prompt window, type in the following command and then press Enter.

Step 4: If any errors were found after the process, type in the below command and then press Enter.
Step 5: During the scanning, a line ending with …queued for offline repair may pop up, which means that the user should reboot Windows so that the computer can fix the problems it detected.
Step 6: Enter the below command and then press Y when you are prompted.
Step 7: After performing all the aforementioned steps properly, reboot your computer outright and wait for the scanning to finish.
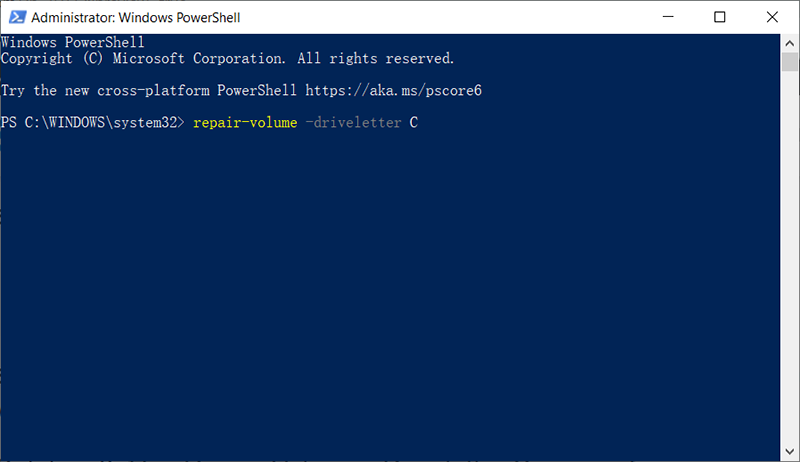
Solution 3: Use Repair-Volume –Driveletter Command
If the previous solution fails to work, there is another command dedicated to repairing your disk in Safe mode. This command also detects and deals with drive errors in the same way similar to check disk. if it’s successfully executed, the computer will not get stuck at a specific percentage.
Step 1: Use a recovery drive to boot the Windows into safe mode.
Step 2: After entering into safe mode, press Windows + S, type in PowerShell in the dialogue box, right-click on the application, and then select Run as administrator.
Step 3: In the PowerShell window, type in the following command and then press Enter:
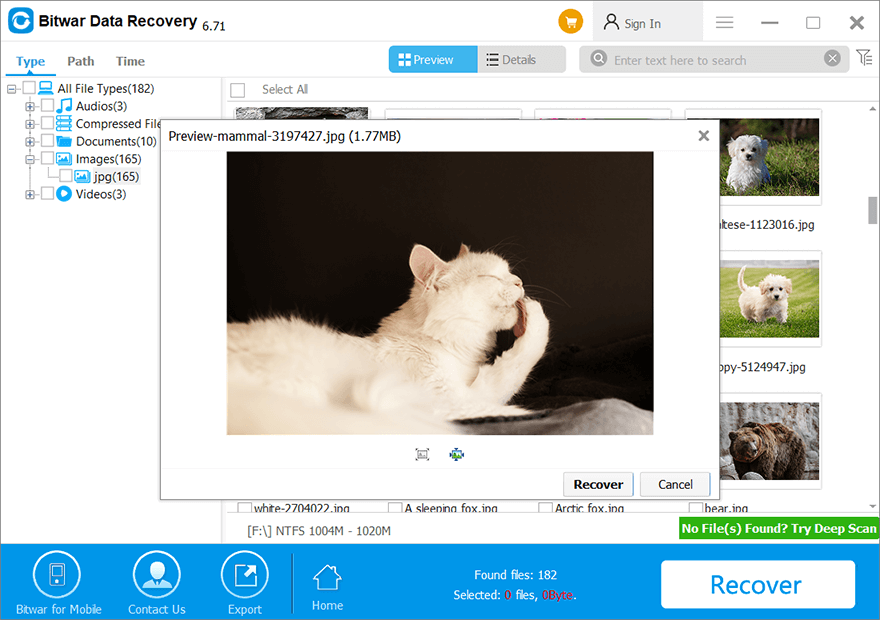
How To Recover Lost Data Using Bitwar Data Recovery
An unbootable system is definitely frustrating and the bleak prospect of losing valued files adds to the burden facing users. Therefore, to help you tackle data loss problems coming close on the heels of the scanning and repairing drive issue, let us introduce our reliable and user-friendly tool, Bitwar Data Recovery. Refer to the following steps to learn how it works like magic.
Step 1: Visit our official website and then download Bitwar Data Recovery and then install it on your PC.
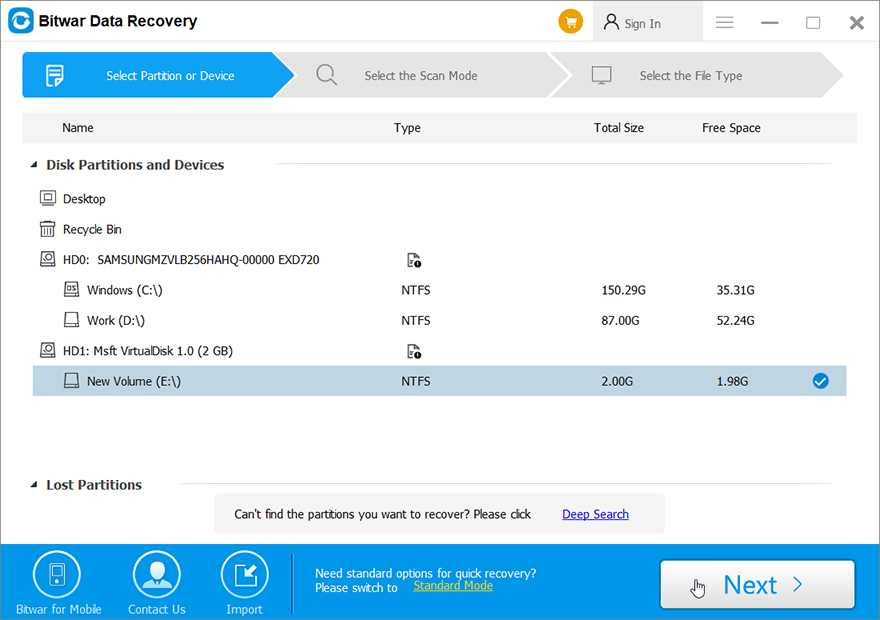
Step 2: Open the program, choose the disk drive where those missing files were stored, and then click Next.
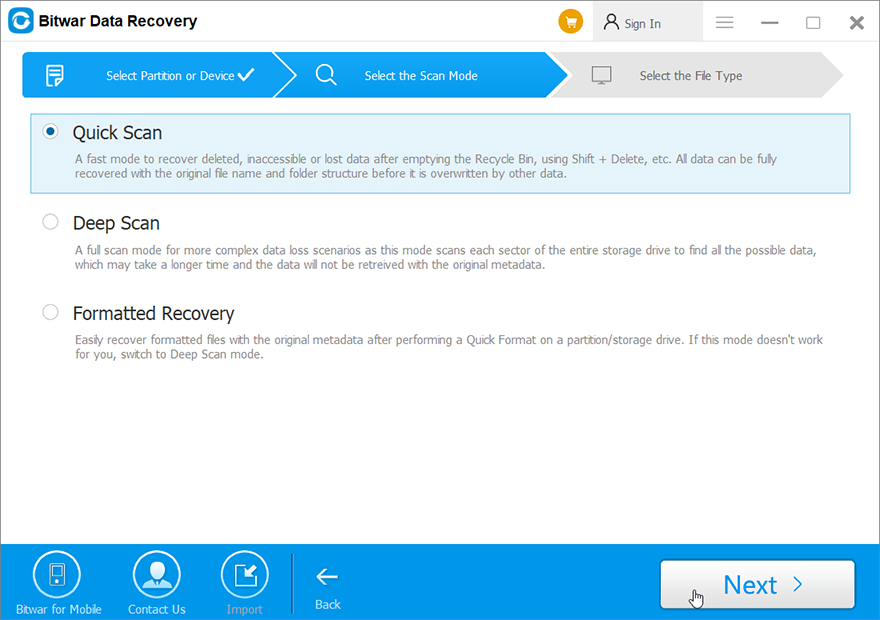
Step 3: You could select a scan mode in this stage. We would like to recommend Quick Scan, which is able to retrieve a great number of lost files. If it fails you, you can re-run the tool again and choose Deep scan, which is more effective.
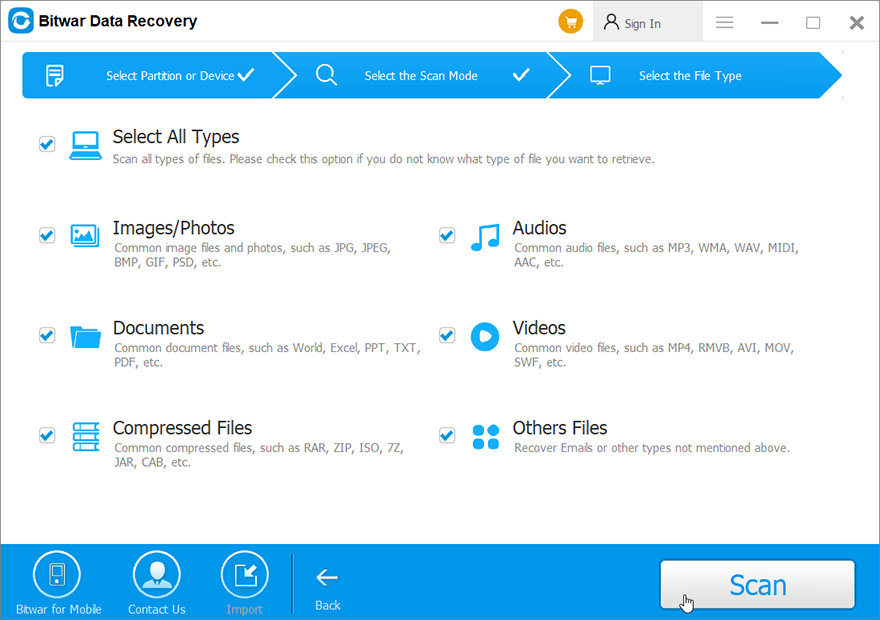
Step 4: Choose the types of files you want to bring back and click Scan.
Step 5: Preview wanted files and check their intactness. Choose those intact files and click Recover.
Advanced Solutions
Solution 1: Disable Automatic Repair
Sometimes Automatic Repair doesn’t work on certain computers. Consequently, the feature may itself cause several issues, such as Windows getting stuck at preparing automatic repair and the Scanning and repairing problem discussed in this article. Hence, you can try disabling Automatic Repair to sidestep this issue. To do so, you will need to enter the Windows Recovery Environment. Refer to the following steps to learn how to do so:
Step 1. Press the power button for 10 seconds to shut down the computer.
Step 2. Press the power button again to boot the computer. right after you have seen the first sign of Windows has started, hold down the power button for another 10 seconds to turn off the computer.
Step 3. Press the power button to start the computer. Once Windows reboots, hold down the power button for 10 seconds to turn off the computer.
Step 4. Press the power button to boot the computer, and this time don’t interrupt. Then you will see your computer enter WinRE.
Step 5. On the Choose an option screen, Navigate to Troubleshoot > Advanced options > Command Prompt
Step 6. Type in bcdedit, press Enter, and then note down the values of identifier and recoveryenabled under Windows Boot Loader, In most cases, it’s {current} and Yes.
Step 7. To disable Automatic Repair, Type in bcdedit /set {current} recoveryenabled no and then press Enter.
Step 8. Reboot your computer.
Solution 2: Stop the scanning and repairing the drive process
If the hard drive runs normally, you can simply abort the scanning and repairing process.
Immediately after the computer boots and the Preparing for automatic recovery screen pops up, press any key until you see the warning disappear. Consequently, your computer will not freeze on automatic recovery. After that, you can run any utilities to check the disk. Refer to the following solutions to learn how to use several effective tools.
Solution 3: Run a Chkdsk Scan
Chkdsk is well-known for its ability to help users to grapple with issues like bad sectors and hard & solid-state drive inconsistencies abound. This kind of problem may well happen after the user has downloaded or updated an application or game.
Step 1: Right-click the Start Menu button and then click Command Prompt (Admin).
Step 2: Type in the following command and press Enter:
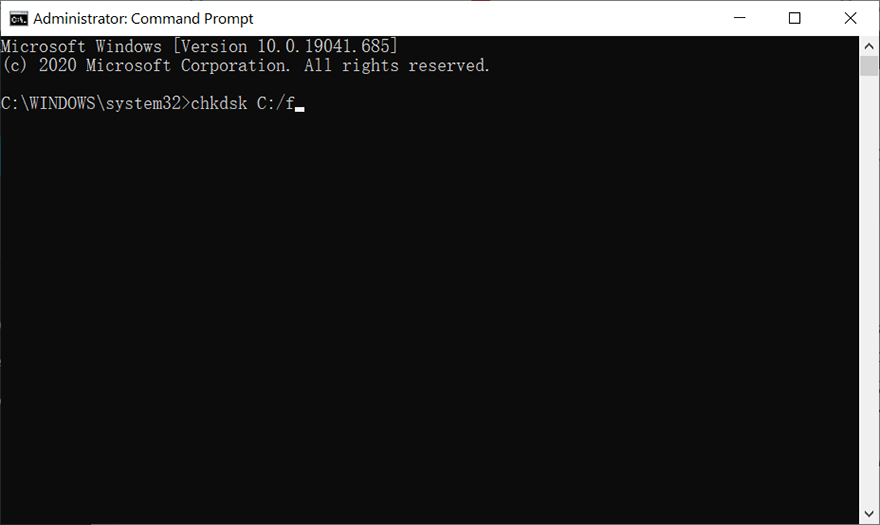
Step 3: Wait for the process to finish.
Step 4: Reboot your computer to check whether the error persists.
If you encounter any problems when utilizing the chkdsk such as Chkdsk cannot open volume for direct access error, you could click on the link to learn how to solve it. There is also an alternative to Chksk, which is called Error checking. You can use it by following these steps:
Step 1: Press Win + E to open File Explorer.
Step 2: Right-click the disk drive/partition that you want to check out and then click on Properties.
Step 3: Switch to the Tools tab.
Step 4: Click on Check within the Error-checking section.
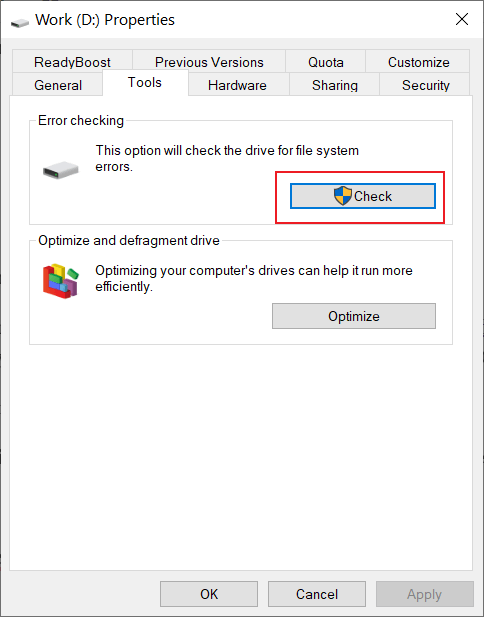
Step 5: Click the Scan drive to confirm your operation.
Solution 4: Run SFC
There are two tools you can use to check your drives and fix lurking problems. One of them is SFC, shorthand for System File Checker. It can look into all of the important system files on the computer and replace any faulty files it finds with healthy ones. Use the following steps to run SFC:
Step 1: Press Win + Q, type in Command Prompt, right-click the search result and then select Run as administrator.
Step 2: In the command prompt window, type in the following command and then press Enter.
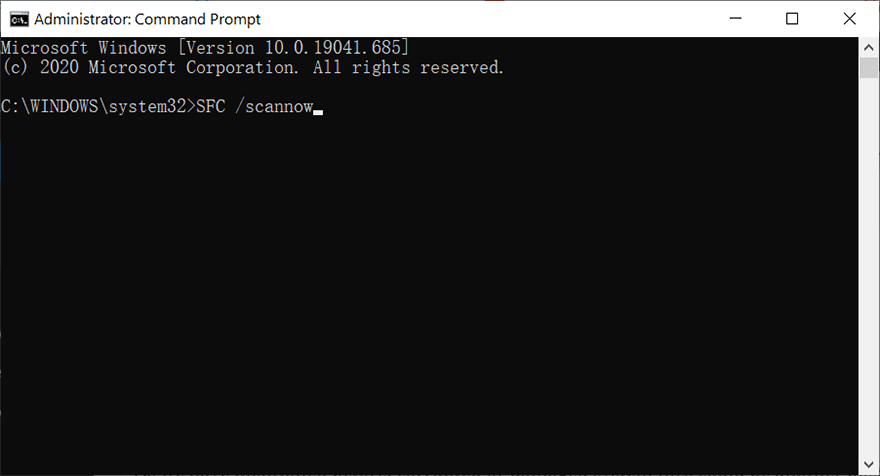
Step 3: Reboot the computer to see whether the problem is fixed.
Solution 3: Run DISM
If SFC fails to work, there is another working tool, DISM, on which users can rely when encountered with the problem of corrupted system files. DISM, shorthand for Deployment Image Servicing and Management, is used to tackle some thorny problems that SFC can’t. To check out whether this method will work for your c0mputer, follow these steps:
Step 1: Type Command Prompt in the search bar, right-click the search result and then select Run as administrator.
Step 2: Enter the following commands and press Enter at the end of each line.
Dism /Online /Cleanup-Image /CheckHealth
Dism /Online /Cleanup-Image /ScanHealth
Dism /Online /Cleanup-Image /RestoreHealth
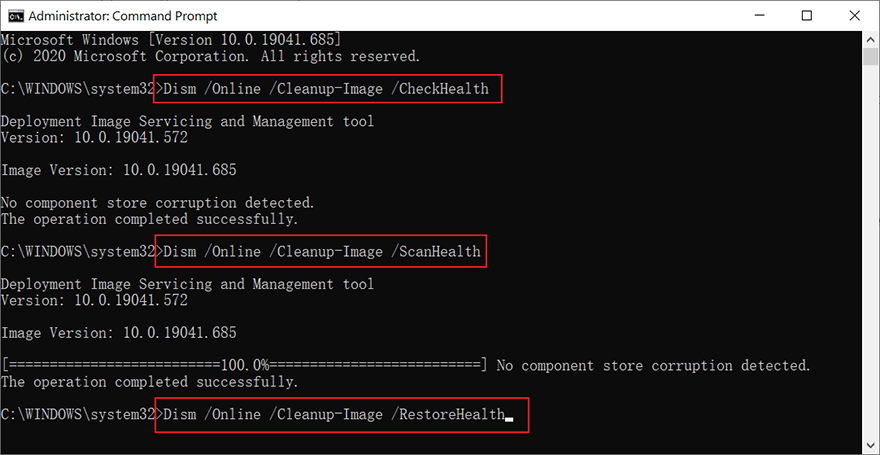
Step 3: After the restoration is complete, reboot your PC to check whether this solution works.
Conclusion
We sincerely hope this article can help you solve the scanning and repairing drive issue affecting your computer. In this article, we mention several potential causes that can trigger the issue and expound on some of the simplest solutions to it. Besides, we also introduce an awesome, effective, and user-friendly tool, Bitwar Data Recovery, on which you can always rely to recover your lost data.
Previous Article
How To Show Application Names On Windows 10 Taskbar Summary: If you turn off your computer abruptly, It's highly likely that when you boot the computer next time, you...Next Article
Solved: The Directory Name is Invalid Summary: If you turn off your computer abruptly, It's highly likely that when you boot the computer next time, you...
About Bitwar Data Recovery
3 Steps to get back 500+ kinds of deleted, formatted or lost documents, photos, videos, audios, archive files from various data loss scenarios.
Learn More


