How To Fix Windows 10 Start Menu Frozen
Table of Contents
What Causes Start Menu to freeze?
Many software issues can lead to Start menu problems. First, a new software update is a common culprit causing the issue. Windows updates can fix some bugs in the previous versions, but also can bring some new glitches and difficulties.
Another cause can be corrupted files. In this case, you can perform a disk scan for corrupted or missing files on your PC using the SFC command. Malware or a virus also can result in problems with your Start menu. Execute a virus scan and clean up your PC to combat any malicious software causing the issue.
Methods to Fix Frozen Start Menu On Windows 10
Method 1: SFC Scan
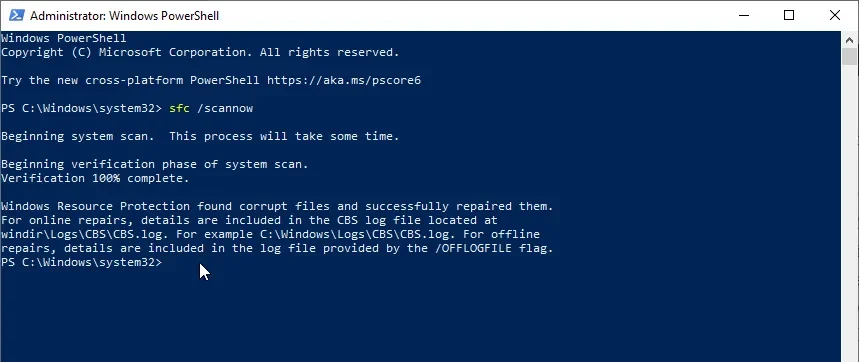
- Corrupt files can cause many problems on Windows, and Start menu issues are no exception. To fix the Start menu frozen issue, execute the SFC command by launching PowerShell.
- Type PowerShell in the Search box, then choose Run as administrator in the right pane.
- Type sfc /scannow and hit Enter.
- If the message says Windows Resource Protection found corrupt files but was unable to fix some (or all) of them, type DISM /Online /Cleanup-Image /RestoreHealth to download clean versions of corrupted files and replace them. If you see the message saying Windows Resource Protection found corrupt files and successfully repaired them, you are all set.
If the above solution doesn’t fix your Windows 10 Start menu frozen issue, go to the next method.
Method 2: Restart Windows Explorer
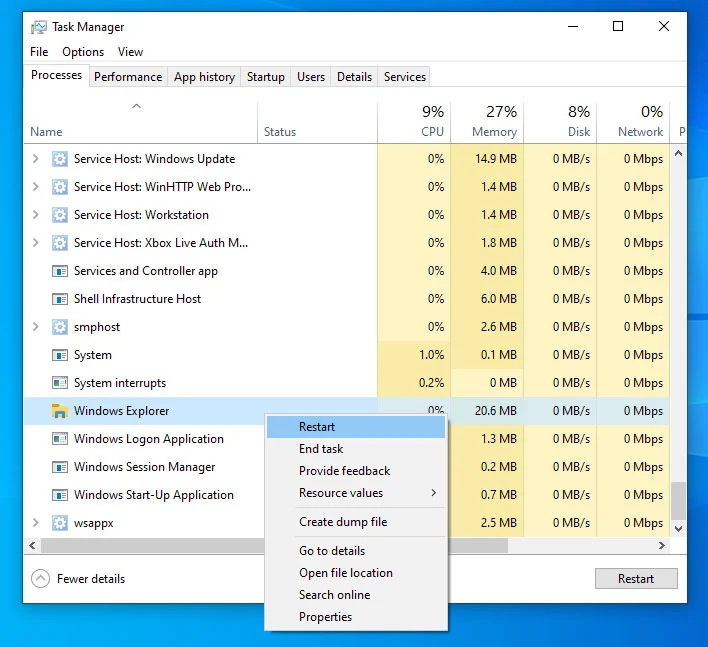
Killing Windows Explorer is a quick-and-easy fix that may come in handy for various situations, such as when you have non-responsive windows or sporadic issues on the Windows desktop. The process is not guaranteed to work but has saved many Windows users from reinstalling their operating system. Here’s how to kill the Windows Explorer process.
- Right-click the Start menu icon and select Task Manager from the menu or hold down Ctrl + Shift + Escape.
- Now, scroll through the Processes tab to find Windows Explorer.
- Next, right-click on Windows Explorer and select Restart from the menu.
Method 3: Rebuild Index
Rebuilding the index in Windows 10 can help you fix Windows 10 Start menu not working error. Follow the steps listed below to initiate the rebuild index in Windows 10:
- Press Windows + R on the keyboard and type control/name Microsoft.IndexingOptions and click on OK.
- In the appearing dialog box, click on Modify.
- Then click on Show all locations, uncheck all the directories in Change selected locations and click on OK.
- Click on Advanced and click on Rebuild in the appearing dialog box.
Method 4: Create New Registry
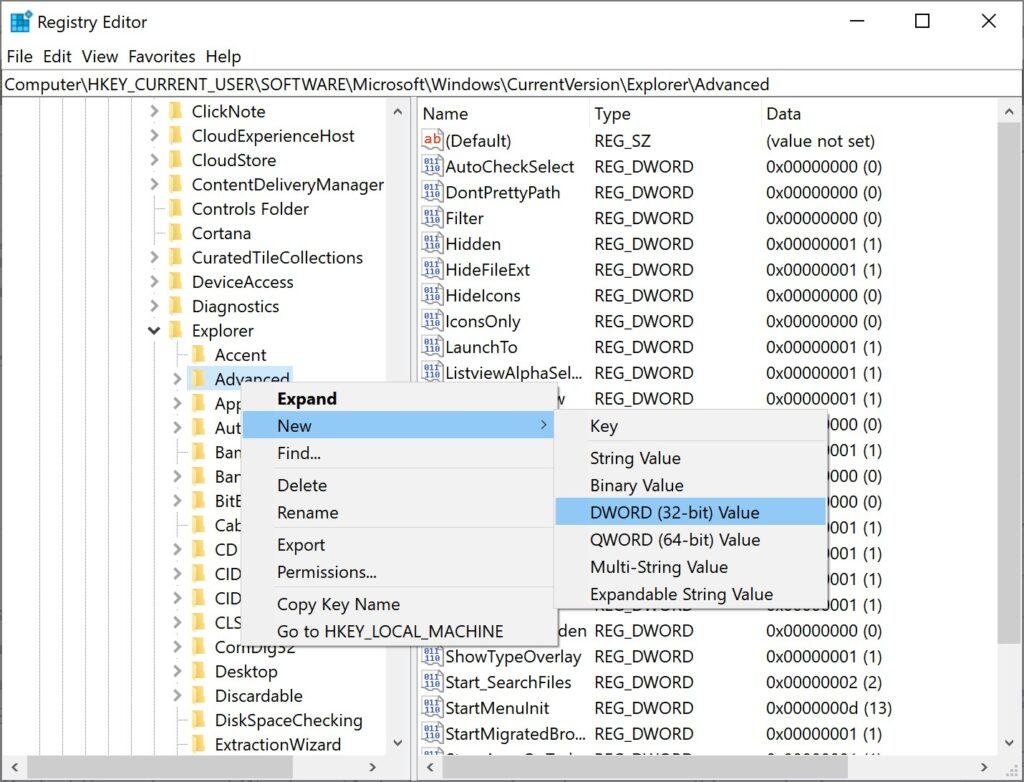
Adding a new registry for the start menu can fix this error. Follow the steps listed below to create a new registry:
- Press Windows + R on the keyboard and type Regedit in the Run box.
- In the appearing window, go to Computer\HKEY_CURRENT_USER\SOFTWARE\Microsoft\Windows\CurrentVersion\Explorer\Advanced, right-click Advanced and choose New.
- Then click on DWORD(32-bit) Value and name the new file as EnableXamlStartMenu.
- Now Restart the system and Windows 10 start menu not working error will be resolved.
Method 5: Malware Scan
Various errors occur on the system due to infected files, which are called malware. These files slowly infect the system and then cause various service failures in the system including Windows 10 Start menu frozen. So you must scan your system regularly and make sure that there is no malware present in your system.
Method 6: Reset System
Windows provides its users with a feature known as Reset, which allows users to return the system to the default settings, making no changes to the data.
- Press Windows +I on the keyboard to open Settings and click on Update & Security.
- Click on Recovery and select Get started under Reset this PC.

- A dialog box will open. Click on Keep my files.
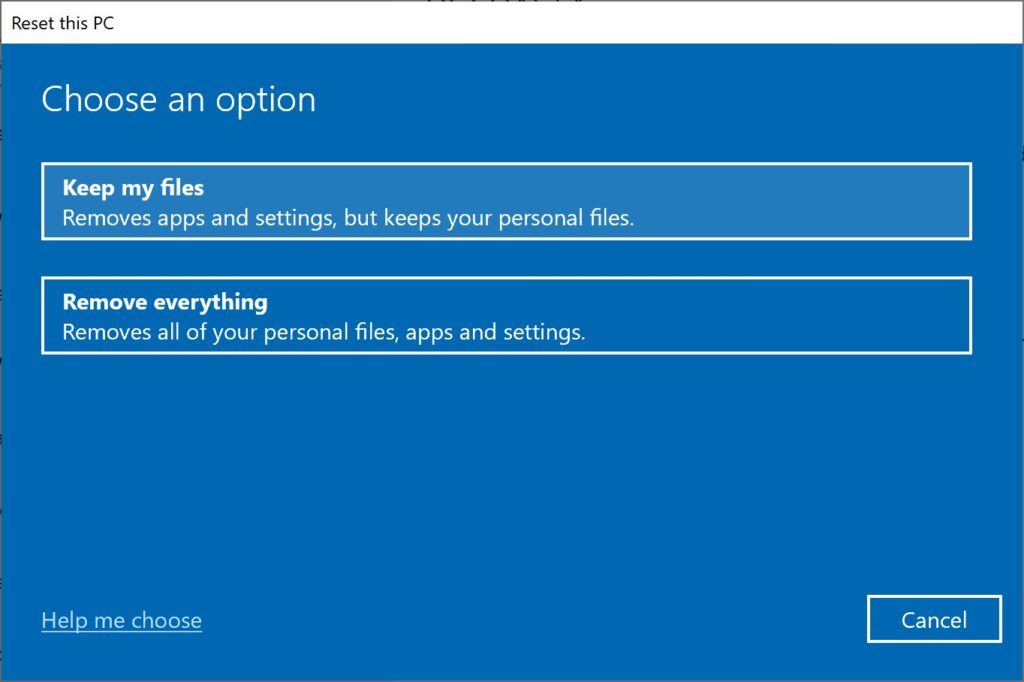
- Then click on Local reinstall and follow the prompts to click on Next.
- Finally, click on Reset to factory reset Windows 10.
Conclusion
To learn more about the methods to fix Windows 10 issues, please log into our Bitwar Official Website and read related articles. Of course, you can also click the following hot article to read:
Previous Article
Mail App Is Not Working On Windows 10: System Error Can’t get mail Summary: Start menu is an essential part of the Graphical User Interface (GUI) of the Microsoft Windows operating system. It...Next Article
8 Methods to Fix When Windows 10 Won’t Shut Down Summary: Start menu is an essential part of the Graphical User Interface (GUI) of the Microsoft Windows operating system. It...
About Bitwar Data Recovery
3 Steps to get back 500+ kinds of deleted, formatted or lost documents, photos, videos, audios, archive files from various data loss scenarios.
Learn More


