How to Format a USB Flash Drive on Windows/Mac
Resumo: Este artigo explica como formatar uma unidade flash USB no Windows 10/8/7 e Mac quando você deseja reformatar um dispositivo de armazenamento removível novo ou usado para se certificar de que ele não contém nenhum arquivo malicioso ou corrigir os erros lógicos.
Índice
O que é formatação?
Formatting is the fastest way to prepare the USB flash drive for initial use. It wipes all the data stored on your flash drive and allows full use of the storage capacity. Meanwhile, it also creates a filing system that can help organize your data on Windows or Mac.
Qual sistema de arquivos devo escolher para uma unidade flash USB?
Não podemos falar sobre formatação sem falar sobre o sistema de arquivos, pois ele difere quando usamos os diferentes computadores; os sistemas de arquivos comuns são FAT32, exFAT e NTFS para Windows, APFS, HFS + e exFAT para macOS. Aqui, falaremos apenas sobre os sistemas de arquivos mais comuns ao formatar uma unidade flash USB:
- FAT32: É compatível com todos os principais sistemas operacionais e usa menos memória. Mas ele não pode lidar com arquivos únicos maiores que 4 GB e tem um tamanho de partição limitado (até 32 GB).
- NTFS:Ele pode criar partições maiores que 32 GB e ler / gravar arquivos maiores que 4 GB. Além disso, ele suporta criptografia de arquivos instantânea. A desvantagem é que o computador Mac só pode ler os dados da unidade NTFS.
- exFAT:Ele fornece um arquivo ilimitado e tamanho de partição. Ele atende não importa os usuários de Windows ou Mac que desejam trabalhar com arquivos maiores que 4 GB.
Recomendamos fortemente que você use exFAT, que é considerado a melhor escolha para computadores Windows e Mac, enquanto o sistema de arquivos exFAT funciona melhor do que FAT32 e pode lidar com arquivos de até 16 GB.
Como formatar uma unidade USB no Windows 7/8/10?
Depois de decidir qual sistema de arquivos você vai aplicar, vamos explorar os métodos de formatação. Geralmente, no Windows 10, 8, 7, existem algumas maneiras comuns de formatar uma unidade flash USB.
Método 1: formatar uma unidade flash USB usando o Gerenciador de arquivos
Essa é a maneira mais fácil com a qual muitos usuários estão familiarizados. Consulte as etapas a seguir para saber como.
Passo 1: Conecte sua unidade flash USB e abra Tecla Win + E to open File Explorer.
Passo 2: Clique com o botão direito na unidade e escolha o Formatopção.
Passo 3: Expanda o menu suspenso Sistema de arquivos e selecione o exFAT opção.

Passo 4: Click on the Start button.
Note: Desmarque a formatação rápida significa formatação completa; Ele faz uma varredura completa e limpa seus dados na unidade flash USB, você não terá chance de recuperar seus dados depois de usar esta opção.
Método 2: formatar uma unidade flash USB usando o Diskpart
Usar o diskpart para formatar uma unidade flash USB é outro método útil e até mesmo funciona para o usuário de computador que não tem opções exFAT no File Explorer ou Disk Management. No entanto, o usuário deve selecionar o volume correto antes de realizar uma formatação rápida ou completa em sua unidade flash USB:
Passo 1: Enter Command Prompt na barra de pesquisa e, em seguida, clique com o botão direito do mouse, escolha Run as administrator.
Passo 2: Enter the below-written commands in the same order and same diskpart window:
- Diskpart
- volume da lista
- selecione o volume NUMBER (Substitua NUMBER pelo número exato de sua unidade flash USB)
- formato fs = exFAT rápido (Não digite rápido se quiser um formato completo)
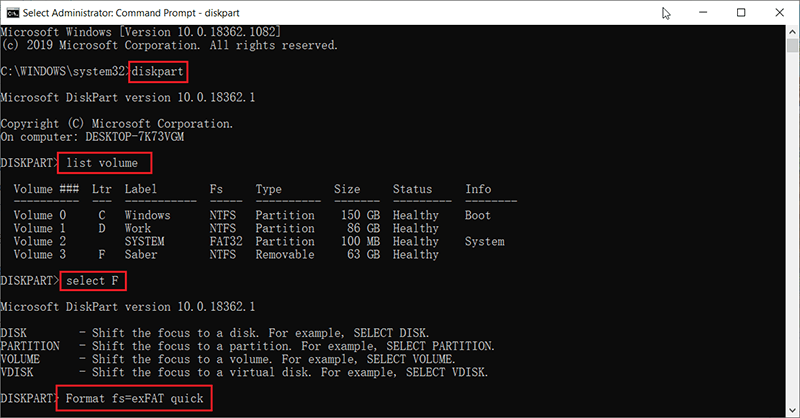
Nota: Substitua exFAT se você escolher outro sistema de arquivos, por exemplo, digite o comando format fs=fat32 para formatar a unidade flash USB no formato FAT32.
Método 3: formatar uma unidade USB usando o gerenciamento de disco
Este é um método semelhante ao executado usando o Explorador de Arquivos, e aqui estão as etapas que você pode seguir:
Passo 1: Press Win + Q, type in Disk Management and open it.
Passo 2: Clique com o botão direito na unidade flash USB desejada e selecione Format.
Passo 3: Selecione exFAT no menu suspenso Sistema de arquivos.
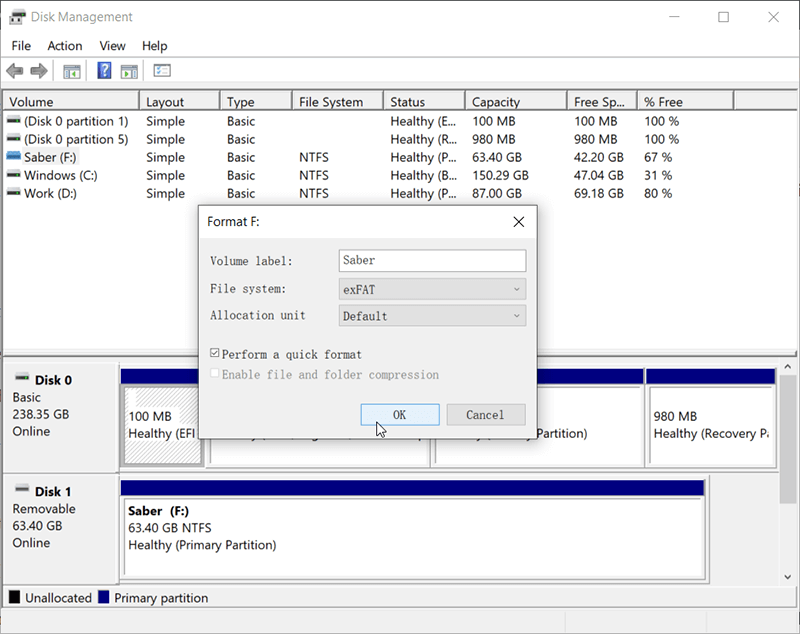
Passo 4: Click on the Está bem button.
Método 4: formatar uma unidade flash USB usando PowerShell (somente Windows 10)
PowerShell é uma plataforma de gerenciamento de tarefas e configuração que apareceu pela primeira vez em 2006; é poderoso que o Prompt de Comando, que pode ser usado para automatizar muitas tarefas diferentes de administração do sistema e, claro, para formatar uma unidade flash USB:
Step 1: Right-click on the Start menu no canto inferior esquerdo e escolha Windows PowerShell (Admin).
Step 2: Digite o seguinte comando para visualizar a unidade flash USB que deseja formatar:
- Get-Volume
- Format-Volume -DriveLetter F -FileSystem exFAT (Substitua F pela letra exata da unidade flash USB)
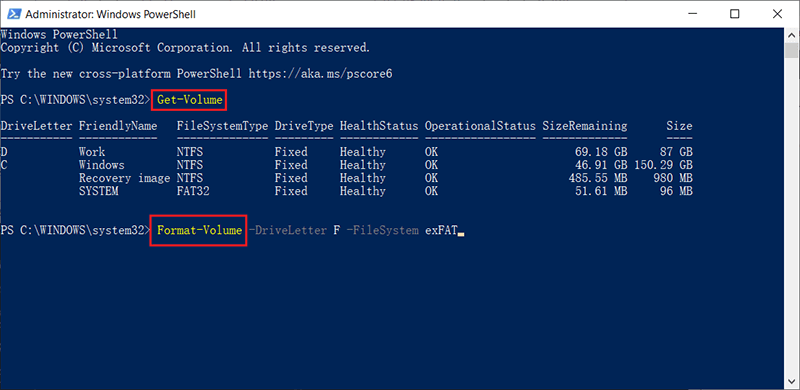
Nota: Neste método, você deve notar que após inserir o comando de formatação, ele formata a unidade flash USB em exFAT diretamente, e se você quiser uma unidade FAT32, basta substituir exFAT por FAT32, isso é tudo.
Como realizar uma formatação de unidade USB no Mac?
Reformatar uma unidade flash USB em exFAT no Mac é fácil do que você imagina; devemos agradecer ao Utilitário de Disco que pode tornar a reformatação fácil de completar; Da mesma forma, siga as mesmas etapas se desejar reformatar um cartão SD, disco rígido interno ou externo:
Step 1: Conecte o stick USB ao PC com uma das portas USB e pressione Comando + Espaço procurar Utilitário de Disco.
Step 2: Depois de selecionar a unidade à esquerda da janela do Utilitário de Disco, clique no Erase botão localizado na parte superior da janela.
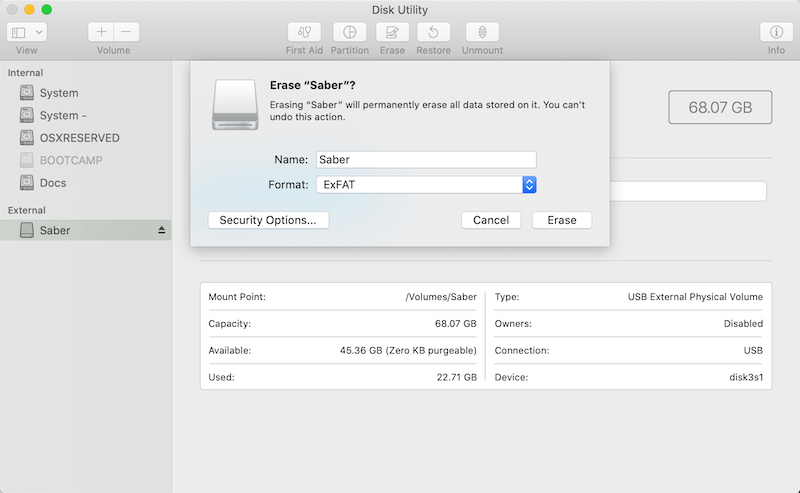
Step 3:Agora, selecione exFAT no menu suspenso do Format.
Step 4: Clique no Erase e aguarde a conclusão do processo de reformatação.
Nota: Faça backup de seus dados antes de formatar sua unidade flash USB, pois o Apagar apagará todos os dados armazenados!
What if you were not intended to format the USB flash drive, and there are lots of vital photos, videos, documents, or any other files stored on the drive that have been lost due to the reformatting. What should we do to retrieve lost data? Don’t worry, a quick format won’t cause all of the data to lose, the file contents still exist on the USB flash drive, and you will have a big chance to get back your data as soon as you launch the third-party data recovery program – Recuperação de dados bitwar para realizar uma verificação completa.
Recupere arquivos de uma unidade formatada usando a recuperação de dados Bitwar
No matter how carefully or gradually backing up the USB flash drive, the data loss is still inevitable, such as the USB flash drive turns into a RAW drive suddenly, or you might unplug the drive without safely removing it from the computer; moreover, the backup files are out-to-dated when the accident happens.
Muitos usuários encontraram o mesmo problema frustrante que faz com que os trabalhos sejam interrompidos, e a maioria deles finalmente optou por reiniciar o trabalho, pois não sabiam como restaurar os dados. Agora, você estará pronto para usar o Bitwar Data Recovery com as etapas abaixo:
Passo 1: Vamos para Bitwarsoft Download Center para baixar e instalar o Bitwar Data Recovery.
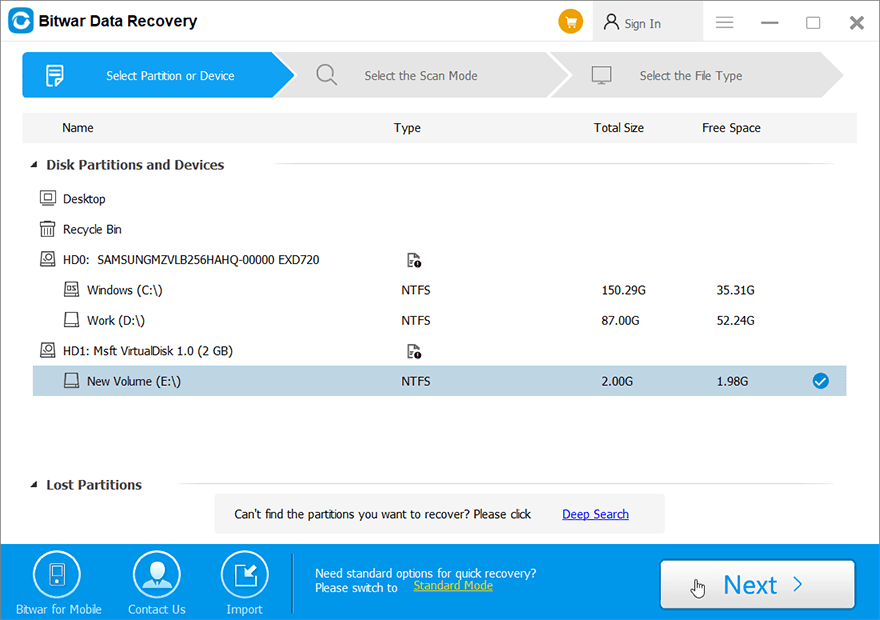
Passo 2: Após completar a instalação, abra o Bitwar data recovery software e selecione a unidade flash USB formatada.
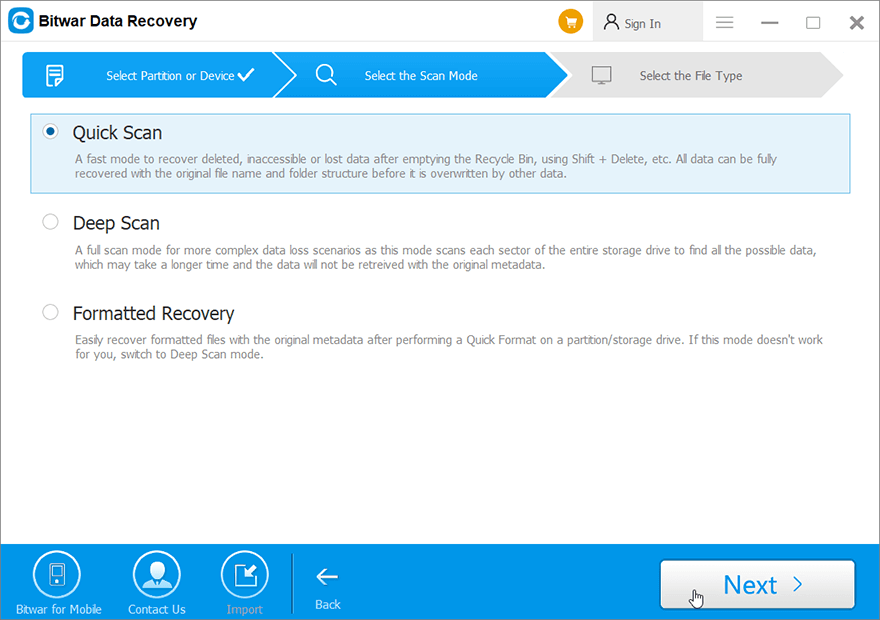
Passo 3: Escolha um modo de recuperação. Recomendamos fortemente que você escolha o Quick Scan pela primeira vez, uma vez que este modo verifica toda a unidade em apenas alguns minutos. No entanto, se esse modo não funcionar para encontrar seus dados, tente com o Deep Scan mode next time.
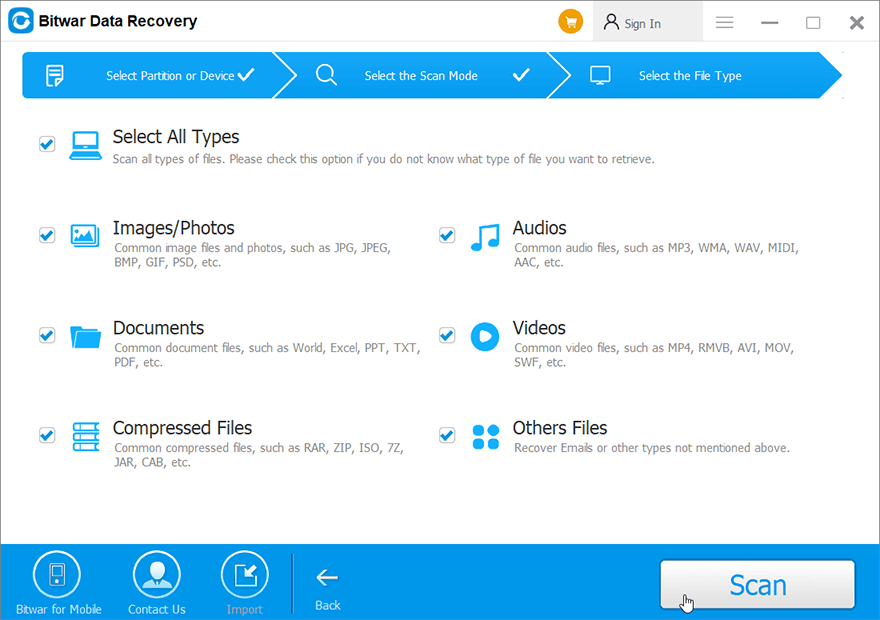
Passo 4: Escolha os tipos de arquivo e pressione o botão Scan button.
Passo 5: Clique duas vezes nos arquivos desejados para visualizá-los. Depois disso, clique em Recover para salvar os arquivos em um local seguro.

Note: Tenha cuidado para não salvar os arquivos recuperados na unidade flash USB formatada. O motivo é evitar que os dados sejam sobrescritos novamente.
Conclusão
Like many other storage devices, The USB flash drive can be easily failed without any concerns. There are many possible causes behind the happening of this accident, such as the unstable flash chip, disconnect the USB flash drive before safely removing it from the computer, virus attack, or Trojan infection. Some of the failures are just logic errors that can be fixed easily by reformatting the drive. Some failures prove that your USB flash drive was physically damaged, and that means you may have to consider buying a new one.
Se você comprou uma unidade flash USB totalmente nova e deseja um uso inicial ou se a unidade flash USB encontrou algum erro lógico conforme informado, este artigo é muito útil, pois ensina como formatar uma unidade flash USB com diferentes métodos no Windows ou Mac. E se houvesse dados vitais armazenados na unidade flash USB, sugere-se recuperar os dados usando o Bitwar Data Recovery antes de iniciar a formatação.
Follow the steps mentioned above and hope that you can finally reformat the USB flash drive or get back the wanted data.
Artigo Anterior
How To Solve This Build Of Windows Will Expire Soon? Summary: This article tells how to format a USB flash drive on Windows 10/8/7 and Mac when you want to...Próximo artigo
Best Free Online PDF Converter On Windows! Summary: This article tells how to format a USB flash drive on Windows 10/8/7 and Mac when you want to...
About Bitwar Data Recovery
3 Steps to get back 500+ kinds of deleted, formatted or lost documents, photos, videos, audios, archive files from various data loss scenarios.
Saber mais


