6 Solutions to the Faulty Hardware Corrupted Page Error
Summary: BSOD, shorthand for Blue Screen of death, is definitely a nightmare for every computer user. Many of us have seen a blue screen of death when using Windows. Despite being a problem of seemingly identical appearance, these BSODs usually come with messages that are central to how to tackle error. One of these error messages you might see is the faulty hardware corrupted page. In this article, we will tell you the causes of the faulty hardware corrupted page and lay out different solutions to it. Besides, we are going to explain to you how to use Recuperación de datos de Bitwar to bring lost data back to your computer.
Table of Contents
What Causes Faulty Hardware Corrupted Page Error
To better get your head around what the faulty hardware corrupted page error is, it is essential to know the possible causes behind the error. We have listed several causes below:
- Wrongly uninstalled or installed program.
- System file corruption resulted from virus attacks or malware attacks.
- Improper installation of Windows update.
- Outdated drivers.
- Windows registry corruption.
- Hard disk corruption.
How to Solve the Faulty Hardware Corrupted Page Error
Solution 1: Update Drivers
The first solution we recommend you to try is to update drivers, not least the Display Drivers. You may well speed up the fixing process of the issue by prioritizing this solution if the problem occurs after a Windows 10 upgrade. Updating your drivers is pretty easy and takes only a few minutes.
Refer to the following steps:
Step 1: Press the Windows key and R, type in devmgmt.msc and then press Enter.
Step 2: double-click on Display Drivers.
Step 3: Right-click on Display Device and then select Update Driver Software.
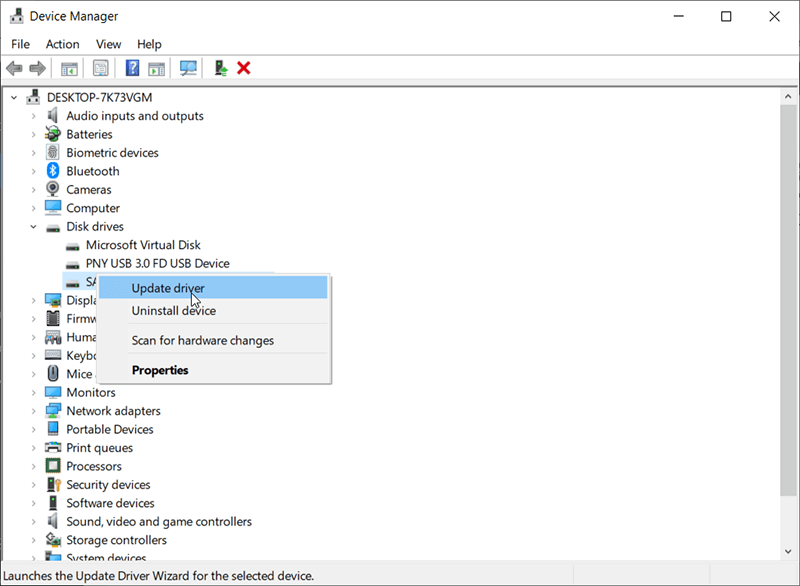
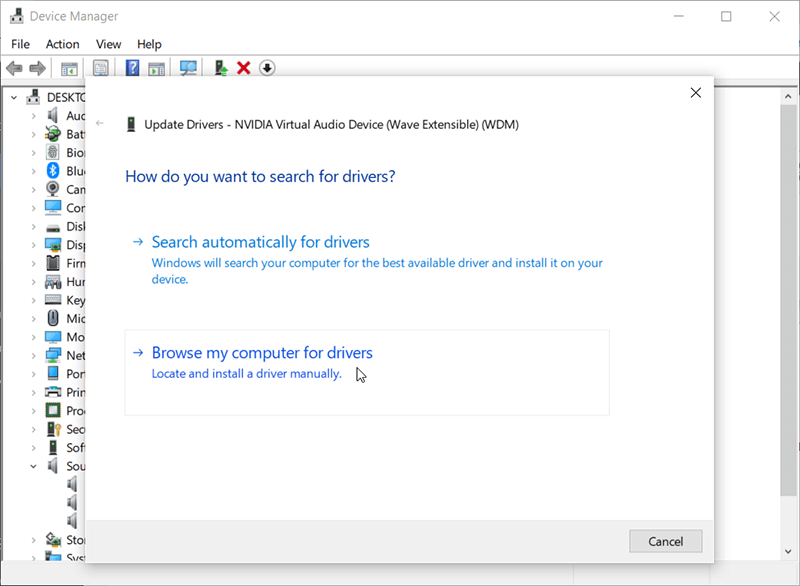
Step 4: Select Search automatically for updated driver software
Wait for your computer to search for an updated version of the device driver. If that works, the driver will be updated but when it doesn’t then you have to refer to the following steps:
Step 1: Return to Device Manager and then Double-click on Display Device.
Step 2: Switch to the Driver tab.
Step 3: Write down the driver version displayed on this tab.
Step 4: Go to the manufacturer’s website, search your Display Device driver, download the latest version.
Step 5: Go back to the Device Manager window.
Step 6: Right-click on the Display Device and select Update Driver Software.
Step 7: Click on Browse my computer for driver software and then Browse.
Step 8: Navigate to the folder where you stored the downloaded driver version and then select it. Click on Open.
Step 9: Click on Next and follow later instructions.
After the driver has been uninstalled, reboot the PC. Its system will automatically install a new driver. Check whether the problem persists.
Solution 2: Turn off Fast Startup
Turning off fast startup is another working solution that serves users well. The Fast Startup feature makes your computer boot quickly compared with a normal startup.
However, it may well trigger problems because of the lack of adequate time for your drivers and programs to be activated fully. Refer to the following steps to learn how to turn off this feature:
Step 1: Press the Windows key + R to open the Run box.
Step 2: Type in powercfg.cpl and then press Enter.
Step 3: Click on the Choose what the power buttons do option on the left pane.
Step 4: Click on Change settings that are currently unavailable.
Step 5: Uncheck the Turn on fast startup (recommended) option.
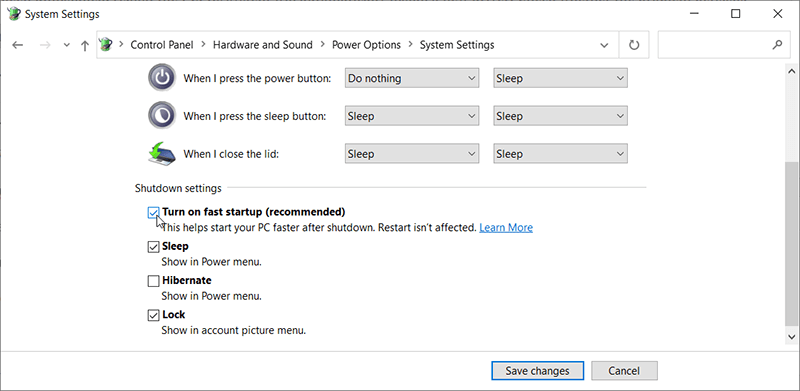
Step 6: Click on Save Changes.
Step 7: Reboot your PC and check whether the error is still there.
Solution 3: Check RAM
Some users have reportedly solved the faulty hardware corrupted page issue by checking the RAM, then cleaning or replacing it. It’s most likely that there is a faulty RAM. So, we would like to advise you to check the RAM as well.
The first step is to take out the RAM, clean it to ensure that there isn’t any dust sticking on the slots and then put the RAM back. After that, re-insert the RAM and then make sure it is properly connected.
Turn on the system and check whether the problem persists. Mercifully, the problem would be solved. But, if the problem still occurs, then get prepared to check the RAM conditions with the help of some memory test program.
Windows Memory Diagnostic
Users can use a Windows built-in memory diagnostic tool reserved for checking the memory. Although it has only limited options compared with other memory test programs, it does provide enough diagnostics for general RAMs. So, it is worth trying especially if you prefer not to download a third-party program.
Use the instructions given below to learn how to use the Windows Memory Diagnostic tool.
Step 1: Press the Windows key + R to open the Run box.
Step 2: Type in mdsched and press Enter.
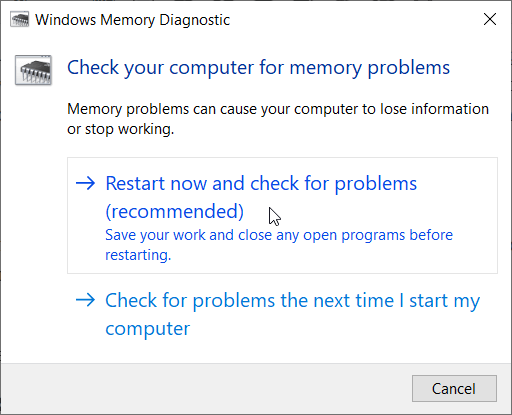
Step 3: Click Restart now and check for problems (recommended).
If this regular way of opening the tool goes haywire, you could instead try the following steps:
Step 1: Press Win + Q to open the search bar.
Step 2: Type in Memory diagnostic tool.
Step 3: Right-click on Windows Memory Diagnostic and then click Run as administrator.
Step 4: Click on Restart now and check for problems (recommended).
The Windows will reboot automatically and then initiate the testing. You will see the testing process. After the testing has finished, the computer will reboot again. Then you will be able to decide whether you need to change your RAM depending on the ensuing test results.
Manual Testing
Since the testing process may well take a lot of time, you can try to fix the problem if you have a spare RAM. You can replace the supposedly faulty RAM with the spare RAM to check if your computer still triggers the error.
Make sure that the spare RAM is in working condition and is compatible with the PC. If replacing your RAM fix the BSOD problem then the previous RAM is most likely the cause behind the issue.
Solution 4: Run SFC
As we have mentioned before, system file corruption might also be the cause behind the faulty hardware corrupted page error. in this case, you can try running System File Checker.
Step 1: Press Windows + X and then select Command Prompt (Admin) from the menu.
Step 2: In the command prompt, type in the following command then press Enter.
sfc /scannow
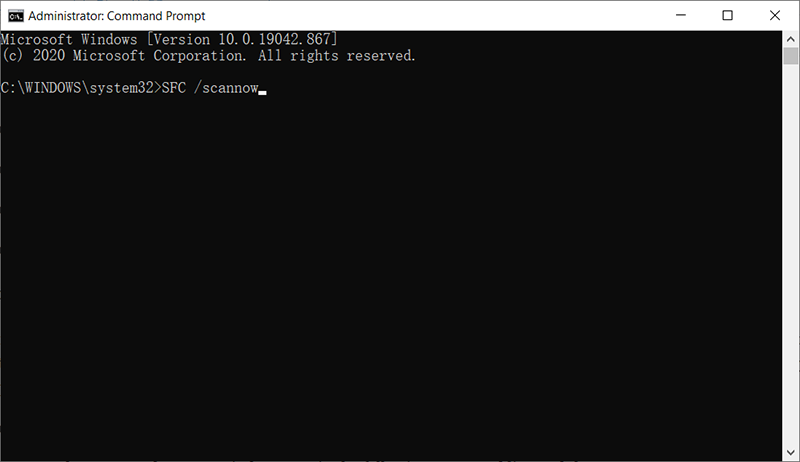
Step 3: Wait for the scan process to finish.
Step 4: Reboot your computer to check whether this solution does the trick.
How to Recover Lost Files Using Bitwar Data Recovery
The faulty hardware corrupted page error may well result in tricky data loss issues, Fortunately, files lost in this way can be recovered using our secure and reliable data recovery tool, Recuperación de datos de Bitwar.
Follow the steps below to recover your lost files!
Step 1: Download Recuperación de datos de Bitwar from Official Download Center and install it on your PC.
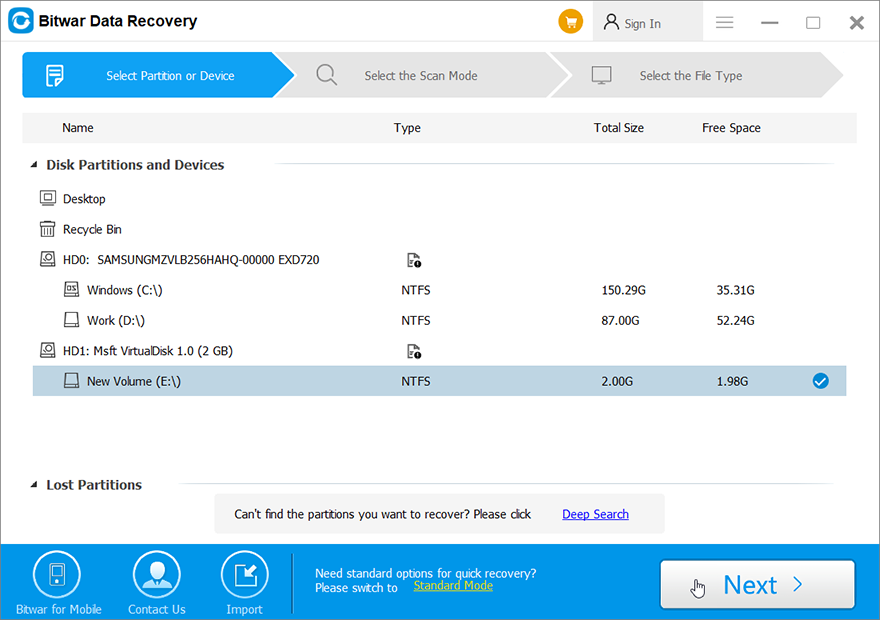
Step 2: Launch the recovery tool and then select the drive where the lost files were and then press the Next button to proceed.
Step 3: You can select a scan mode. To beginners, we recommend Quick Scan, which is capable of recovering a healthy number of lost files. If it doesn’t serve you well, you can use Deep Scan next time.

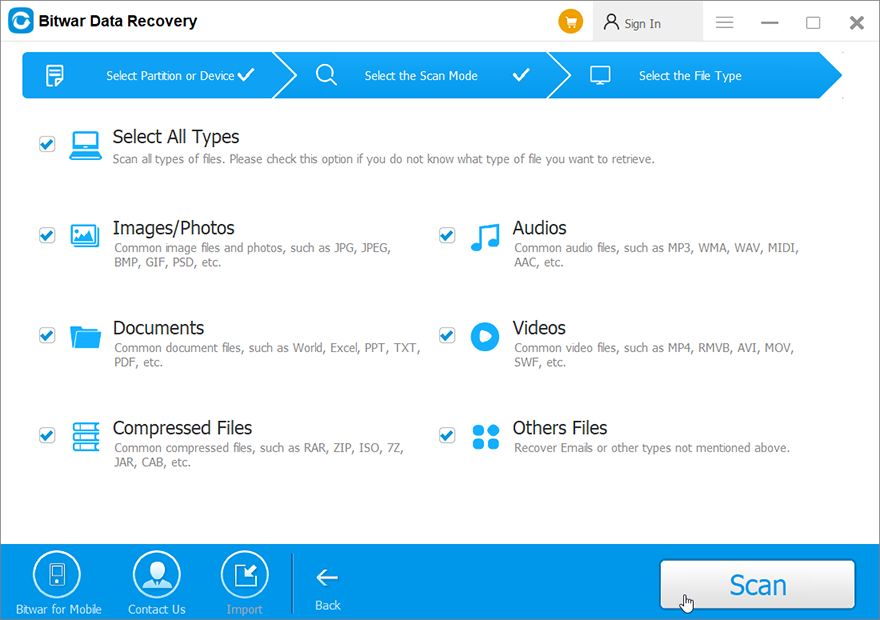
Step 4: Click Next, select the file types you want to retrieve and then press the Next button.
Step 5: Preview all the files you want.
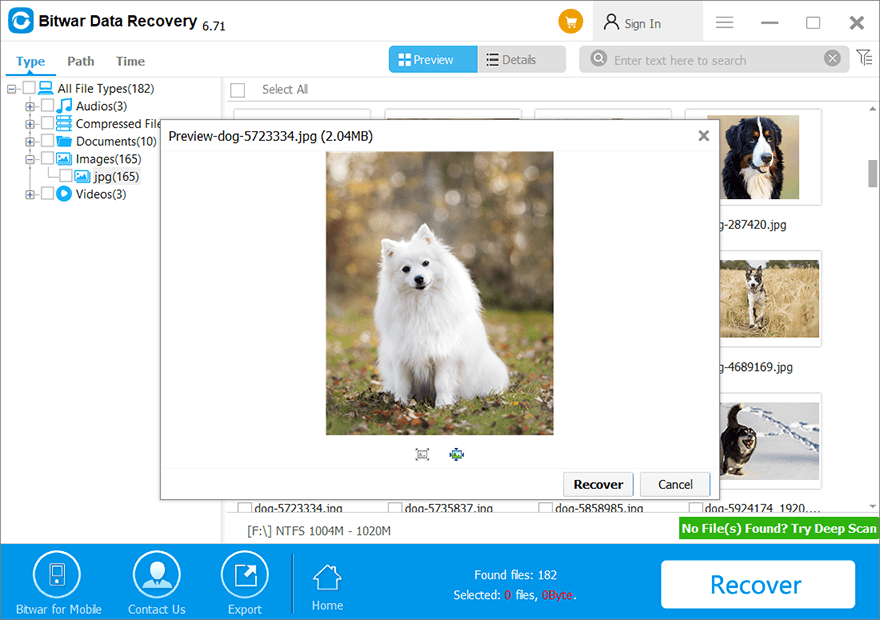
Step 6: Lastly, after previewing and selecting the files you want, click the Recover button to begin the recovery process.
Advanced Solutions
Solution 1: Reset your Operating System
If all the aforementioned solutions go haywire, there are two options left, one of which is resetting your operating system. But bear in mind that before using this solution, users had better back-up important data and files.
Refer to the following steps to learn how to use this solution:
Step 1: Press Win + I to open Settings and then select Update and Security.
Step 2: Click on Recovery on the left panel.
Step 3: Click on Get Started under Reset this PC title and then click Remove Everything.
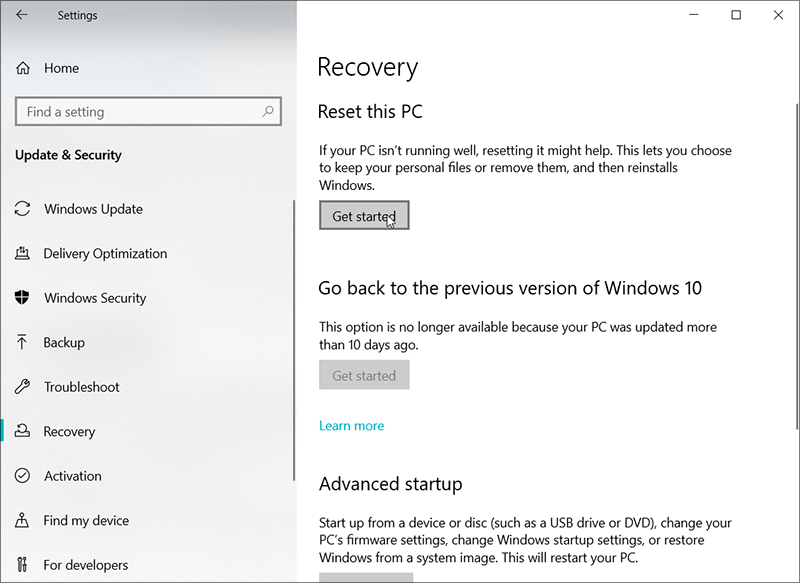
Step 4: Click on the Reset button.
Step 5: After the resetting is done, the computer will install Windows automatically.
Solution 2: Run System Restore
Another working solution is System Restore. Bear in mind that you are able to run a system restore only if the computer has restore points. It’s best to run a system restore to a point before the problem occurred.
Step 1: Press the Windows key + Q, type in Create a restore point and then open it.
Step 2: Click on the System Restore option and then click on Next.
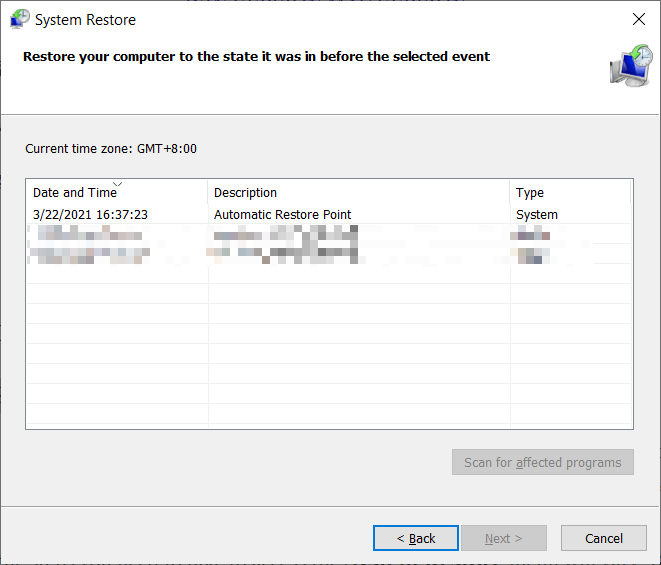
Step 3: Choose a restore point.
Step 4: Click Next to revert to the selected state.
Step 1: Type in Create a restore point in the Search bar.
Step 2: Ensure that the state of the protection for your system drive is On.
Step 3: If the state is off, select the disk and then click Configure.
Step 4: In the new window, select Turn on system protection and then click on OK to confirm the change you make.
Conclusion
In this article, we delineate how to tackle the faulty hardware corrupted page error, which usually occurs in three common scenarios. To help users facing this error that may be triggered by various causes, we have listed several working solutions for each case. Along with solutions, for users who also run into a data loss issue, we have also introduced a powerful and reliable data recovery tool Recuperación de datos de Bitwar, to help you retrieve lost files.
Previous Article
How to Fix the WHEA_UNCORRECTABLE_ERROR Summary: BSOD, shorthand for Blue Screen of death, is definitely a nightmare for every computer user. Many of us have...Next Article
[Solved] BSOD Error Machine Check Exception Summary: BSOD, shorthand for Blue Screen of death, is definitely a nightmare for every computer user. Many of us have...
About Bitwar Data Recovery
3 Steps to get back 500+ kinds of deleted, formatted or lost documents, photos, videos, audios, archive files from various data loss scenarios.
Learn More


