해결됨: 치명적인 장치 하드웨어 오류로 인해 요청이 실패했습니다.
개요: 이 기사에서는 문제를 해결하는 가장 좋은 방법을 소개합니다. 치명적인 장치 하드웨어 오류로 인해 요청이 실패했습니다. 강력한 기능을 사용하여 모든 필수 데이터를 복구합니다. data recovery software.
치명적인 장치 하드웨어 오류로 인해 문제 요청이 실패하는 것은 Seagate 및 Western Digital 하드 드라이브에 발생하는 일반적인 문제 중 하나이므로 액세스할 수 없습니다. 때때로 이 요청은 0x800701E3과 같은 다른 오류 코드와 결합되어 이 상황을 심각한 상황으로 만들므로 가능한 한 빨리 문제를 해결할 필요가 있습니다.
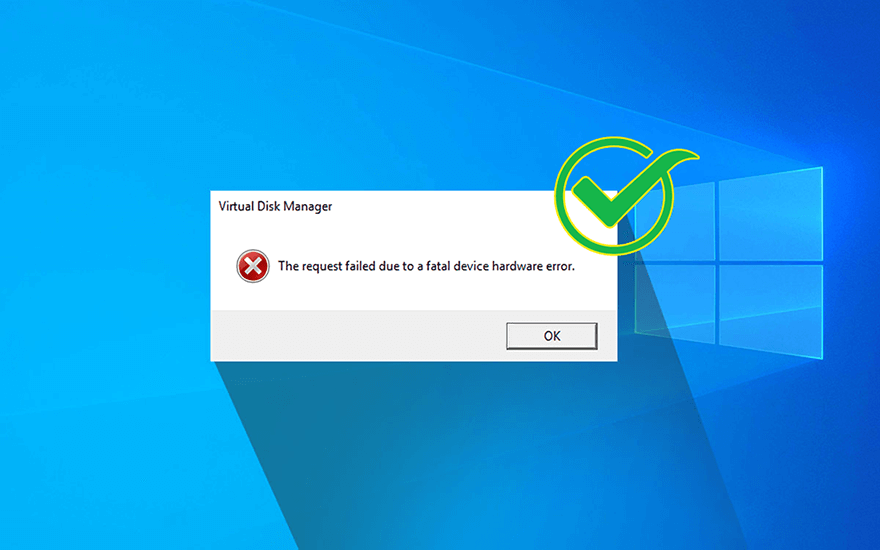
치명적인 장치 하드웨어 오류로 인해 요청이 실패하면 운영 체제가 하드 드라이브 또는 SSD에 액세스할 수 없거나 읽기 또는 쓰기 작업을 수행할 수 없음을 의미합니다. 이 문제를 일으킬 수 있는 몇 가지 요인은 다음과 같습니다.
- USB 연결에 결함이 있거나 느슨함
- 드라이브의 불량 섹터 존재
- 하드웨어 또는 시스템 오류입니다.
그럼에도 불구하고 이 오류가 발생하더라도 당황하지 마십시오. 이 기사에서는 이를 해결하기 위해 여러 번 검증된 방법을 제시합니다. 또한 이 오류로 인해 데이터 손실 문제가 발생하는 사용자를 위해 강력하고 사용자 친화적인 복구 도구도 소개합니다. Bitwar 데이터 복구, 손실된 파일을 손쉽게 복구할 수 있습니다.
목차
치명적인 장치 하드웨어 오류로 인해 실패한 요청에 대한 솔루션
해결 방법 1: 연결 상태 확인
때때로 느슨한 연결로 인해 이러한 오류가 발생할 수 있습니다. 따라서 가장 먼저 취해야 할 단계는 확인하는 것입니다. 연결 확인이 끝나면 하드 드라이브를 마더보드의 USB 포트에 연결하여 안정적인 전원 공급을 받으세요. 그런 다음 일치하지만 다른 USB 케이블을 찾기 위해 이동합니다. 이 솔루션이 작동하지 않으면 다음 솔루션으로 이동합니다.
해결 방법 2: 디스크 드라이버 업데이트
오래된 디스크 드라이버가 디스크 드라이브의 정상적인 기능을 방해할 수 있다고 보고되었습니다. 이것이 드라이브 결함의 원인인지 여부를 증명하기는 어렵지만 디스크 드라이브를 업데이트하는 것은 디스크에 거의 해를 끼치지 않습니다. 따라서 더 복잡한 다른 솔루션을 사용하기 전에 이 솔루션을 추천하고 싶은 간단한 수정 사항입니다.
Step 1: Press Win + Q, type in Device Manager and open it.
Step 2: Expand the Disk drives entry.
Step 3: 결함이 있는 드라이브의 항목을 마우스 오른쪽 버튼으로 클릭합니다.
Step 4: Click on Update 운전.
5 단계: In the new window, select 자동으로 드라이버 검색.
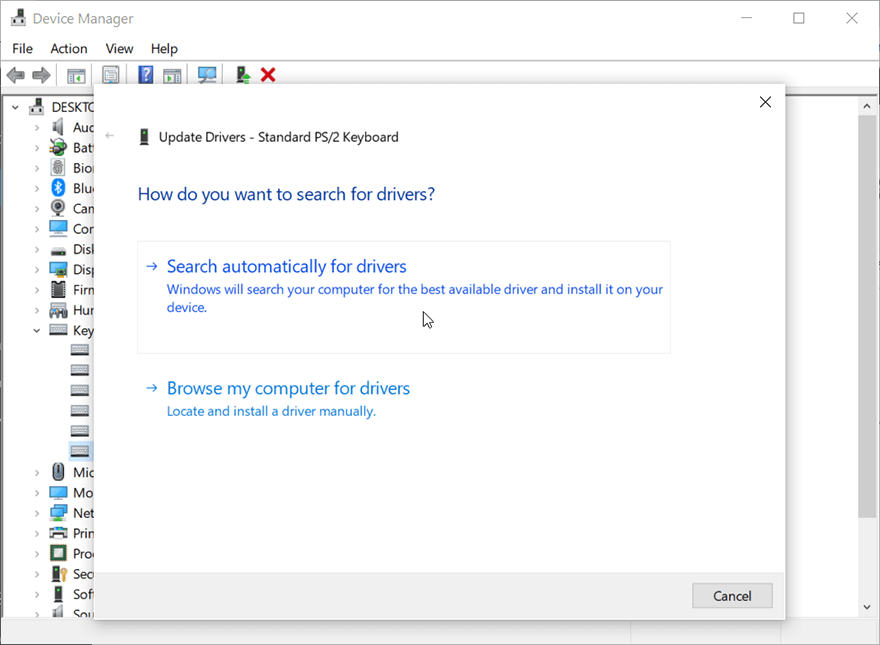
6 단계: 프로세스가 완료될 때까지 기다렸다가 문제가 지속되는지 확인합니다.
솔루션 3: SMART 속성 실행
SMART, an acronym for Self-Monitoring, Analysis, and Reporting Technology serve as a system that monitors the basic information of drives. It’s a widely used tool for checking the health status of a drive. Refer to the following steps to learn how to run it.
Step 1: 실행 Command Prompt 를 눌러 관리자로 윈도우+X 키를 동시에 누릅니다.
Step 2: 명령어 입력 and press 입력 to execute.

Step 3: 이제 창에 아래에 언급된 상태 중 하나가 표시됩니다.
- 알 수 없음, 나쁨: 수정한 후에도 오류가 발생할 확률이 높습니다. 긴급 데이터 복구가 필요합니다.
- Caution: Hard drive gravely affected, need data recovery immediately to reduce the risk of permanent data loss.
- OK: 하드 드라이브가 원래 상태로 복원될 가능성이 높습니다. 그렇게하려면 아래에 제공된 솔루션을 따르십시오.
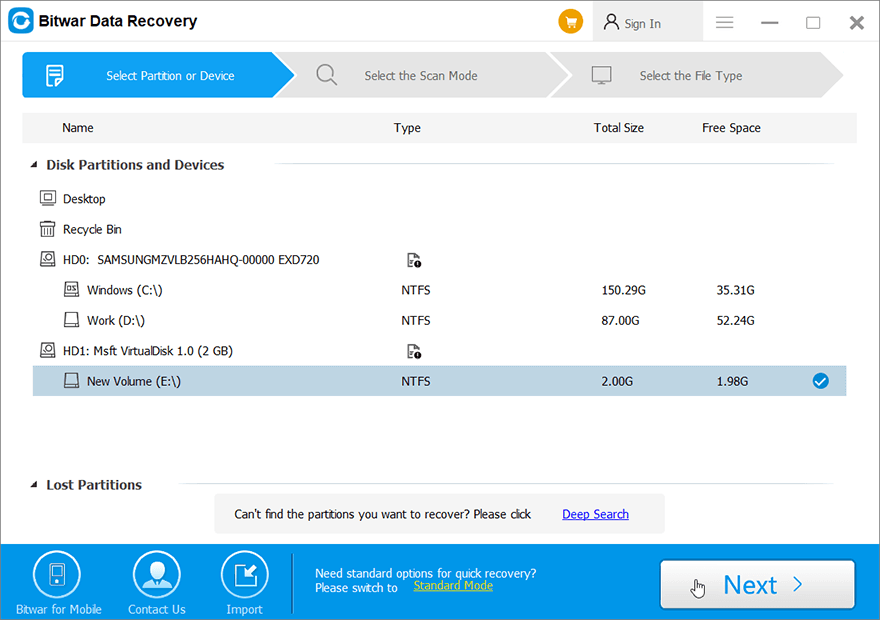
Bitwar Data Recovery를 사용하여 데이터 복구
From this point on, later solutions can involve data loss when you try using them to solve the request that failed due to a fatal device hardware error. 드라이브에 액세스할 수 없으므로 신뢰할 수 있는 도구의 도움을 받아 중요한 데이터를 더 안전한 다른 드라이브로 복구하는 것이 좋습니다.
우리가 고른다 Bitwar 데이터 복구 프로그램 for any type of data recovery as this software is quite easy to use, works efficiently, and delivers in-time results. It can recover many kinds of data such as doc, Xls, audio files, video files, etc. from storage devices like memory cards, hard drives, flash drives, and USBs. Refer to the following steps to learn how to use the software.
Step 1: Download Bitwar Data Recovery software from the official website.
Step 2: 그런 다음 복구 소프트웨어를 실행하고 데이터를 검색할 드라이브를 선택한 후 다음 버튼을 눌러 계속 진행합니다.
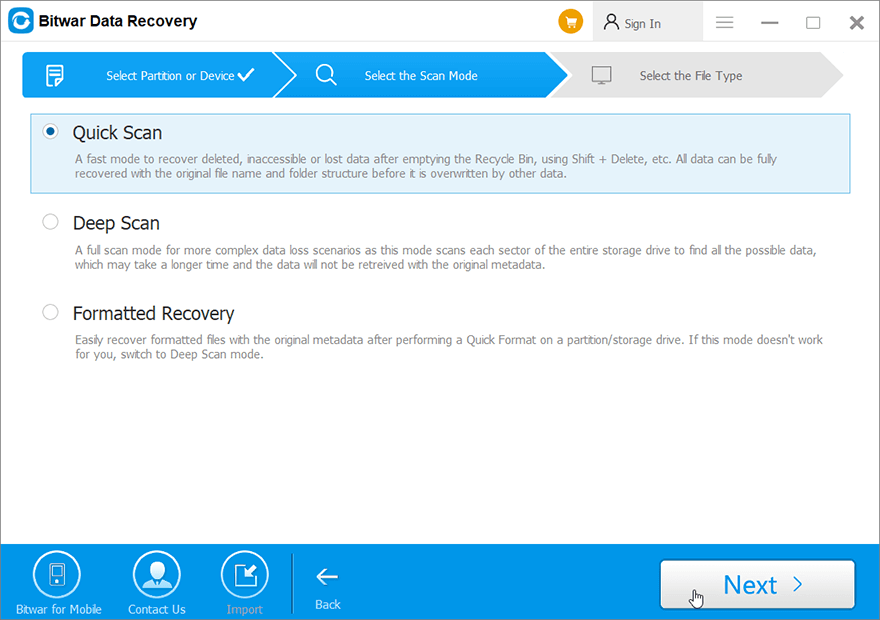
Step 3: 스캔 모드를 선택합니다. 초보자에게 권장합니다. Quick Scan, which can recover lost files. If it doesn’t serve you well, you can try Deep Scan 다음번.
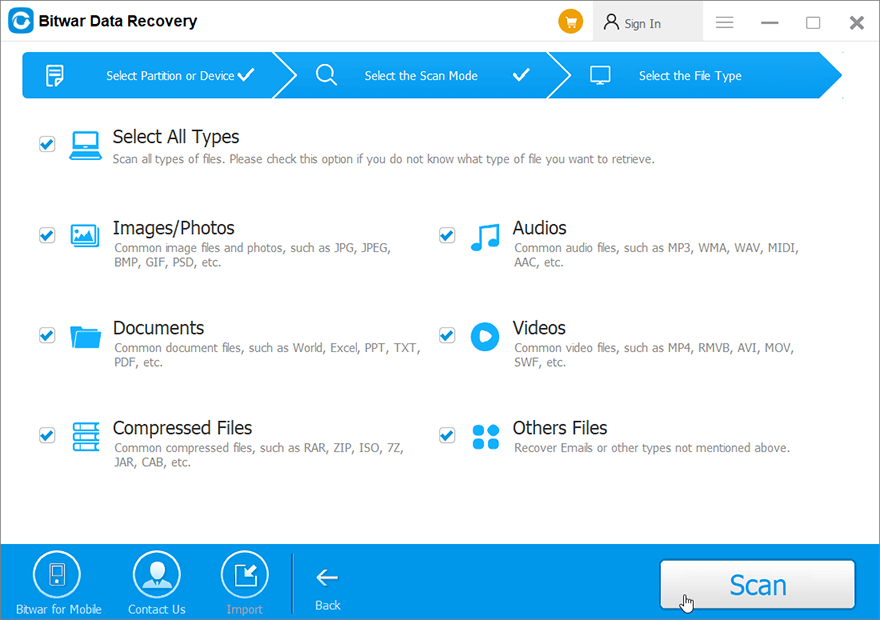
Step 4: 이제 검색하려는 파일 형식을 선택한 다음 Next button.
5 단계: Preview 선택한 모든 데이터.
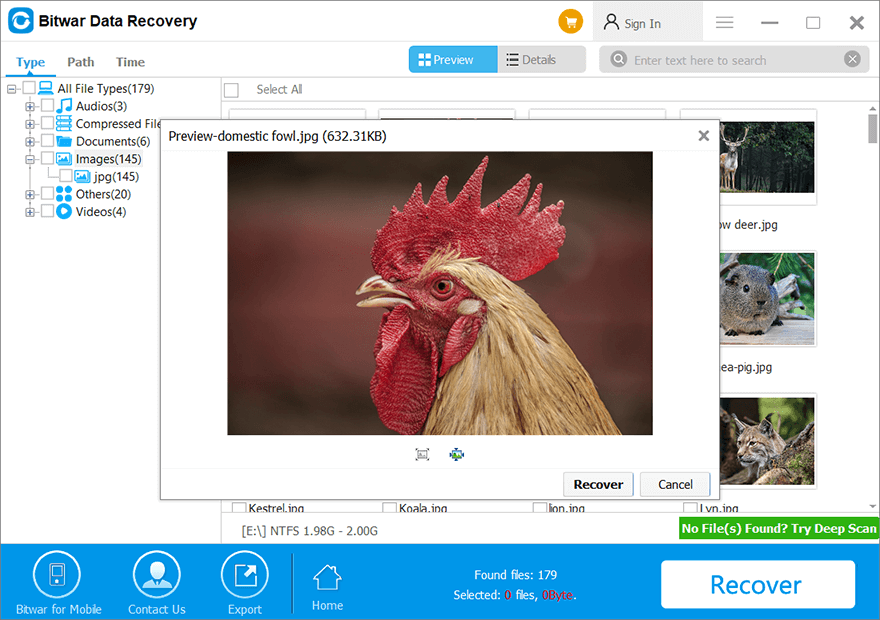
6 단계: 마지막으로 원하는 파일을 선택하여 미리 본 후, 다시 덮다 button to begin the data recovery process.
On successful recovery of all the data, save it at some safe place. Do not save it back on the same drive from which the deleted files get lost.
Advanced Solutions
해결 방법 4: 오류 검사 사용
Error checking is a tool offered by Windows that can be used in Windows 10/8/7/Vista/XP. Users often run it to solve computer issues and improve the performance of a computer after encountering disk problems resulting from potential causes, like corrupted software, improper or sudden shutdowns, or metadata corruption.
Step 1: Press Win + E to open File Explorer.
Step 2: 결함이 있는 디스크 드라이브를 마우스 오른쪽 버튼으로 클릭한 다음 Properties.
Step 3: Switch to the Tools tab and then click on the Check button within the Error Checking box.
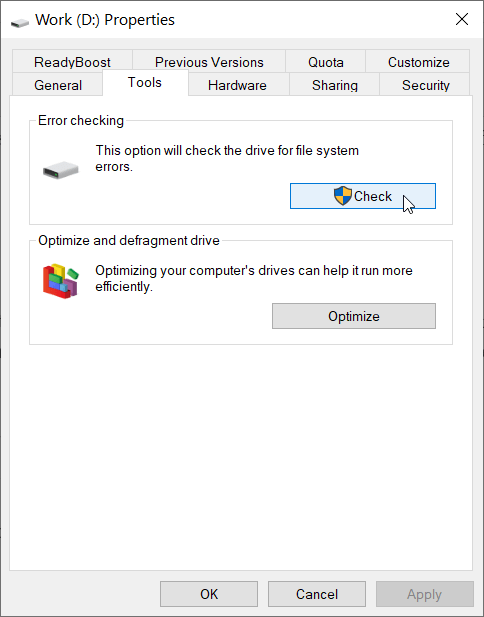
Step 4: Click on Scan Drive to confirm your operation.
해결 방법 5: CHKDSK 실행
On top of Error-checking, Windows provides users with another system tool, CHKDSK, which can be considered as an advanced version of Error Checking.
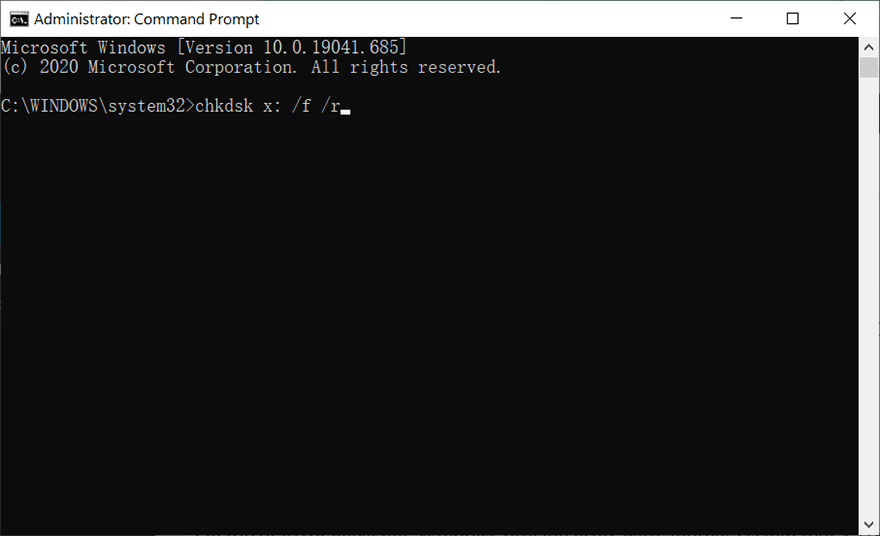
Step 1: Open Command Prompt by pressing 윈도우+X 키를 동시에 누르고 관리자로 실행하십시오.
Step 2: 이제 아래 명령어를 입력하고 엔터를 누릅니다.
해결 방법 6: 디스크 관리를 통해 하드 드라이브 초기화
Several system errors that trigger the Request Failed Due To A Fatal Device Hardware error may also result in a faulty drive needing to be initialized. If this is the symptom of your problematic drive, use the following steps to initialize it.
Step 1: Type in 디스크 관리 in the Search 바를 열고 엽니다.
Step 2: 결함이 있는 하드 드라이브를 마우스 오른쪽 버튼으로 클릭한 다음 Initialize Disk.
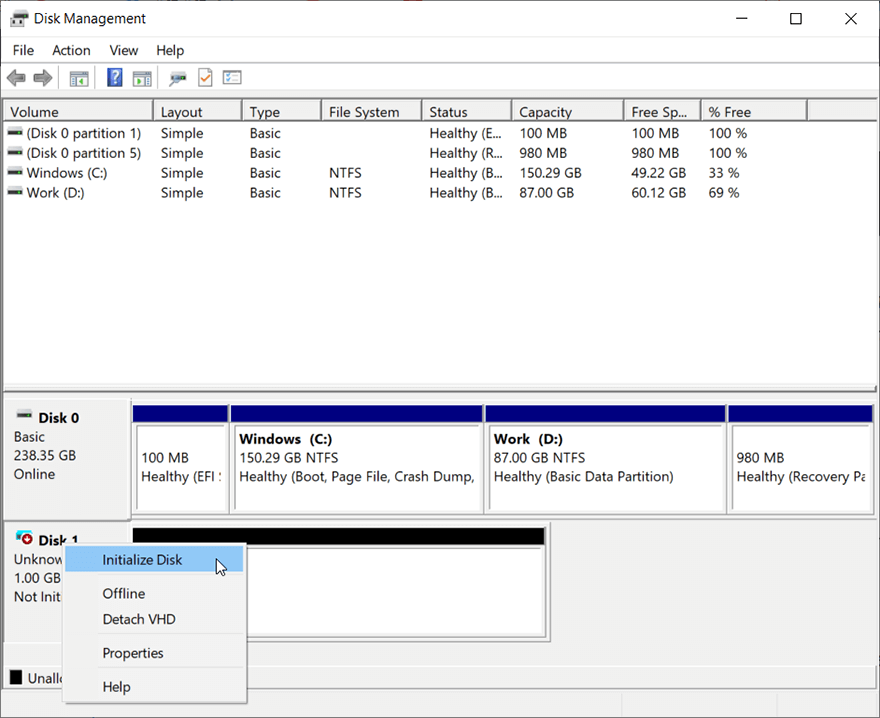
Step 3: 드라이브를 초기화할 파티션 스타일을 선택합니다.
해결 방법 7: 드라이브 포맷
위에서 언급한 해결 방법이 치명적인 장치 하드웨어 오류로 인해 실패한 요청을 해결하지 못한 경우 드라이브를 포맷할 수 있습니다. 효과적이지만 이전과 마찬가지로 드라이브의 모든 데이터를 지웁니다. 포맷을 위해 다음 단계를 진행하기 전에 드라이브에 데이터 백업이 있는지 확인하십시오.
Step 1: Press Win + E to open File Explorer.
Step 2: 결함이 있는 드라이브를 마우스 오른쪽 버튼으로 클릭한 다음 Format.
Step 3: 원하는 파일 시스템을 선택한 후 Start.
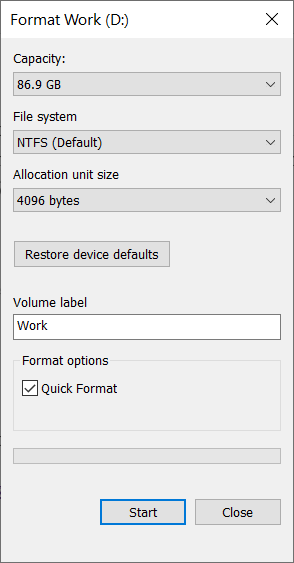
Step 4: 포맷이 완료된 후에도 문제가 지속되는지 확인하세요.
Conclusion
Anyone can witness the request fail due to a fatal device hardware error, and the probable reasons for this error to occur are bad sectors, faulty connections, and faulty hard drives.
Well, there is no need to worry if you ever come across this error as the above simple solutions will help you to fix it. However, before using those effective but destructive solutions, consider recovering all your important data using Bitwar Data Recovery software to prevent any permanent data loss.
이전 기사
[Fixed] The Application Was Unable to Start Correctly (0xc0000005) Summary: In this article, we will introduce you to some of the best ways to fix the request failed due...다음 기사
[Solved] Blue Screen of Death 0xc0000428 Error Summary: In this article, we will introduce you to some of the best ways to fix the request failed due...
About Bitwar Data Recovery
3 Steps to get back 500+ kinds of deleted, formatted or lost documents, photos, videos, audios, archive files from various data loss scenarios.
더 알아보기


