Cómo solucionar el problema 0xa0000001
Resumen: Hay varios problemas de BSOD que puede encontrar al arrancar su computadora, como 0x000000c5, a los que hemos expuesto en varias soluciones. En este artículo, vamos a explicar cómo resolver otro problema de BSOD, 0xa0000001, que bien puede surgir cuando la computadora está arrancando o cuando los usuarios intentan representar un video utilizando algún software de edición. Además, en caso de que se encuentre con la pérdida de datos, un problema común por el cual el 0xa0000001 a menudo se acompaña, también explicamos cómo usar nuestra herramienta de recuperación de datos efectiva y confiable, Recuperación de datos de Bitwar, para recuperar sus valiosos datos.
Tabla de contenido
¿Cuáles son las causas del problema 0xa0000001?
Resulta que el problema 0xa0000001 puede ocurrir a causa de las siguientes varias causas:
- Conductor de GPU corrupto/obsoleto
- Configuración de la UEFI/BIOS inconsistencia
- Archivos de sistema operativo corrupto
- Interferencia de software antivirus
¿Cómo resolver el problema 0xa0000001?
Método 1: Instale todas las actualizaciones de Windows pendientes
Dado el hecho de que Windows 10 puede causar un error que produce este tipo de problema de BSOD con algún modelo de GPU, le recomendamos que comience a solucionar el problema 0xa0000001 instalando todas las actualizaciones de Windows pendientes.
Algunos usuarios han informado que el problema se resolvió por completo después de haber forzado la instalación de todas las actualizaciones de Windows pendientes.
Si se encuentra en un escenario similar y la computadora tiene actualizaciones pendientes de Windows, use las instrucciones a continuación para instalar todas las actualizaciones pendientes:
Paso 1: Prensa Ganar + R para abrir el Correr caja.
Paso 2: Escriba MS-Settings: WindowsUpdate en el cuadro de ejecución y luego presione Ingresarpara abrir elactualizacion de Windowsventana.
Paso 3: En el panel derecho de la ventana, haga clic en el Buscar actualizaciones botón para iniciar el escaneo.
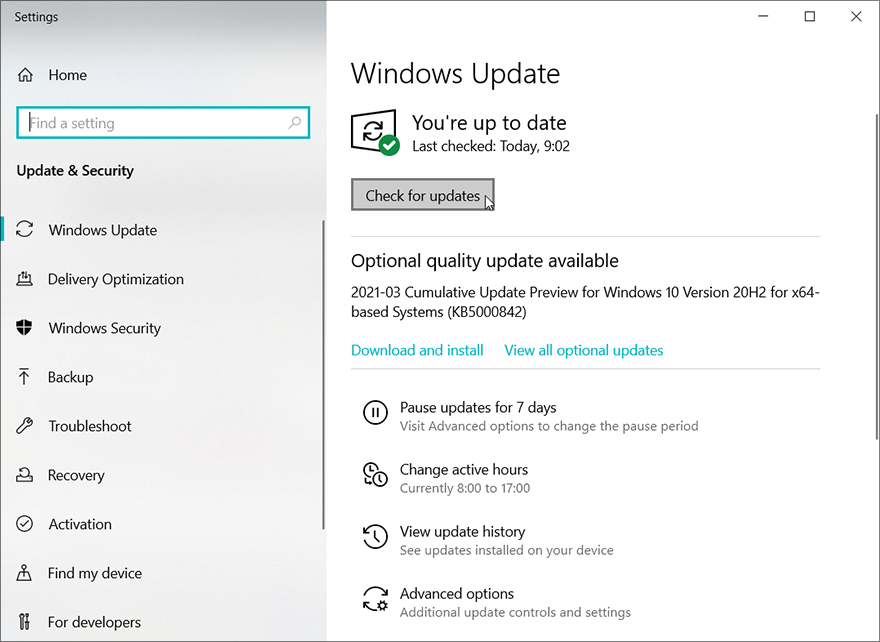
Etapa 4: Una vez que haya terminado el escaneo inicial, siga las instrucciones en pantalla para instalar todas las actualizaciones pendientes.
Paso 5: Después de haber logrado instalar todas las actualizaciones pendientes. Reinicie su computadora y verifique si el 0xa000000001 problemaestá arreglado.
Método 2: elimine el software antivirus de terceros
Según los informes proporcionados por los usuarios, una de las causas más comunes que podrían terminar causando el 0xa0000001El problema es un software antivirus sobreprotector que produce un proceso crítico del núcleo. En general, AVG, Kaspersky y Comodo AV son los culpables más comunes.
Si la computadora realmente está ejecutando un antivirus de terceros que podría ser responsable del 0xa0000001Problema, podría desinstalar la suite actual de terceros para ver si el problema se soluciona. Consulte las siguientes instrucciones para aprender cómo desinstalar el software antivirus de terceros.
Paso 1: Prensa Win+ R para abrir el Correr caja.
Paso 2: A continuación, escriba appwiz.cpl y luego presiona Ingresar Para abrir elProgramas y características ventana.
Paso 2: En el Programas y características Ventana, desplácese a través de la lista de aplicaciones instaladas para ubicar el software antivirus que desea desinstalar.
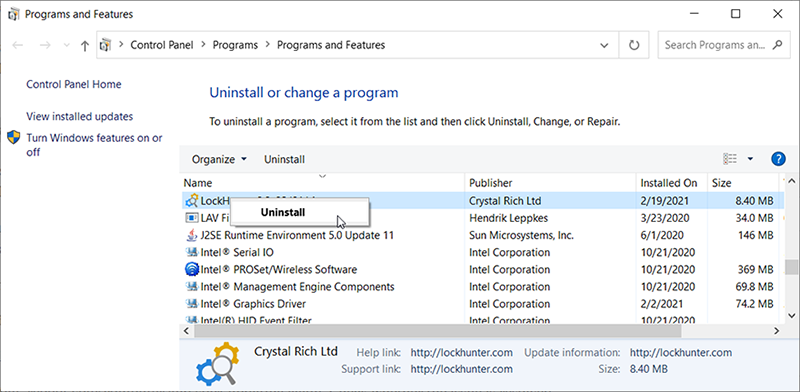
Paso 3: Haga clic con el botón derecho en el software antivirus y luego elija Desinstalaren el menú desplegable.
Etapa 4: En la ventana de desinstalación, siga las instrucciones en pantalla para completar la desinstalación y luego reinicie su computadora.
Método 3: Realizar una bota limpia
Si no está utilizando un programa antivirus y el método mencionado anteriormente no funciona, es probable que se encuentre con una interferencia de terceros diferente que desencadena la 0xa0000001 asunto. Dado que hay muchas causas potenciales diferentes de este problema, debe intentar ejecutar un arranque limpio y verificar si el problema persiste.
Consulte las siguientes instrucciones:
Paso 1: PrensaWindows + R Para abrir el cuadro de ejecución, escriba en msconfig y luego presione Ingresar.
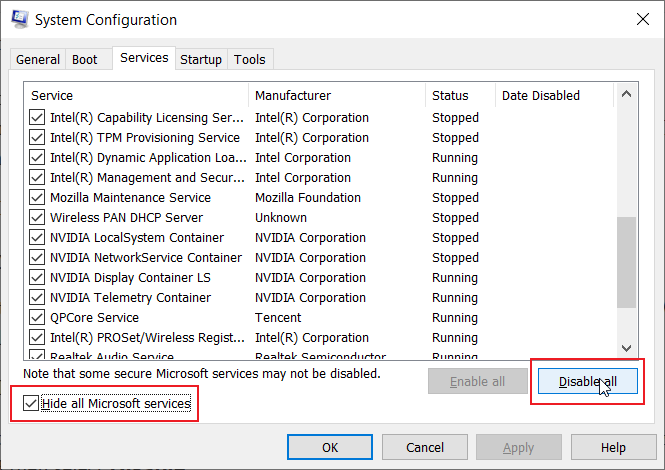
Paso 2: Cambiar a laServiciospestaña.
Paso 3: Marque la casilla al lado de Esconder todos los servicios de Microsoftopción.
Etapa 4: Haga clic en el Deshabilitar todo Botón y luego OK.
Paso 5: Surgirá un aviso preguntando cuándo reiniciar. elegir Reiniciar más tarde.
Paso 6: Relanzar Configuración del sistema nuevamente usando los mismos pasos mencionados anteriormente y luego cambie a la Puesta en marchapestaña.
Paso 7: Haga clic en el Abrir administrador de tareas botón.
Paso 8: Haga clic con el botón derecho y Desactivar startups con Alto impacto de inicio.
Paso 9: Reinicie su computadora para verificar si el problema persiste. Después de eso, repita los mismos pasos para volver a habilitar esos programas para discapacitados uno por uno hasta que encuentre el programa defectuoso y elimínelo.
Método 4: actualizar el controlador de la GPU
Muchos usuarios han atestiguado sus publicaciones que la incompatibilidad entre el controlador de GPU y la computadora puede conducir a BSOD variados y frecuentes (no menos importante cuando está utilizando una unidad AMD). Y algunos usuarios que estaban tratando con el problema 0xa0000001 han confirmado que en sus respectivos casos, el problema fue causado por un controlador de GPU corrupto o obsoleto.
Si sospecha de su controlador de GPU por ciertos motivos, como el hecho de que no se ha actualizado durante mucho tiempo, nos gustaría sugerirle que solucione este problema actualizando los controladores de GPU y el módulo de física que es la computadora. Actualmente, utilizando (esto es crítico en caso de que se encuentre con el problema solo cuando ejecuta un juego o una aplicación que exige muchos recursos).
Si no está seguro de cómo eliminar los controladores corruptos antes de reinstalarlos, use las instrucciones que se enumeran a continuación paso a paso para aprender cómo actualizar los controladores de GPU actuales a través de Administrador de dispositivos:
Paso 1: PrensaGanar + R Para abrir unCorrer caja.
Paso 2: Escriba devmgmt.msc en el cuadro y luego presiona Ingresar abrir Administrador de dispositivos.
Paso 3: En el Administrador de dispositivos Ventana, desplácese a través de la lista de dispositivos instalados para expandirse Mostrar adaptadores.
Paso 5: Después de eso, aparecerá un aviso. Haga clic en el Buscar automáticamente el software de controlador actualizado opción.
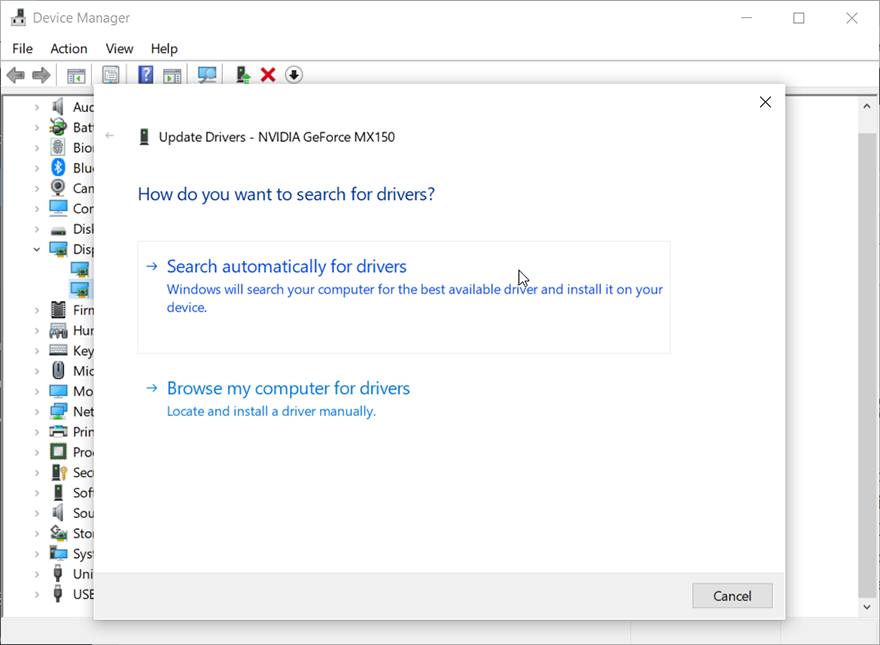
Paso 6: Una vez que se complete el escaneo, siga las instrucciones en pantalla para instalar el último controlador de GPU.
Paso 7: Si una nueva versión de controlador de GPU se instala correctamente, puede reiniciar su computadora para verificar si el problema se soluciona.
Método 5: Restablecer BIOS / UEFI a los valores predeterminados
Si ninguno de los métodos antes mencionados le sirve cuando intenta arreglar el 0xa0000001problema, puede centrar su atención en otro posible problema relacionado con su BIOSoUEFI ajustes.
En el caso de que el problema sea creado por un error BIOS / UEFI, puede solucionar el problema cambiando el BIOS / UEFI a la configuración predeterminada. Tenga en cuenta que, según la especificación que está utilizando, las instrucciones de hacer esto pueden variar.
Pero a pesar de la complejidad de los diferentes tipos de especificaciones de los usuarios, hemos publicado dos sub-métodos diferentes que le explicarán cómo restablecer la configuración de BIOS o UEFI:
A. Cambie la configuración de UEFI a predeterminado
Paso 1: Prensa Ganar + R para abrir el Correr caja.
Paso 2: Tipo MS-Settings: Actualización y seguridad en el cuadro y luego presiona Ingresar.
Paso 3: En el Actualización y seguridad ventana, haga clic en Recuperación.
Etapa 4: Espera el reinicio de tu computadora. Entrará en el Opciones avanzadasmenú.
Paso 5: Navegar a Solución de problemas> Opciones avanzadas y luego haga clic en Configuración de firmware de la UEFI/BIOS.
Paso 6: Haga clic en Reanudar para ingresar al Firmware UEFI Menú de configuración. Después de eso, su computadora se reiniciará en el UEFI / BIOSconfiguración.
Paso 7: Poro sobre los menús y seleccionar Restaurar los valores predeterminados.
Paso 8: Confirme el reinicio de la configuración de UEFI, luego reinicie su computadora para que se inicie de la manera normal.
B. Restablecimiento de la configuración del BIOS al valor predeterminado
Paso 1: Reinicie su máquina y luego presione el preestablecimiento Llave de arranque repetidamente.
Paso 2: Después de acceder Configuración de BIOS, busque un menú llamadoConfiguración de valores predeterminados (Otros nombres como Configuración predeterminada. Restablecer al valor predeterminado,oPredeterminado de fábrica). Luego seleccione el Cargar los valores predeterminados de configuraciónopción.
Paso 3: Confirme y guarde los cambios que ha realizado, salga del menú BIOS y luego espere a que el sistema reinicie.
Método 6: Restablecer cada componente del sistema operativo
Si todos los métodos mencionados anteriormente fracasan, puede estar lidiando con un problema sistémico que no puede resolver de manera convencional. En este caso, el único método que le recomendamos que pruebe es restablecer cada componente de Windows para corregir la corrupción del archivo del sistema que podría conducir al 0xa000000001 problema.
Cuando se trata de restablecer una versión de Windows a la última versión disponible, puede probar los siguientes dos métodos:
- Reparar instalar - Esta es la operación que nos gustaría recomendar, ya que solucionará cualquier tipo de corrupción en Windows 10. Necesitará un medio de instalación compatible. La principal ventaja de usar este método es que los usuarios no perderán juegos, aplicaciones y medios personales almacenados en la unidad del sistema operativo.
- Instalación limpia - Esta es la operación más fácil porque los medios de instalación compatibles no son necesarios (puede realizar esta operación desde el menú GUI). Sin embargo, la principal desventaja de este método es que debe hacer una copia de seguridad de su C: \ Drive con anticipación. De lo contrario, perdería todos los juegos, aplicaciones, medios personales y preferencias de usuario.
Método 7: Reemplace o devuelva la GPU
Al final, existe una débil posibilidad de que su computadora tenga un problema de hardware. En la mayoría de los casos, la instalación de reparación o la instalación de limpieza debería poder resolver todos los problemas relacionados con el software. Por lo tanto, si el problema persiste, el culpable más probable es una GPU defectuosa.
Hay muchos informes de usuarios que revelan que una GPU AMD defectuosa se retiró, causando el problema 0xa0000001.
Para verificar si ese es el problema que le enfrenta, puede intentar ejecutar una herramienta de diagnóstico de GPU o enviarla para reparaciones si la GPU aún está bajo garantía.
Recuperar los datos perdidos utilizando la recuperación de datos de Bitwar
Además de la pantalla azul inesperada con la que se acompaña el 0xa0000001, este error podría inducir otro problema difícil, la pérdida de datos. Por lo tanto, para ayudar a los usuarios a resolver este problema en particular, nos gustaría introducir nuestra herramienta de recuperación de datos confiable y efectiva, Recuperación de datos de Bitwar.
Con la ayuda, podrá recuperar archivos que se eliminaron por cierto o desaparecieron misteriosamente. Consulte las siguientes instrucciones para aprender cómo funciona el programa como Magic.
Paso 1: Descargar Recuperación de datos de Bitwar deCentro de descarga de Bitwarsoft e instálelo en la PC de Windows.
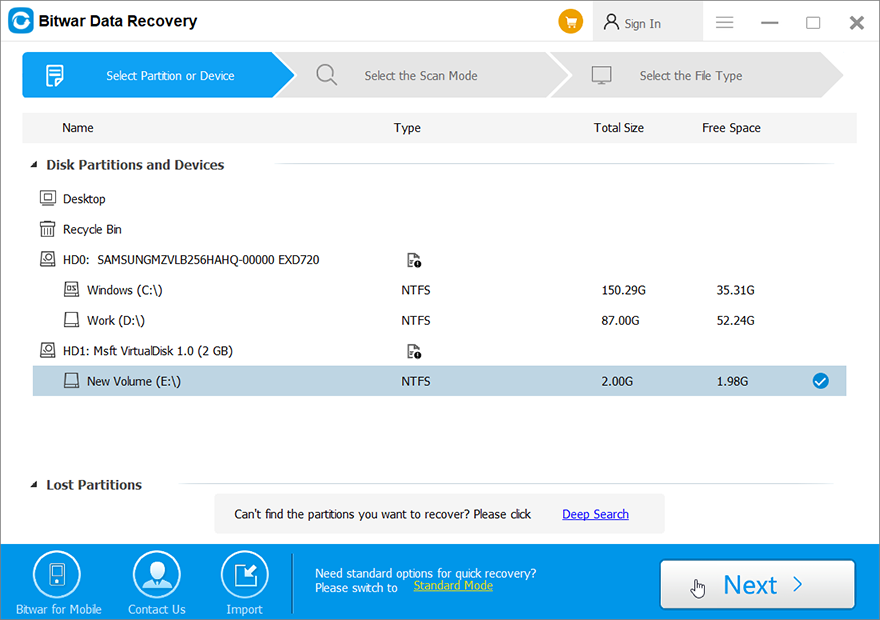
Paso 2: Inicie el programa y luego seleccione la unidad de disco donde se almacenaron los archivos faltantes y luego haga clic en Próximo.
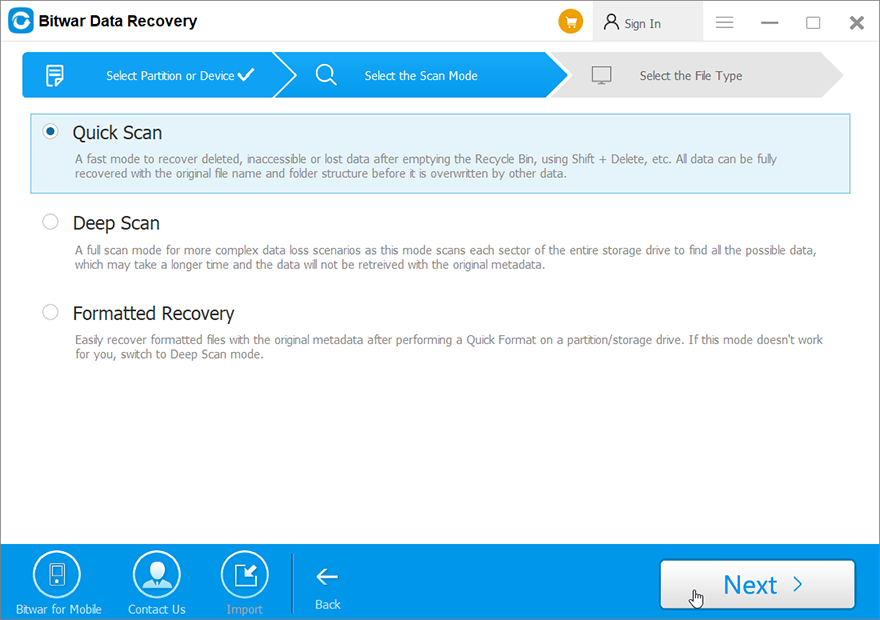
Paso 3: Puede elegir un modo de escaneo en esta etapa. Nos gustaría recomendarle que seleccione Escaneo rápido, que es capaz de recuperar la mayoría de los archivos perdidos. Si no le sirve bien, puede volver a esta etapa para ejecutar el software nuevamente y usar Escaneo, que es más efectivo.
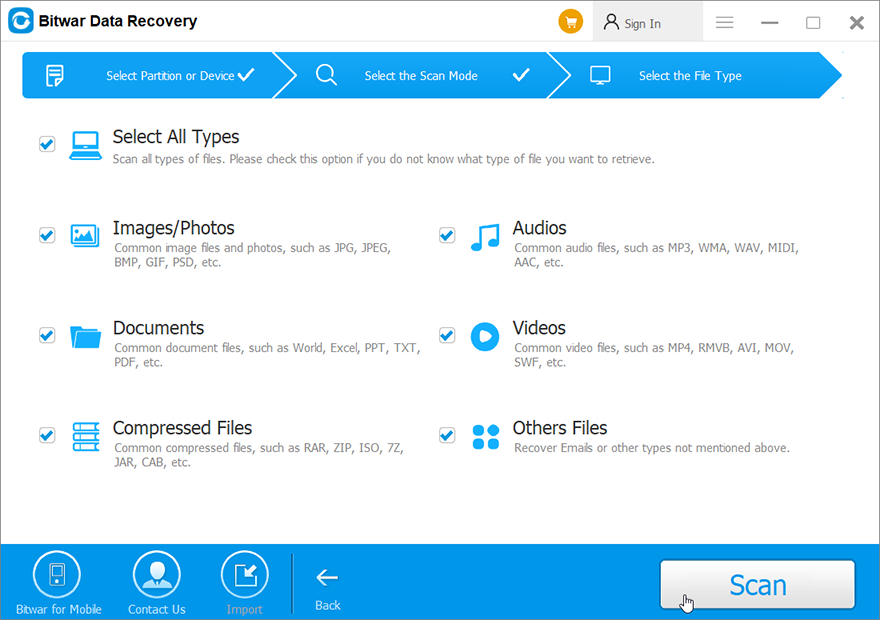
Etapa 4: Elija los tipos de archivos que desea recuperar y haga clic en Próximo.
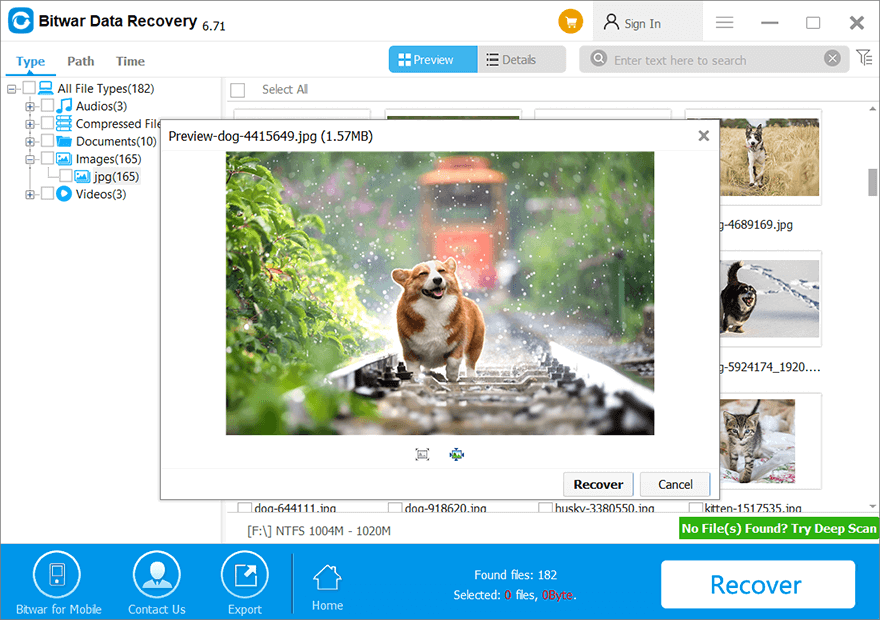
Paso 5: Avance Los archivos deseados para verificar su intacilidad. Seleccione esos archivos recuperables y luego haga clic en Recuperar Para iniciar el proceso de recuperación.
Conclusión
En este artículo, hemos enumerado soluciones a un tipo común de problema BSOD, el problema 0xa0000001. Es un problema molesto ya que el mensaje de error no revela mucha información útil. Por lo tanto, para cubrir tantos casos como sea posible, hemos tratado de cubrir tantos métodos como sea posible.
Además, dada la posibilidad de pérdida de datos, también presentamos nuestra herramienta de recuperación de datos confiable y efectiva, Recuperación de datos de Bitwar. Los usuarios cuyo trabajo se corta debido al problema 0xa0000001 puede usar la herramienta para recuperar sus valiosos archivos.
Artículo anterior
4 Best Solutions To Fix External Hard Drive Access Denied Error Summary: There are several BSOD problems that you may encounter when booting your computer, such as 0x000000c5, which we have...Artículo siguiente
7 Effective Methods To Fix 0x0000003B Error On Windows Summary: There are several BSOD problems that you may encounter when booting your computer, such as 0x000000c5, which we have...
Acerca de la recuperación de datos de bitwar
3 Steps to get back 500+ kinds of deleted, formatted or lost documents, photos, videos, audios, archive files from various data loss scenarios.
Aprende más


