


Summary: Formatting a disk drive is an essential step in many scenarios. In some cases, when users want to format a drive to set aside its capacity for installation of a new operating system, they may encounter a tricky error: Failed to format the selected partition [Error 0x8004242d]. Despite the fact that the message presents nothing except the error, several solutions have been tested and proved effective. In this article, we will expound on how to use these solutions. On top of that, to fix the problem of data loss, which is highly associated with the 0x8004242d error, we will also introduce Bitwar Data Recovery, a user-friendly and powerful data recovery tool.
Table of Contents
What Causes the 0x8004242d Error?
![Failed to Format the Selected Partition Error [0x8004242d]](https://www.bitwarsoft.com/wp-content/uploads/2021/01/Failed-to-Format-the-Selected-Partition-Error-0x8004242d.png)

Based on the cases reported by users who have encountered the error, there are several problems that may lead to the 0x8004242d error, as the following list shows:
- Inconsistency with or corruption in the Master Boot Record
- A missing file of importance on the disk drive
- Damage or file corruption on the disk drive
- Issues related to the Windows mass storage controller
The causes listed above may not be specific enough to help users solve the problem directly, but it has tremendously narrowed the range of solutions we need to try out. Hence, regardless of the possible origins of the problem, you could try out the following solutions to fix the error.
How to Solve the 0x8004242d Error?
Solution 1: Change a Dynamic Disk to Basic Disk
Because Windows operating systems cannot be installed on a dynamic disk, it would prompt an error if you tried to format the partition to install. Before you use the following steps, remember to back up the dynamic disk to be converted to basic.
Step 1: Press Win + R to open the Run box.
Step 2: Type diskmgmt.msc and then click on the OK button.
Step 3: Disk Management will show if disks are dynamic or basic in the Type Column. Right-click on every dynamic disk drive and then select Delete Volume.
Step 4: Right-click on the hard disk and then select Convert to GPT Disk.
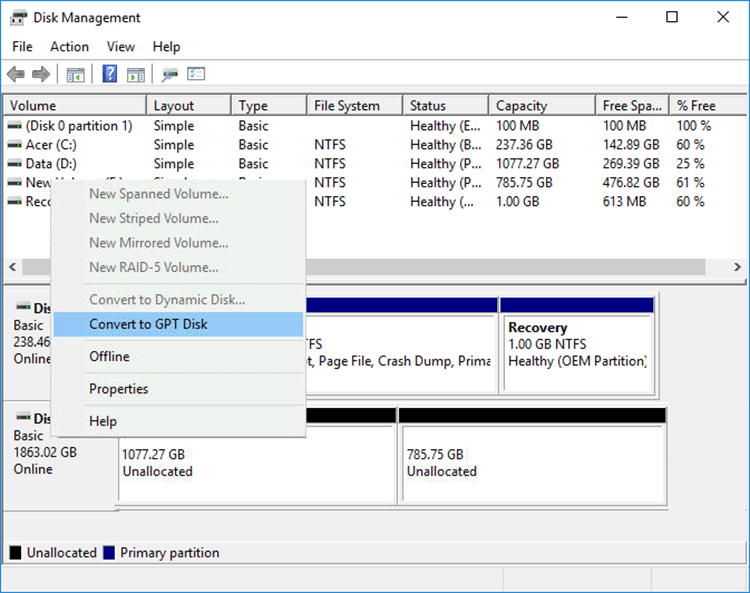

Step 5: Check whether the error persists.
Solution 2: Delete All Partitions
When the computer is afflicted with some kind of corruption in the Master Boot Record, users are most likely to encounter the 0x8004242d error. The symptom of it is either the missing of the drive that Windows needs or a corrupted drive.
It’s reported that several users facing the problems fixed the issue by booting from compatible media and deleting every partition before formatting them.
Although the efficacy of the solution has been proved, it usually entails irrevocable data loss. For users who fully intend to do a completely clean, It doesn’t matter what could happen to the data on the drive. But for users who don’t want to delete every partition of it, that doesn’t serve them well.
Backup Your Data
Hence, if you want to backup your data on the drive safely before deleting all partitions, you could use the instructions listed below that tell you how to create a system image backup.
Step 1: Type in Control Panel in the search bar and then open it.
Step 2: Browse Control Panel items by category and then navigate to System and Security > File History > System Image Backup (at the bottom of the left pane)
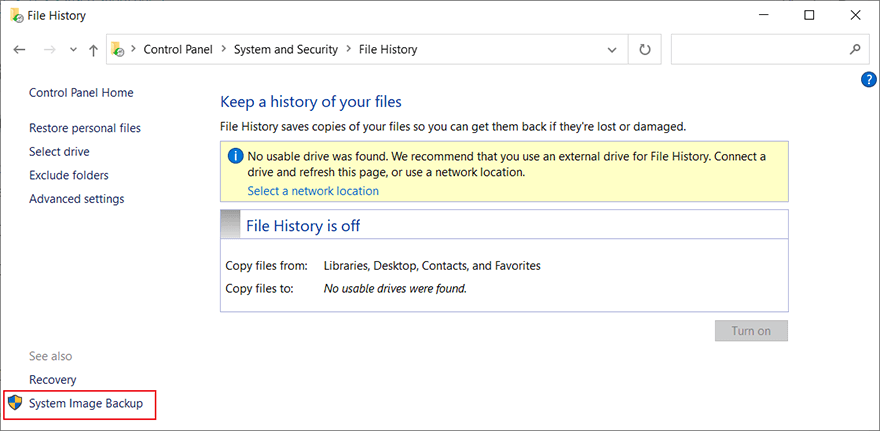

Step 3: Click on Set up backup.
Step 4: Select the disk drive where the system image will be saved, and then click on Next.
Step 5: Select the drives that you want to save into the system image, and then click on Next.
Step 6: The utility will present a clear picture of general aspects related to the system image, such as the location to which the system image will be stored, the drives to be backed up, and the disk drive this system image will occupy. Check those details and then click on Start backup.
Step 7: Wait for the system to create a system image. Based on the size of the disk drives you want to backup, this process may take a considerable amount of time.
X:\WindowsImageBackup\(the name of your computer)\Backup YYYY-MM-DD HHMMSS
X stands for the drive letter of the disk drive where you store the system image. YYYY-MM-DD HHMMSS stands for the exact time when the system image was created.
Delete All Partitions
After you have successfully backed up important data, you can use the following steps to delete every partition to fix the 0x8004242d error.
Step 1: Insert an installation media and reboot your computer. After seeing the initial starting screen, your computer will prompt a message asking you whether you want to start the computer from the installation media. To confirm this, press any key.
Step 2: After you have managed to boot your computer from the installation media, click Install now, and follow the installation steps.
Step 3: A second message will be brought up asking you to choose the type of installation you want. Select Custom: Install Windows only (advanced).
Step 4: Once you are in the partitioning stage, select each partition, and then click on Delete. When it asks for confirmation, click Yes. Do this repeatedly until there is only a single disk drive named Drive 0 of Unallocated Space.
Step 5: Now you should be able to format the disk drive you want.
Solution 3: Use Diskpart to Clean the Disk Drive
As we have mentioned before, this issue my well occur due to a mass storage driver or an incompatible/corrupted mass storage controller. If that is a problem facing you, your best chance of fixing the issue is by using diskpart to clean the disk first and running the Windows Setup installation again.
But make sure that you will need compatible installation media to complete the steps below. Several users have reported that this solution finally allowed them to format partitions successfully without the interruption prompted by the 0x8004242d error.
Step 1: Connect a compatible installation media to your computer and reboot it.
Step 2: After the initial screen, there will be a message on the screen asking whether you want to start the computer from the installation media. To make the confirmation, press any key.
Step 3: Click on the Repair my Computer button in the lower-left corner.
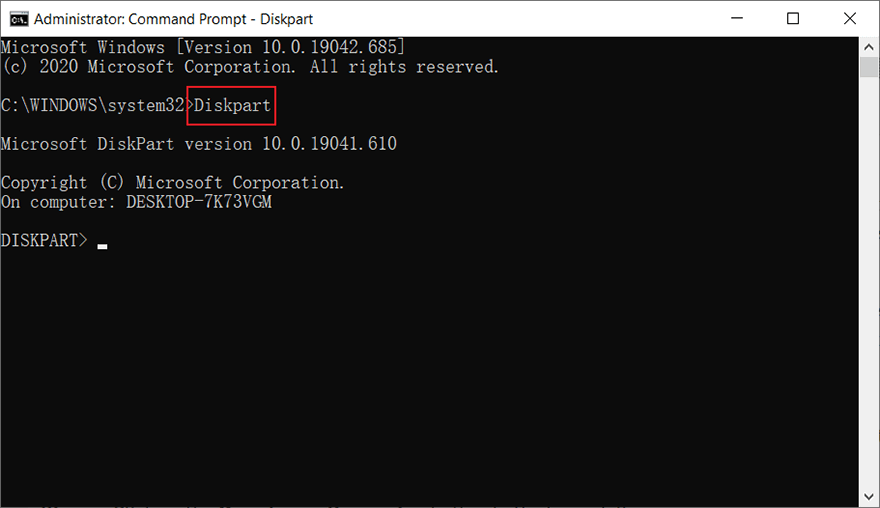
Step 4: Select the Troubleshoot button on the list and then click on Command Prompt.
Step 5: In the elevated CMD prompt, type in “Diskpart” and then press Enter.

Step 6: With the Diskpart utility launched, type in the following command and press Enter to list all the available hard disks.
Step 7: You will see a list of disks. If you have more than one, you can identify the faulty disk by comparing the sizes of your hard disks.
Step 8: After you’ve figured out which drive is making the issue, type in the following command and press Enter to choose the appropriate HDD:
Step 9: Type in the following command and press Enter to make sure that the correct hard disk is selected:
Step 10: After you have confirmed that the correct hard disk is selected, type in the following command and press Enter to start the cleaning of the hard disk using Diskpart:
Step 11: After the procedure is complete, type in the following command and press Enter to close the tool:
Step 12: Reboot your computer and return to the disk selection stage to check whether the problem persists.
Solution 4: Disable USB Boot Support
On top of the possible causes covered above, there is another potential culprit that could wind up triggering the 0x8004242d error, which is the conflict between the new counterpart (UEFI) and the legacy setup (BIOS). Many users have found that if a computer includes both features, with the UEFI Boot Support enabled, it could well lead to the 0x8004242d error.
In this case, to fix the issue, you should reboot your computer and disable the UEFI Boot Support by entering the BIOS Configuration. This is also a time-tested solution. Refer to the following steps to learn how to do so:
Step 1: Reboot your computer and press the Setup key right after the initial startup key has come up. Keep pressing the key until you enter the BIOS menu.
Note: In most cases, the Setup key is one of the F keys (F10, F8, F6, F4, and F2) or the Del key. If none of them works on your computer, search online for the specific steps needed to enter the BIOS settings of your computer.
Step 2: Once you have entered the BIOS Configuration, switch to the BOOT tab and make sure that the UEFI Boot Support option is Disabled.
Step 3: After this modification has finished, confirm and save the modifications. To check whether the issue has been resolved, reboot your computer and repeat again the action that previously caused the 0x8004242d error.
Recover Lost Data Using Bitwar Data Recovery
When you are in the process of fixing the 0x8004242d error, if any issue related to data loss happens, you can certainly use Bitwar Data Recovery, a powerful and user-friendly data recovery tool, to bring back data that has been unintentionally deleted. Refer to the following steps to see how the tool works like magic.
Step 1: Download Bitwar Data Recovery from our official website and install it.
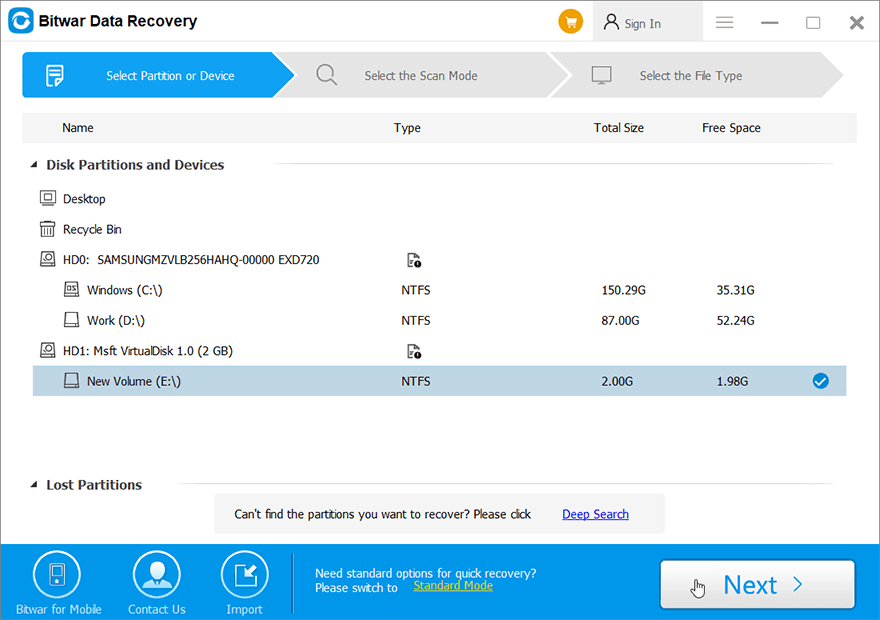
Step 2: Open the program and choose the disk drive where the missing data were stored and then click Next.

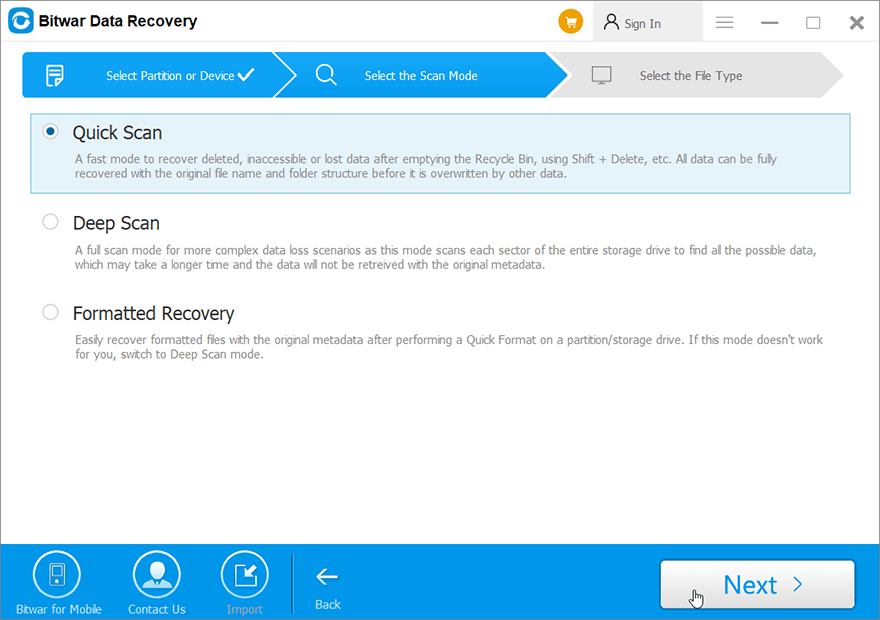
Step 3: Choose a scan mode in this stage. We would like to recommend Quick Scan, which is capable of recovering a healthy number of lost files. If it doesn’t work, you can run the software again and use Deep scan, which is more effective.
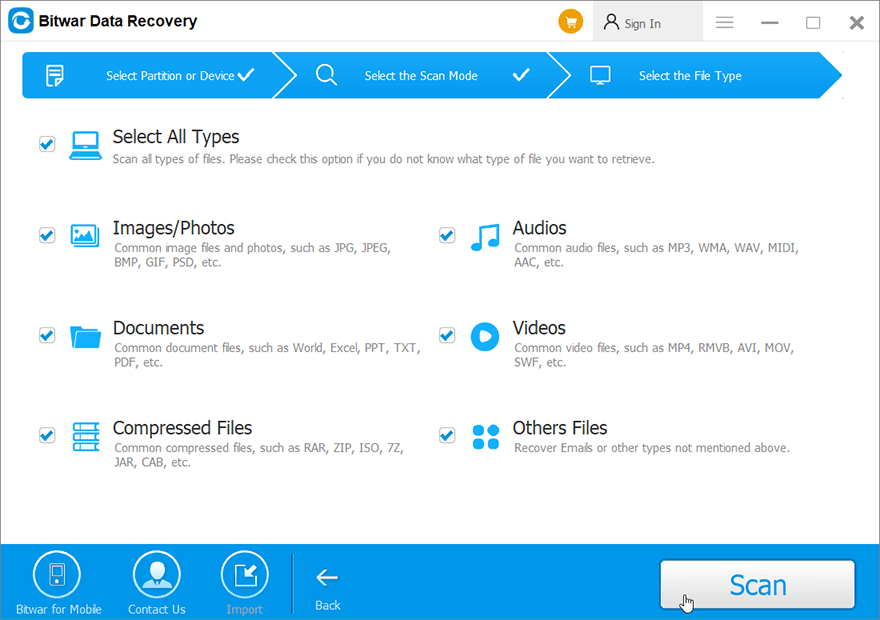
Step 4: Choose the types of files you want to recover and click Next.
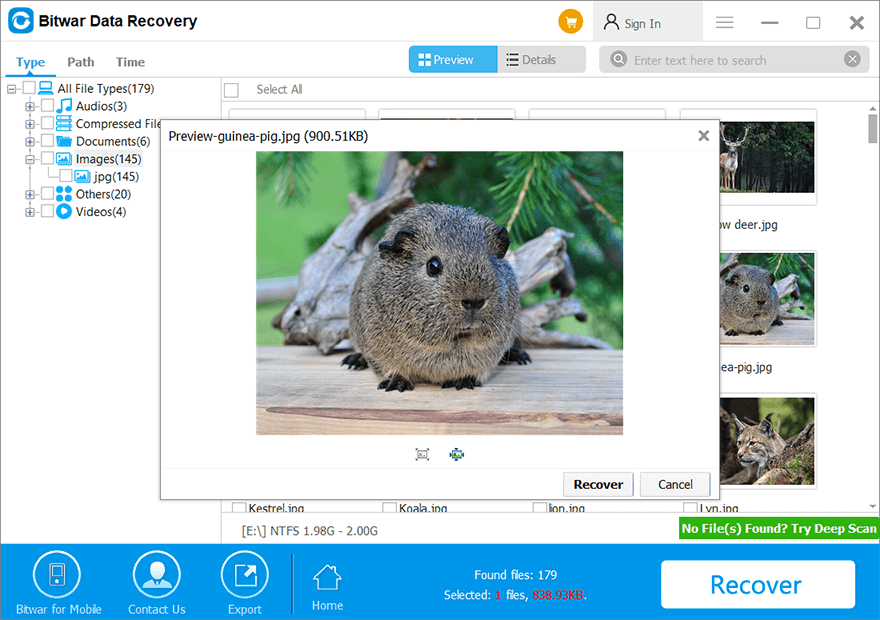
Step 5: Preview the desired files to check their intactness. Select those files and click on Recover to start the recovery process.
Conclusion
In this article, we explain how to fix the 0x8004242d error, which could occur when users attempt to carry out certain operations, such as installing a new operating system or trying to format their hard disks. Based on similar cases posted online and solutions tried out by many users, we have listed 4 time-tested solutions above. Considering that some users might well run into trickier issues related to data loss, we also introduce an effective and user-friendly data recovery tool, Bitwar Data Recovery, with whose help you will be able to bring back your valuable data effortlessly.